Custom Connector Lab 2
Task: Create a custom connector and send data from EmpowerID to External System (SQL database)
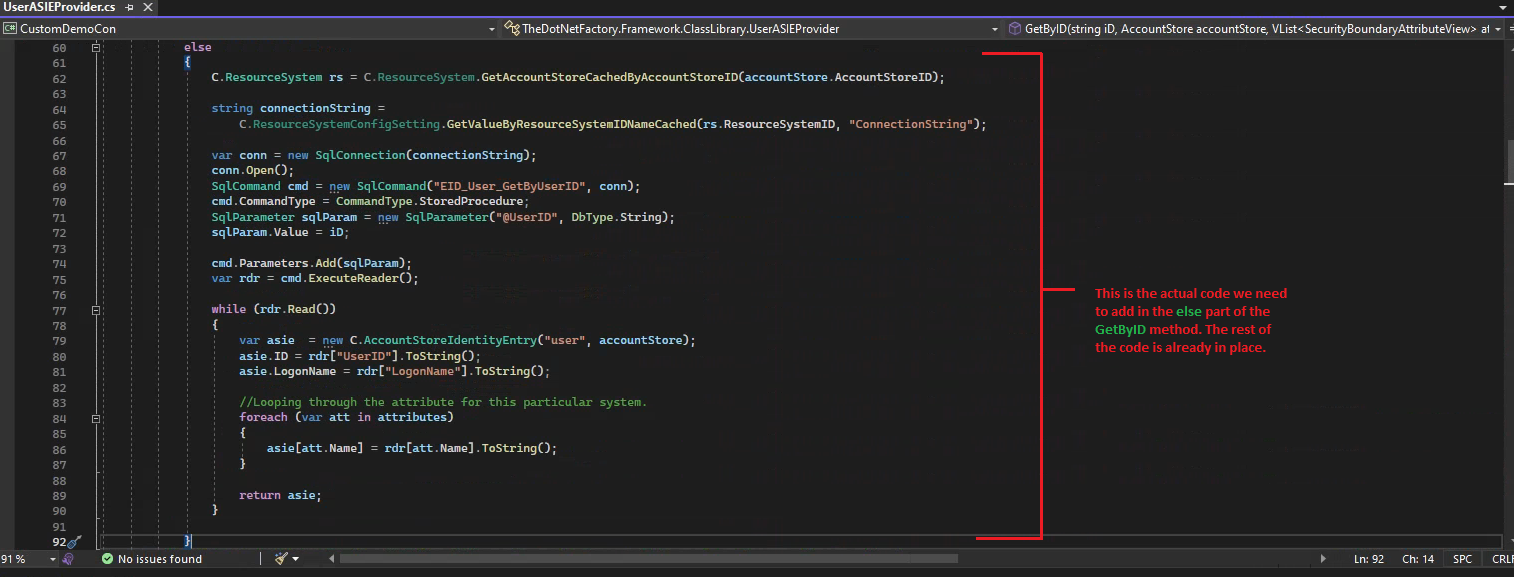
- In order to send data from EmpowerID to the external system, write the code below in the GetByID method of the UserASIEProvider.cs
 if (accountStoreEntryInfo.ObjectTypeID == 2) //Group
            {
                //Add code to get group from external system, or use the code below to get the group from EID database.
                var grp = C.Group.GetBySystemIdentifierAccountStoreID(iD, accountStore.AccountStoreID);
                if (grp != null && !grp.Deleted)
                {
                    var grpEntry = new C.AccountStoreIdentityEntry("group", accountStore);

                    SynchFromEntity((E.IEntity)grp, grpEntry);
                    return grpEntry;
                }
            }
            else
            {
                C.ResourceSystem rs = C.ResourceSystem.GetAccountStoreCachedByAccountStoreID(accountStore.AccountStoreID);

                string connectionString =
                    C.ResourceSystemConfigSetting.GetValueByResourceSystemIDNameCached(rs.ResourceSystemID, "ConnectionString");

                var conn = new SqlConnection(connectionString);
                conn.Open();
                SqlCommand cmd = new SqlCommand("EID_User_GetByUserID", conn);
                cmd.CommandType = CommandType.StoredProcedure;
                SqlParameter sqlParam = new SqlParameter("@UserID", DbType.String);
                sqlParam.Value = iD;

                cmd.Parameters.Add(sqlParam);
                var rdr = cmd.ExecuteReader();

                while (rdr.Read())
                {
                    var asie  = new C.AccountStoreIdentityEntry("user", accountStore);
                    asie.ID = rdr["UserID"].ToString();
                    asie.LogonName = rdr["LogonName"].ToString();

                    //Looping through the attribute for this particular system.
                    foreach (var att in attributes)
                    {
                        asie[att.Name] = rdr[att.Name].ToString();
                    }

                    return asie;
                }

            }


            /* //Add code to get the account from the external system, or use the code below to get the account from EID database.
             var account = C.AccountBase.GetByAccountStoreIDSystemIdentifier(accountStore.AccountStoreID, iD);
             if (account != null)
             {
                 var entry = new C.AccountStoreIdentityEntry("user", accountStore);
                 SynchFromEntity((E.IEntity)account, entry);
                 return entry;
             }*/
            //}
            return null;
In the above code snippet, I have included the complete code of the GetByID method, incorporating both the code we need to write and the code that was already present.
In the above code, we are calling the EID_User_GetByUserID stored procedure, which is present in ExternalDB. This stored procedure retrieves the user from the User table based on the UserID we have passed to it.
- Go to SQL Server, create a stored procedure named Custom_User_CreateUser, and insert the following code into it.
1 USE [ExternalDB]
2
3 CREATE PROCEDURE [dbo].[Custom_User_CreateUser]
4 (
5
6 @UserGUID uniqueidentifier,
7 @UserID nvarchar (200),
8 @LogonName nvarchar (200),
9 @FriendlyName nvarchar (255),
10 @Name nvarchar (255),
11 @FirstName nvarchar (50),
12 @LastName nvarchar (50),
13 @EmployeeID nvarchar (50)
14
15 )
16 AS
17 INSERT INTO [dbo].[User]

In the Insert method of the UserASIEProvider.cs write the code below. After writing the code Publish the connector.

18 (
19  [UserGUID]
20 ,[UserID]
21 ,[LogonName]
22 ,[FriendlyName]
23 ,[Name]
24 ,[FirstName]
25 ,[LastName]
26 ,[EmployeeID]
27 )
28 VALUES
29 (
30 @UserGUID
31 ,@UserID
32 ,@LogonName
33 ,@FriendlyName
34 ,@Name
35 ,@FirstName
36 ,@LastName
37 ,@EmployeeID
38 )
39
40 SELECT *
41 FROM
42 [dbo].[User]
43 WHERE
44 [UserGUID] = @UserGUID
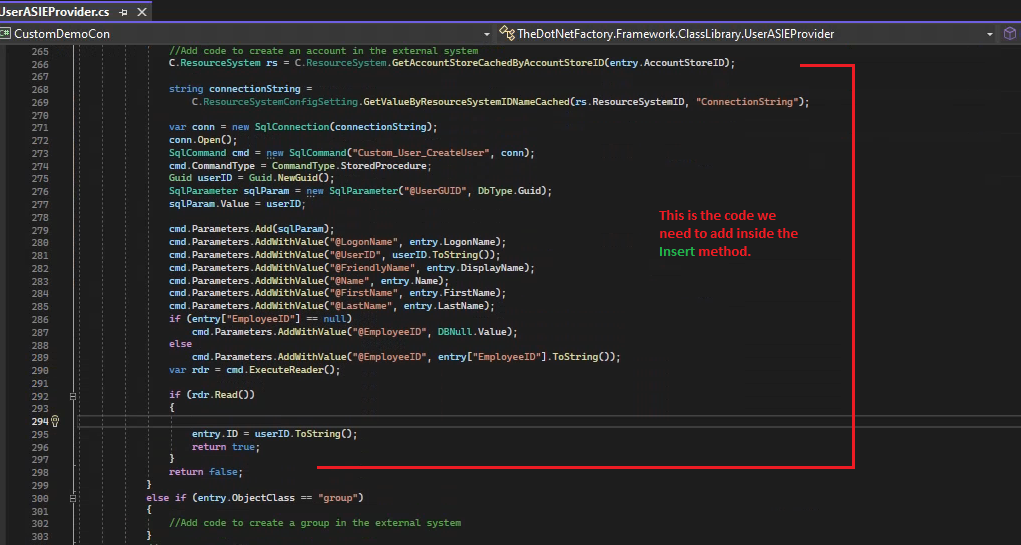
The above stored procedure takes different parameters and creates a user in the User table of the ExternalDB database. In the following step, we will see how we can call this stored procedure from our custom connector.
- In the Insert method of the UserASIEProvider.cs write the code below. After writing the code Publish the connector.
1 {
2             //Implement this to write back to an external system
3             if (entry.ObjectClass == "user")
4             {
5                 //Add code to create an account in the external system
6                 C.ResourceSystem rs =
7                 C.ResourceSystem.GetAccountStoreCachedByAccountStoreID(entry.AccountStoreID);
8
9                 string connectionString =
10                     C.ResourceSystemConfigSetting.GetValueByResourceSystemIDNameCached(rs.ResourceSystemID,
11                     "ConnectionString");
12
13                 var conn = new SqlConnection(connectionString);
14                 conn.Open();
15                 SqlCommand cmd = new SqlCommand("Custom_User_CreateUser", conn);
16                 cmd.CommandType = CommandType.StoredProcedure;
17                 Guid userID = Guid.NewGuid();
18                 SqlParameter sqlParam = new SqlParameter("@UserGUID", DbType.Guid);
19                 sqlParam.Value = userID;
20
21                 cmd.Parameters.Add(sqlParam);
22                 cmd.Parameters.AddWithValue("@LogonName", entry.LogonName);
23                 cmd.Parameters.AddWithValue("@UserID", userID.ToString());
24                 cmd.Parameters.AddWithValue("@FriendlyName", entry.DisplayName);


23                 cmd.Parameters.AddWithValue("@Name", entry.Name);
24                 cmd.Parameters.AddWithValue("@FirstName", entry.FirstName);
25                 cmd.Parameters.AddWithValue("@LastName", entry.LastName);
26                 if (entry["EmployeeID"] == null)
27                     cmd.Parameters.AddWithValue("@EmployeeID", DBNull.Value);
28                 else
29                     cmd.Parameters.AddWithValue("@EmployeeID", entry["EmployeeID"].ToString());
30                 var rdr = cmd.ExecuteReader();
31
32                 if (rdr.Read())
33                 {
34
35                     entry.ID = userID.ToString();
36                     return true;
37                 }
38                 return false;
39             }
40             else if (entry.ObjectClass == "group")
41             {
42                 //Add code to create a group in the external system
43             }
44             //Remove after implementing this method
45             throw new NotImplementedException();
In order to test the implementation, we have done so far we would have to create a Provisioning Policy
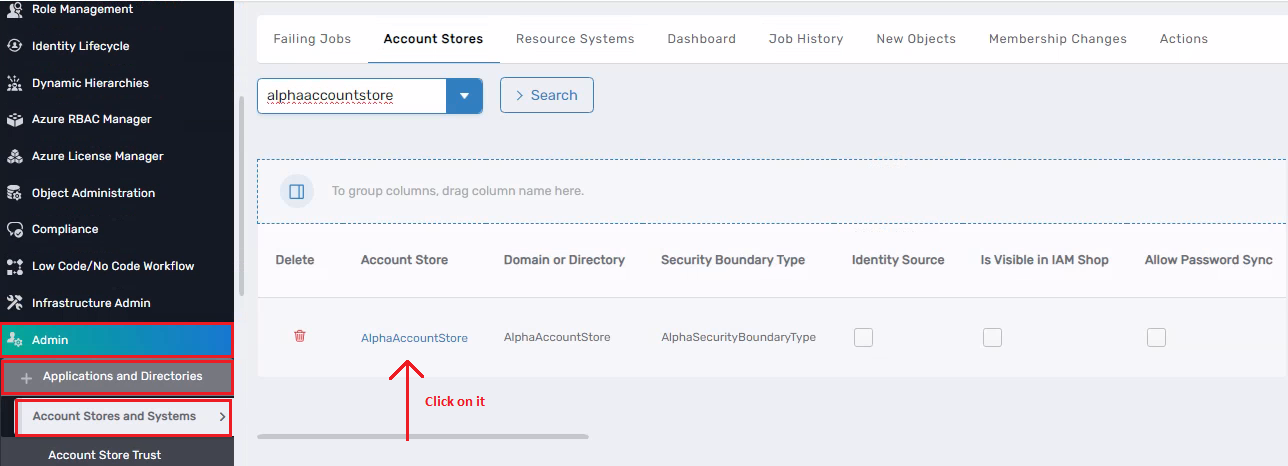
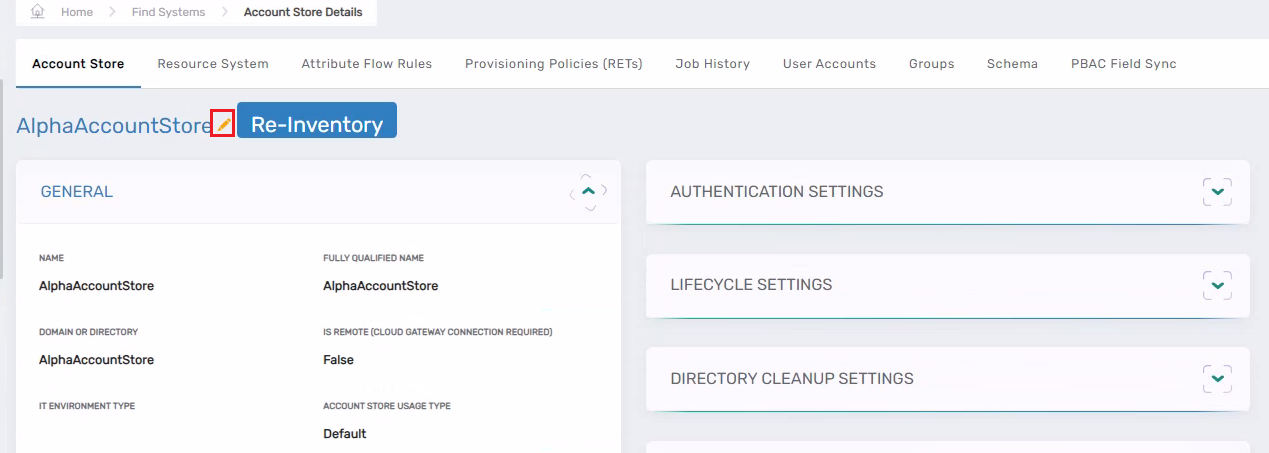
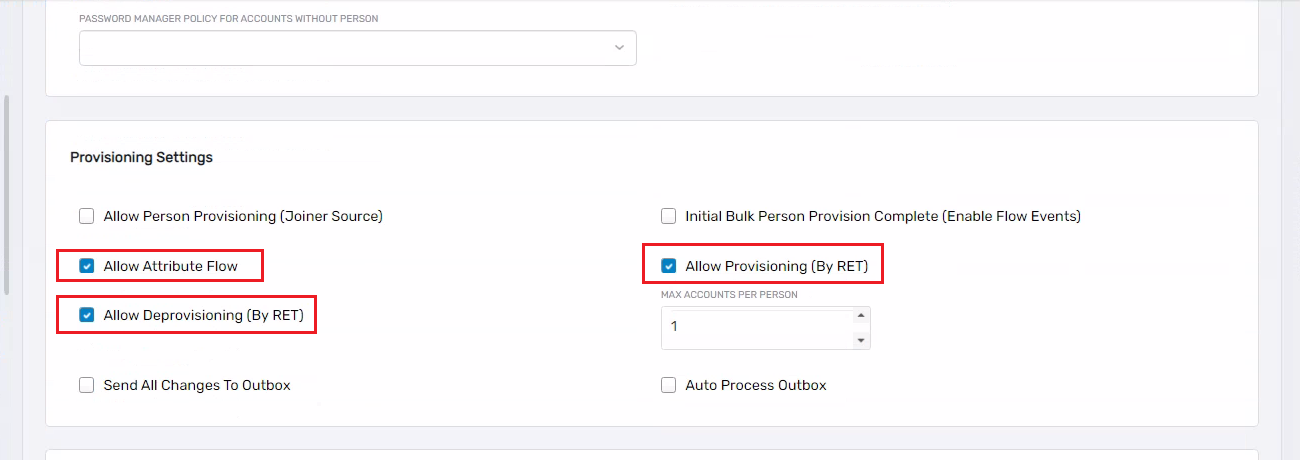
- Go to your account store (AlphaAccountStore). Click on your Account Store name under the Account Store column (see image 1); it will take you to another page. Click on the pencil icon (see image 2); this action will take you to the Account Store Details page. Scroll down and make sure the options shown in image no. 3 are selected under the Provisioning Settings section. If not, then select them.
-
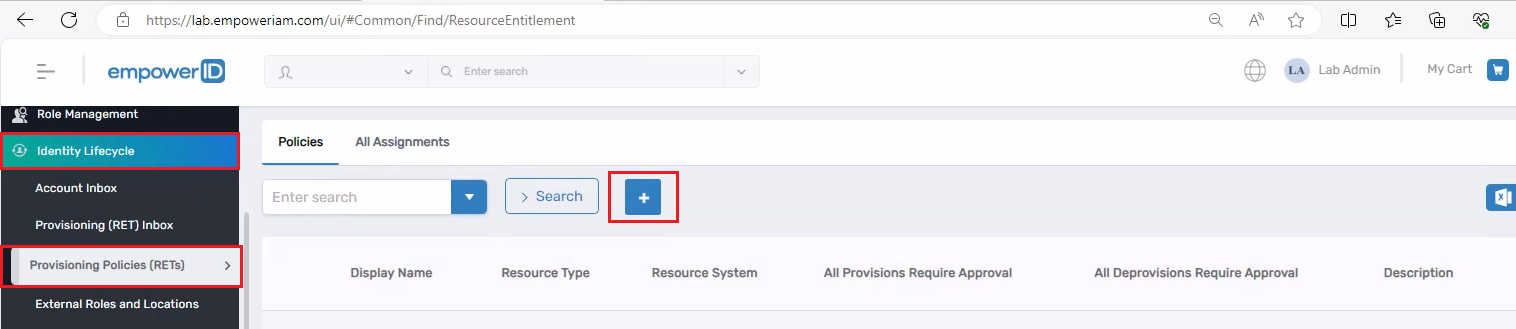
Go to Identity Lifecycle → Provisioning Policies (RETs). Click on the + button and it will take you to the Policy Details page.
-
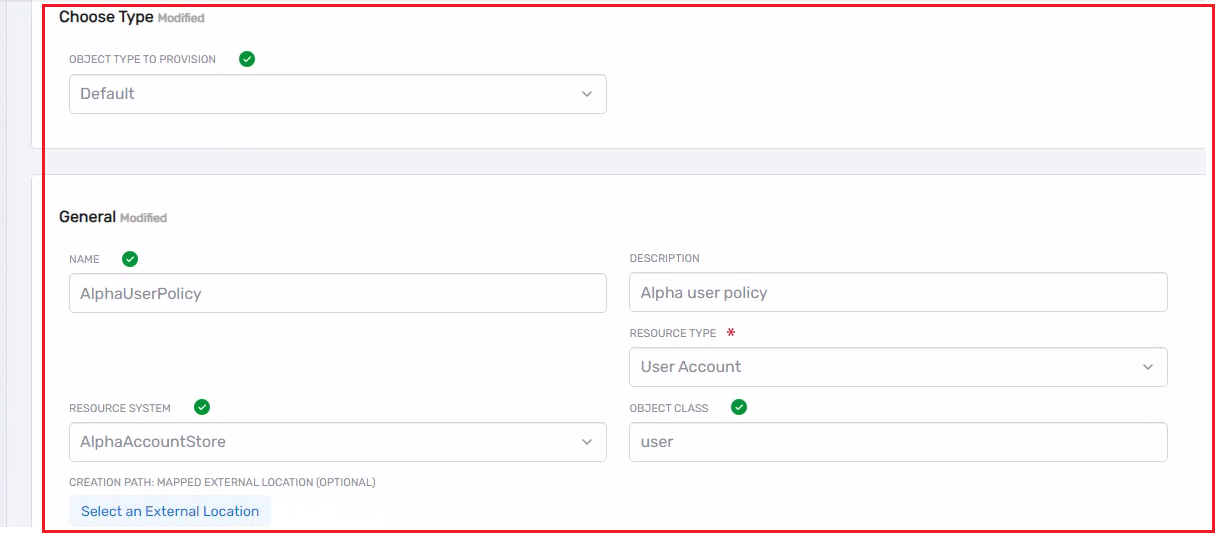
On Policy Details page. Fill out the form as indicated below and leave the rest of the fields as they are.
- Object Type to Provision: Default
- Name: AlphaUserPolicy
- Description: Alpha user policy
- Object Class: user
- Resource Type: User Account
- Resource System: AlphaAccountStore (This is the account store we created in Lab 1)
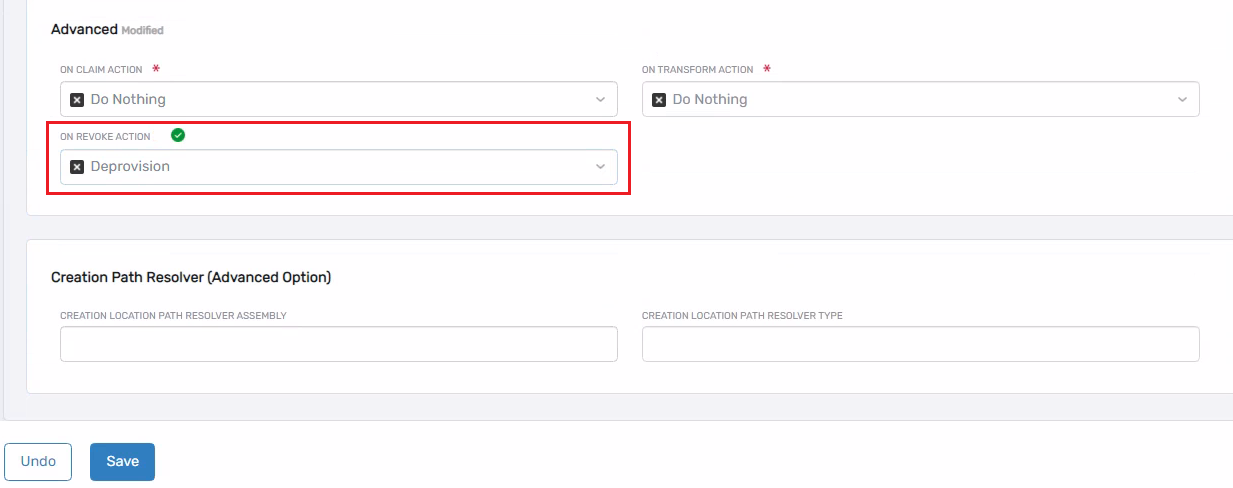
- On Revoke action: Deprovision
Click on the Save button.


-
Now under the Policies tab click on the AlphaUserPolicy.
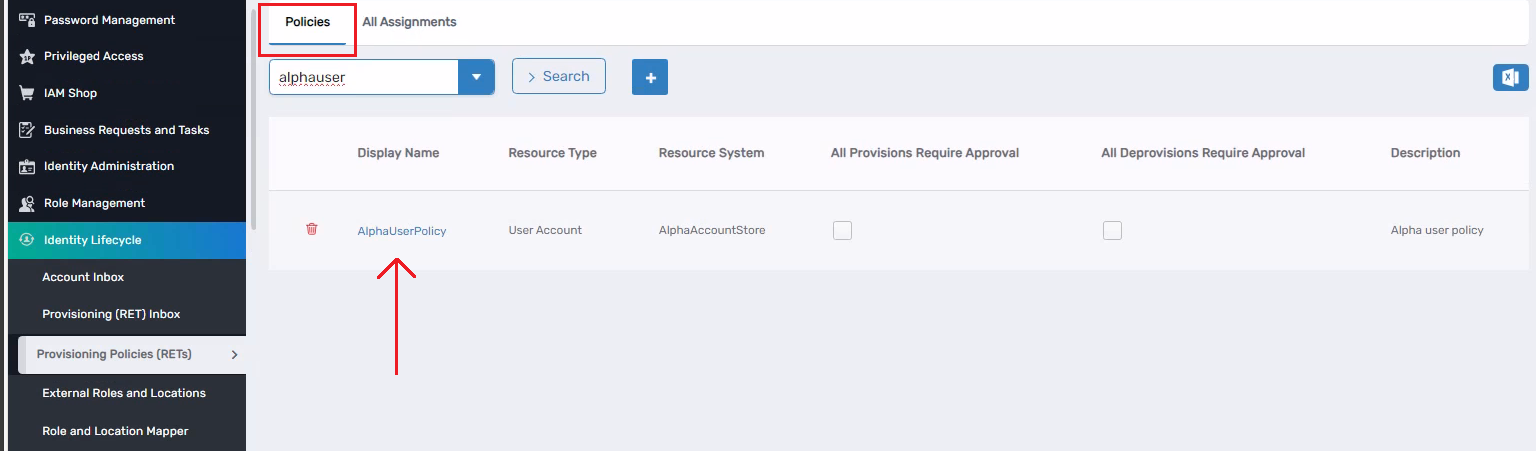
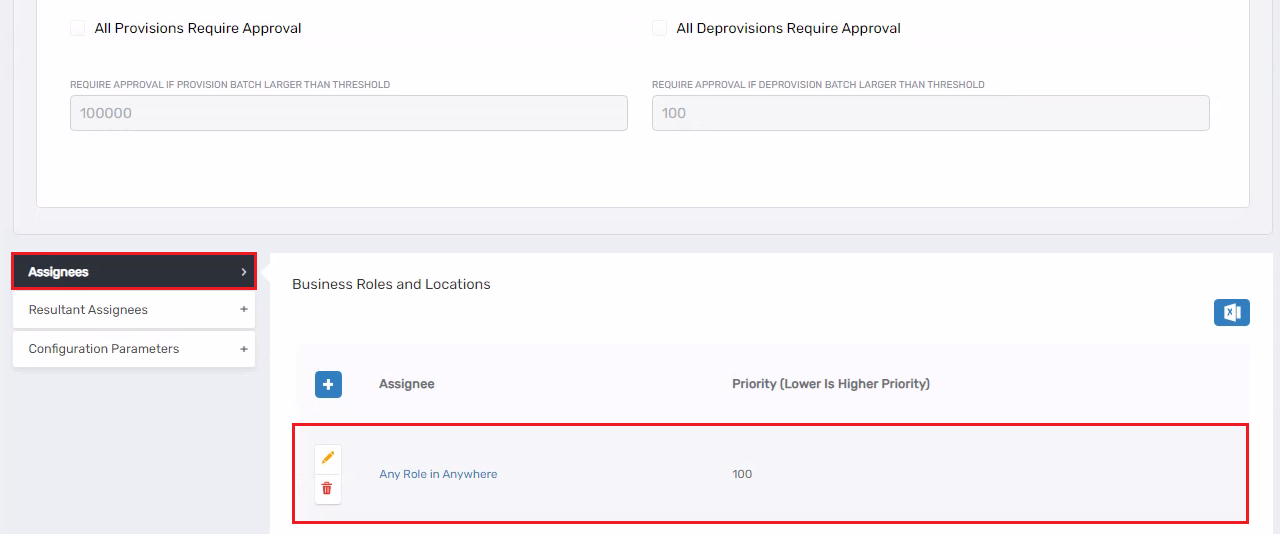
-
Scroll down and click on the Assignees tab, then click on the + button. From the Business Role, choose the Any Role Location option, and from the Location, choose Anywhere. Then, click on the Select button.
- Now, you can wait for the policy to be compiled, or you can compile it manually by stopping the EmpowerID Worker Role service, then go to IAM Shop → Self-Service Workflows and click on the Refresh RBAC.
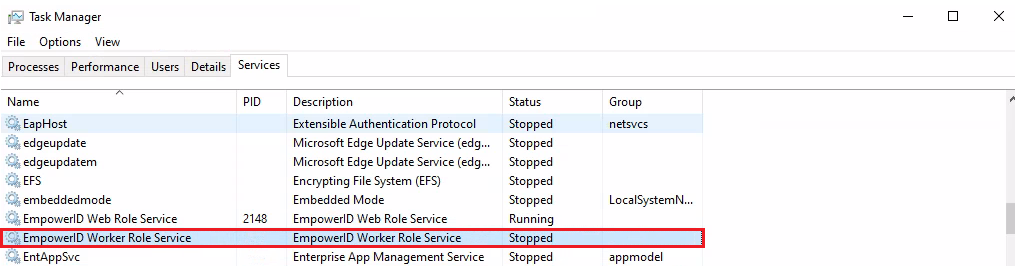
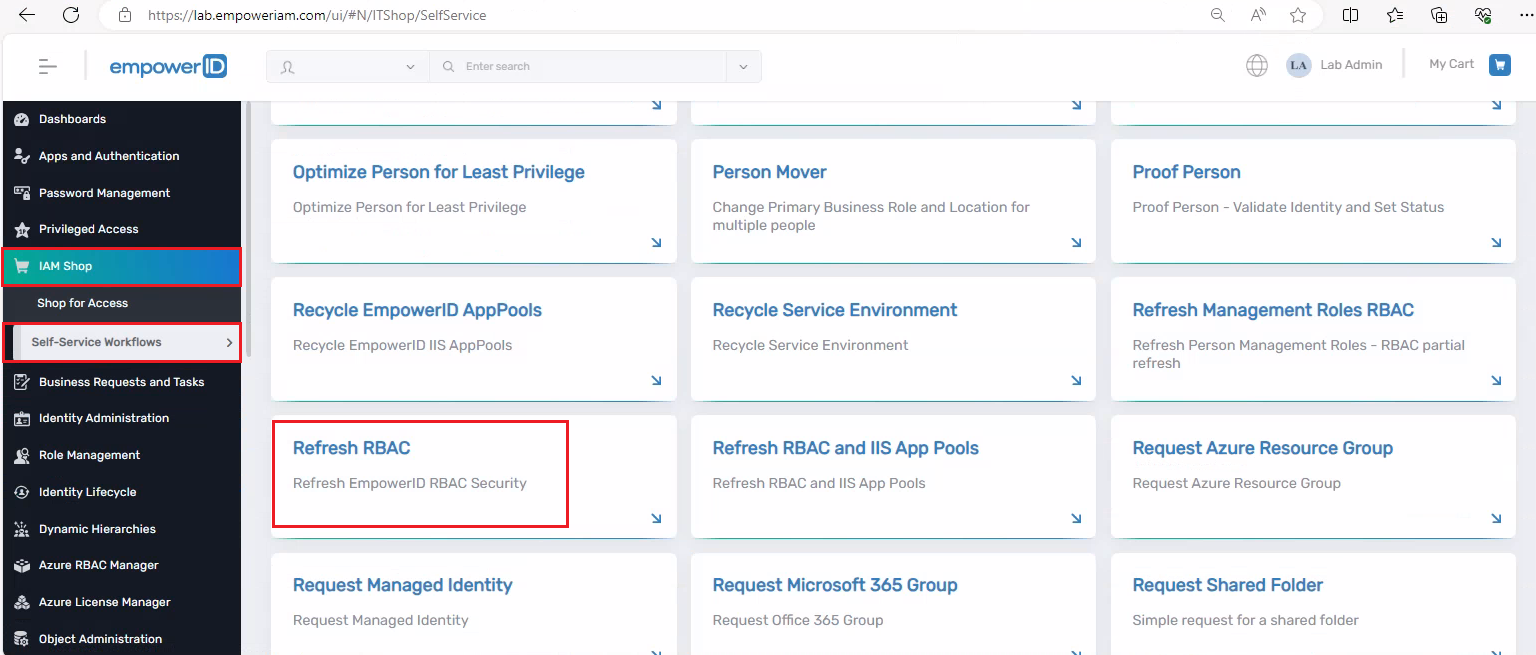
-
Once Refresh RBAC workflow has run successfully. Start the EmpowerID Worker Role Service.
-
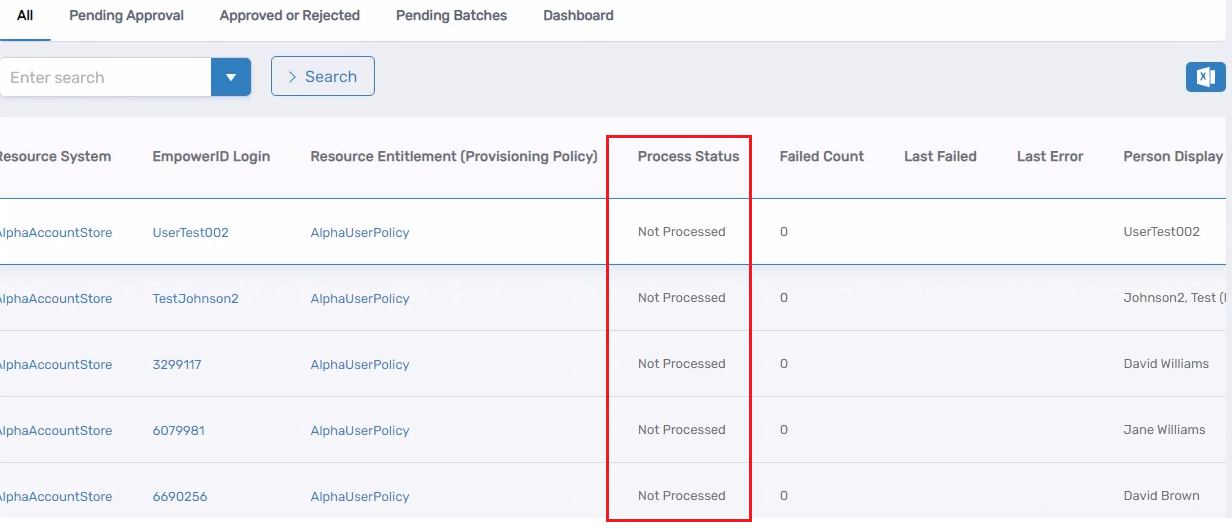
Navigate to Identity Lifecycle → Provisioning (RET) Inbox, and under the All tab, you can see the accounts that have been moved from the EmpowerID system to our External System (ExternalDB).
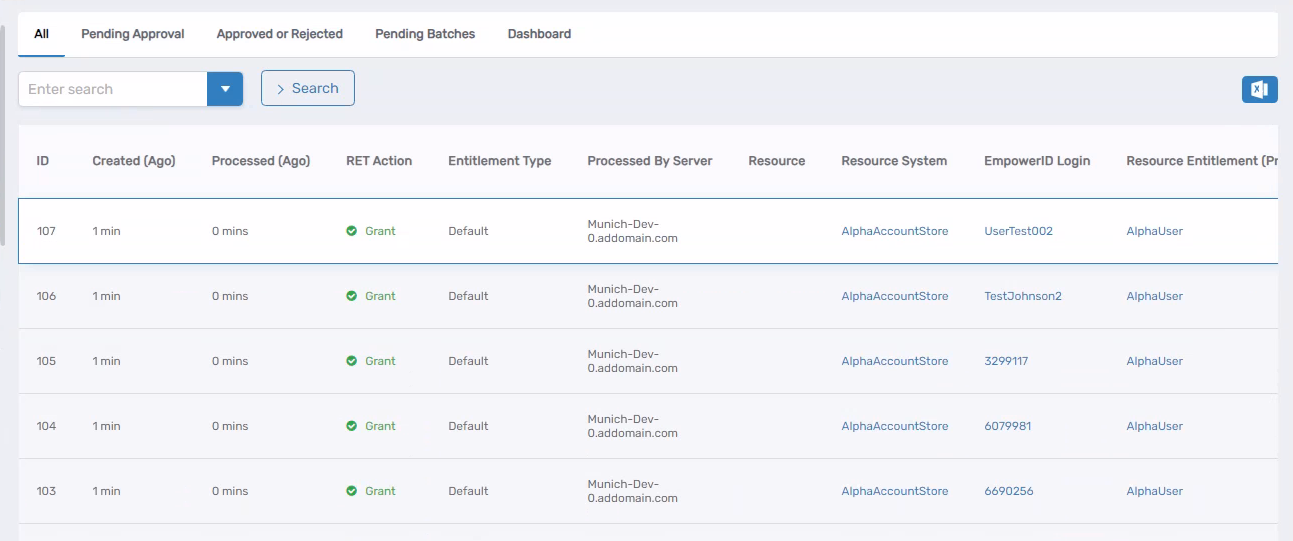
- Initially, the Process Status could be Not Processed, but after running the EmpowerID Worker Role Service, it will change to Processed.

-
Now, let’s test it with a new user.
-
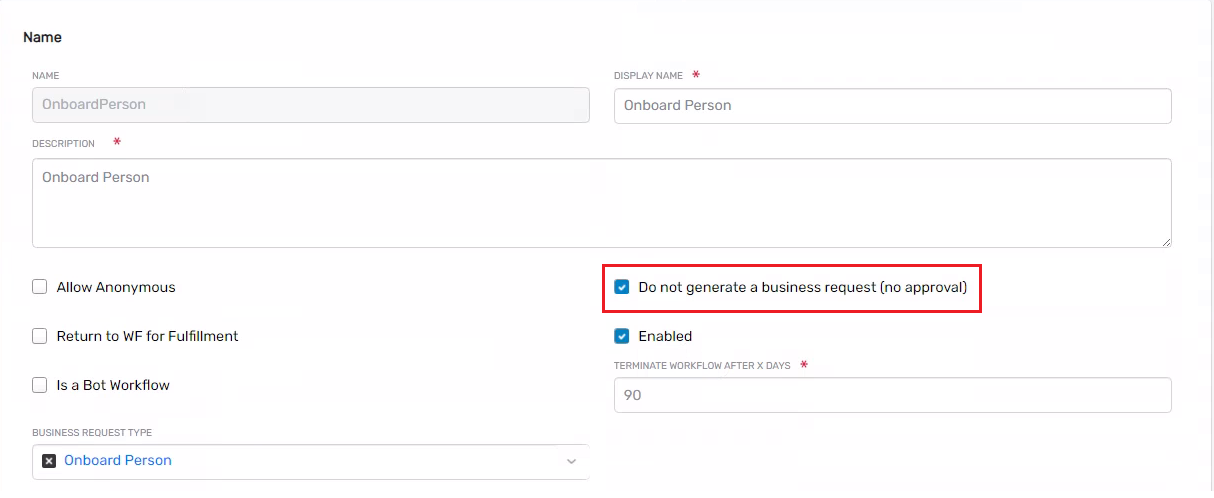
Go to the Onboard Person workflow, edit it, make sure that the Do not generate a business request (no approval) checkbox is checked.
-
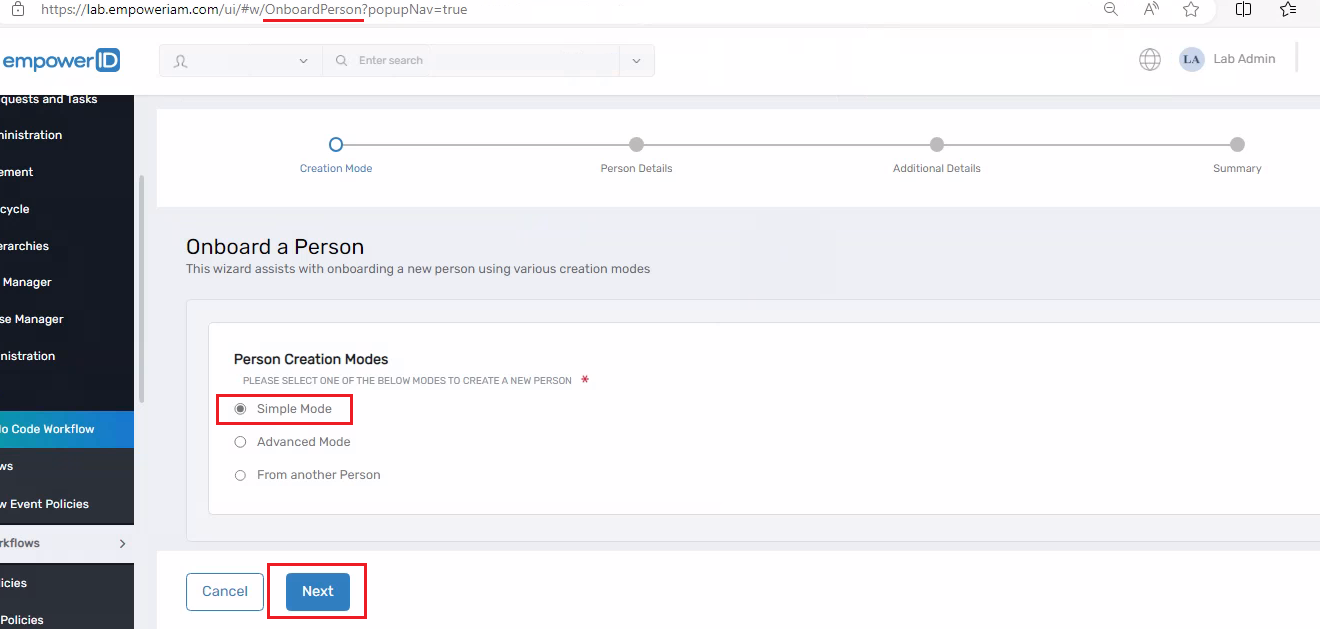
Once you have made the above changes go and run the Onboard Person workflow.
-
Select the Simple Mode option on the first form that appears. Click on the Next button.
- A second form will appear. Fill up all the required fields and click on the Next button.
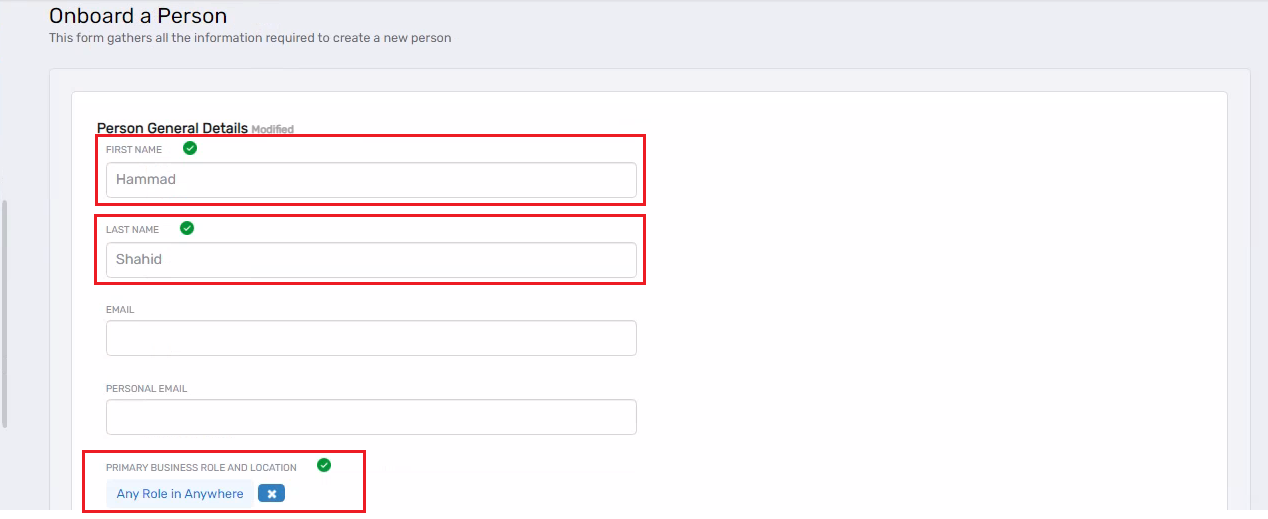
-
A summary form will appear, showing you a summary of the form you filled out in the previous step. Click on the Submit button.
-
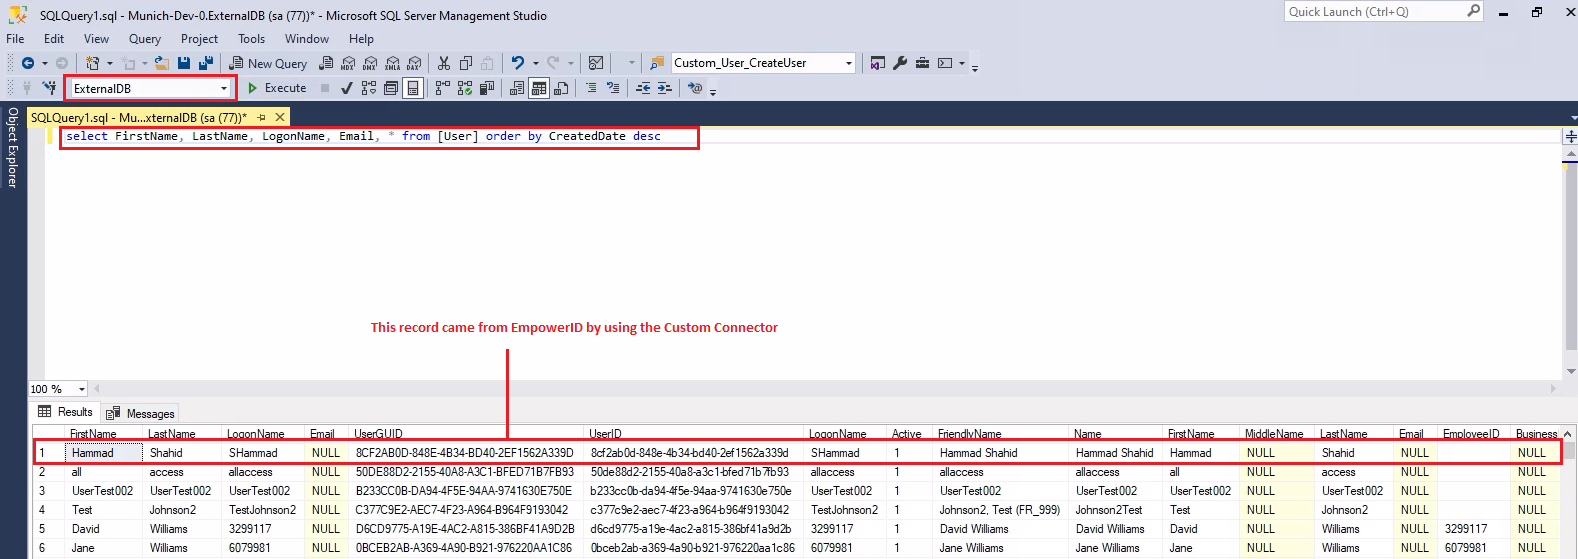
Go to your external database and execute the query below to see if the new user you created in EmpowerID has been moved to the external system (ExternalDB).
select FirstName, LastName, LogonName, Email, * from [User] order by CreatedDate desc
- You can also check by going to Identity Lifecycle → Provisioning (RET) Inbox.
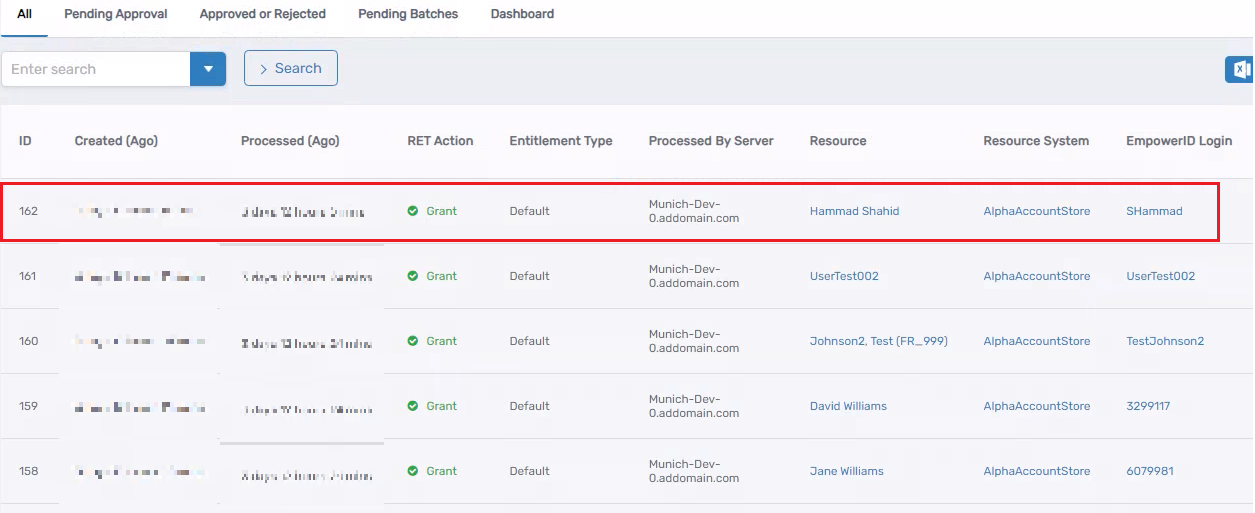
If you do not see the record immediately created in the external system, stop the EmpowerID Worker Role service, then go to IAM Shop → Self-Service Workflows and click on Refresh RBAC. After it has run successfully, try checking the record again in the external system.
If you want to debug the connector while it is making changes in the external system, you don’t need to run the CustomConnectorUtility.exe command. Instead, you can directly attach the w3wp processes from Visual Studio. Then, modify the person attribute from the UI, and it will hit the breakpoint in the UserASIEProvider class.