CRUD Service Overview
This section provides a detailed walkthrough of the various components that constitute a CRUD service, highlighting their functionalities and interactions within the system architecture.
Systems Folder
Within Visual Studio Code, select the Explorer icon located in the primary sidebar. Then, proceed to expand the Systems folder to view its contents (.yaml files).
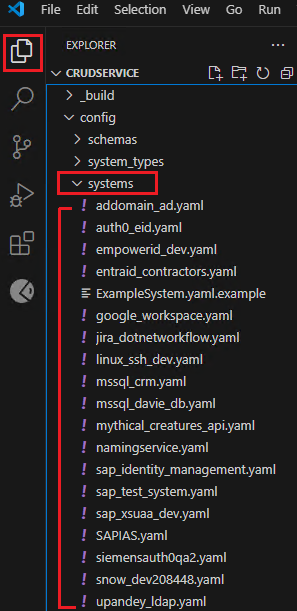
The Systems folder serves as a central repository for configuration files that define how the CRUD service interacts with different external systems. This folder helps organize and manage the configurations for various target systems, enabling the CRUD service to connect to and perform operations on them.
Each file within the Systems folder represents a distinct external system and contains details such as:
- System Name: A unique identifier for the system (e.g., "auth0_eid," "sap_identity_management," "google_workspace").
- System Type: The type of system (e.g., "Auth0," "GCP," "sapidm," "azure_system").
- Authentication Details: Information needed to authenticate to the system, potentially including:
- Authentication type (e.g., client credentials, username/password).
- Credentials (client ID, client secret, usernames, passwords).
- Token URLs, base URLs, and other relevant endpoints.
- Supported Object Types: EmpowerID object types relevant to the system (e.g., "Account," "Group," "Role").
- Commands: CRUD actions supported for each object type (e.g., account.create, group.delete, role.get_by_id).
- Schema Mapping Files: References to separate files defining the mapping between the EmpowerID schema and the native schema of the external system.
- Security: Storing sensitive credentials directly in YAML files within the Systems folder raises security concerns. Therefore, we use environment variables or Azure Key Vault to store credentials securely.
It is crucial to manage these configuration files using a version control system (like Git) to track changes, collaborate effectively, and revert to previous versions if needed.
Example Configuration
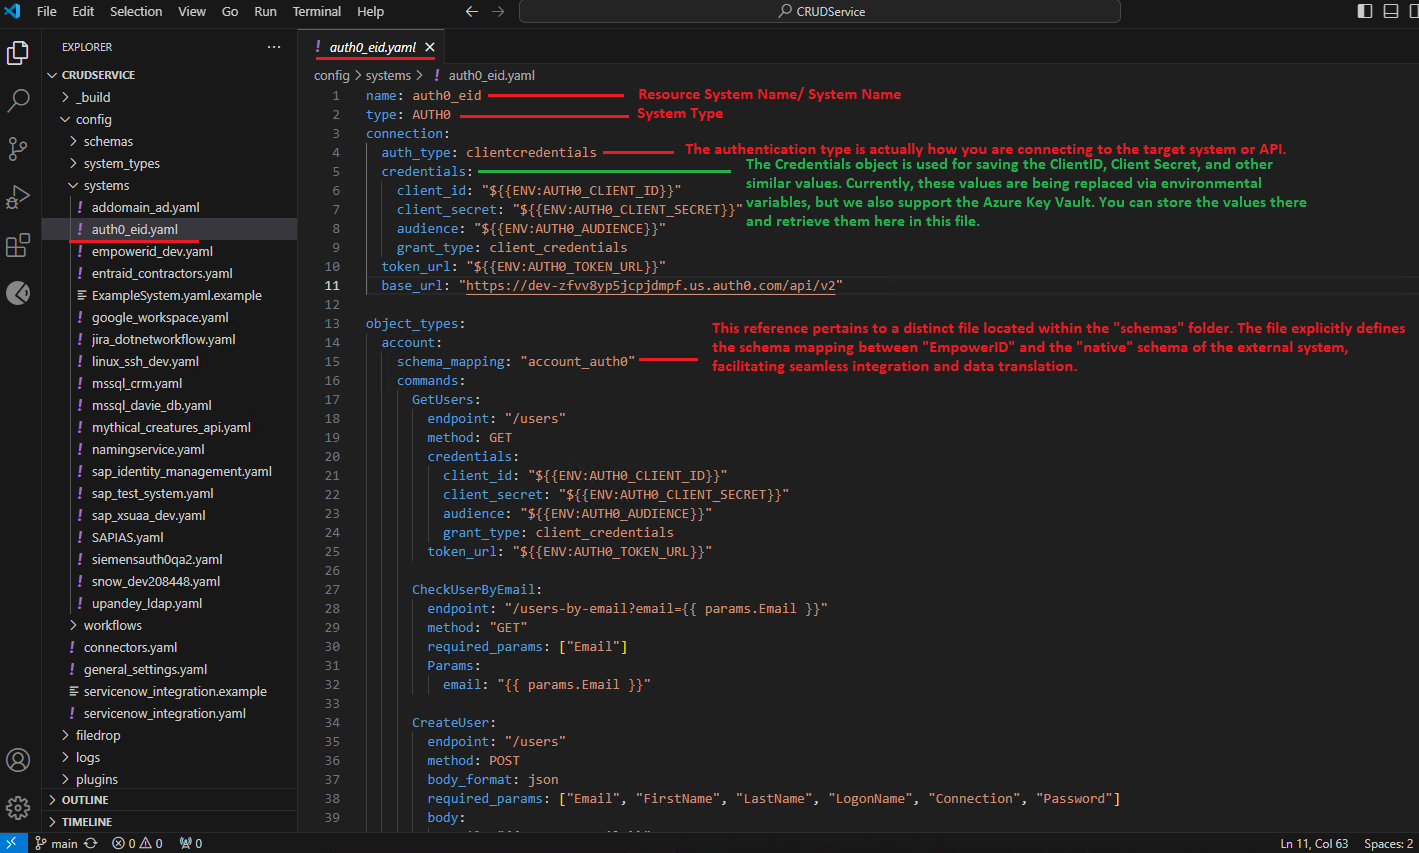
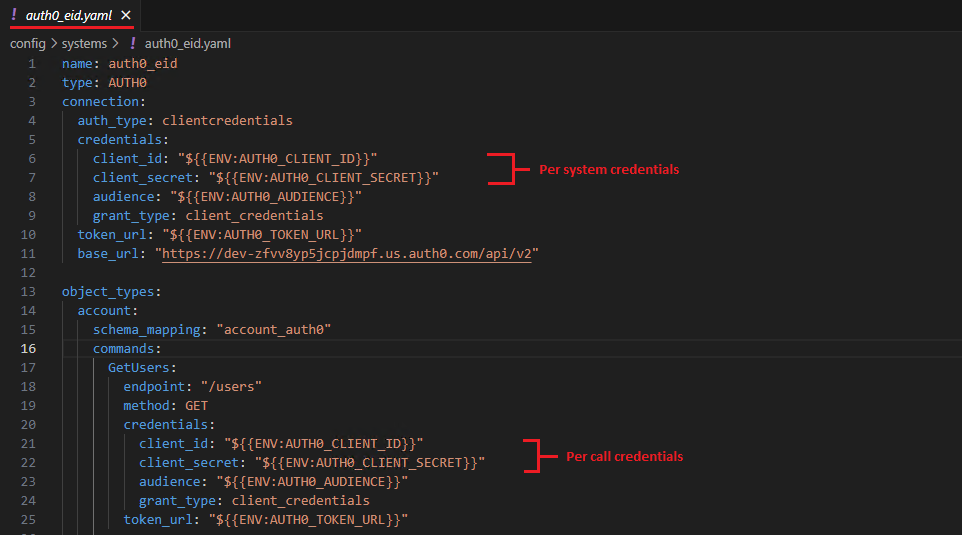
Below is an example YAML configuration for an Auth0 system, detailing authentication types, credential sources, supported object types, and available commands. This provides a practical template for integrating your systems with ease.
auth0_eid.yaml
Schemas Folder
Bridging the Schema Gap: Why Schema Mapping is Needed
The EmpowerID CRUD service is designed to simplify interactions with diverse external systems. However, a significant challenge arises from the differences in data schemas between EmpowerID and these systems. Each external system may represent user accounts, groups, roles, and other objects in distinct ways, leading to potential mismatches and data inconsistencies.
For instance, the CRUD service must handle Auth0 roles, which have no direct equivalent in EmpowerID's data model. The service maps Auth0 roles to local roles within EmpowerID, requiring a translation between the two schemas.
The "schemas" Folder: A Repository for Schema Mappings
The "schemas" folder within the CRUD service project contains files dedicated to defining schema mappings. Each file typically corresponds to a specific external system, detailing the correspondence between EmpowerID's schema and that system's native schema.
Example Schema Mapping:
- transform_to_caller_schema: Specifies how to map attributes from the Auth0 response to EmpowerID's account schema. For instance, Auth0's "given_name" maps to EmpowerID's "FirstName" attribute.
- transform_to_source_schema: Defines the reverse mapping, instructing the CRUD service on translating data from EmpowerID's format into the native Auth0 schema.
The "schema mapping file" associated with the account_auth0.yaml system definition file illustrates how this file contains instructions for converting data received from Auth0 into a format compatible with EmpowerID's account schema.

Benefits of the "schemas" Folder:
- Centralized Management: A dedicated folder for schema mappings enhances organization and maintainability, allowing developers to easily locate and modify mappings for specific systems.
- Flexibility and Extensibility: This approach supports various external systems without requiring changes to the core CRUD service code. Adding a new system only involves creating a new schema mapping file in the "schemas" folder.
- Data Consistency: Explicitly defined schema mappings ensure consistent data transformation between EmpowerID and external systems, reducing the risk of errors and misinterpretations.
The "schemas" folder is vital for enabling the EmpowerID CRUD service to integrate seamlessly with various external systems. By providing a structured approach to defining schema mappings, the service can handle diverse data formats, ensuring consistent and reliable data exchange between EmpowerID and other systems.
System Type Folder
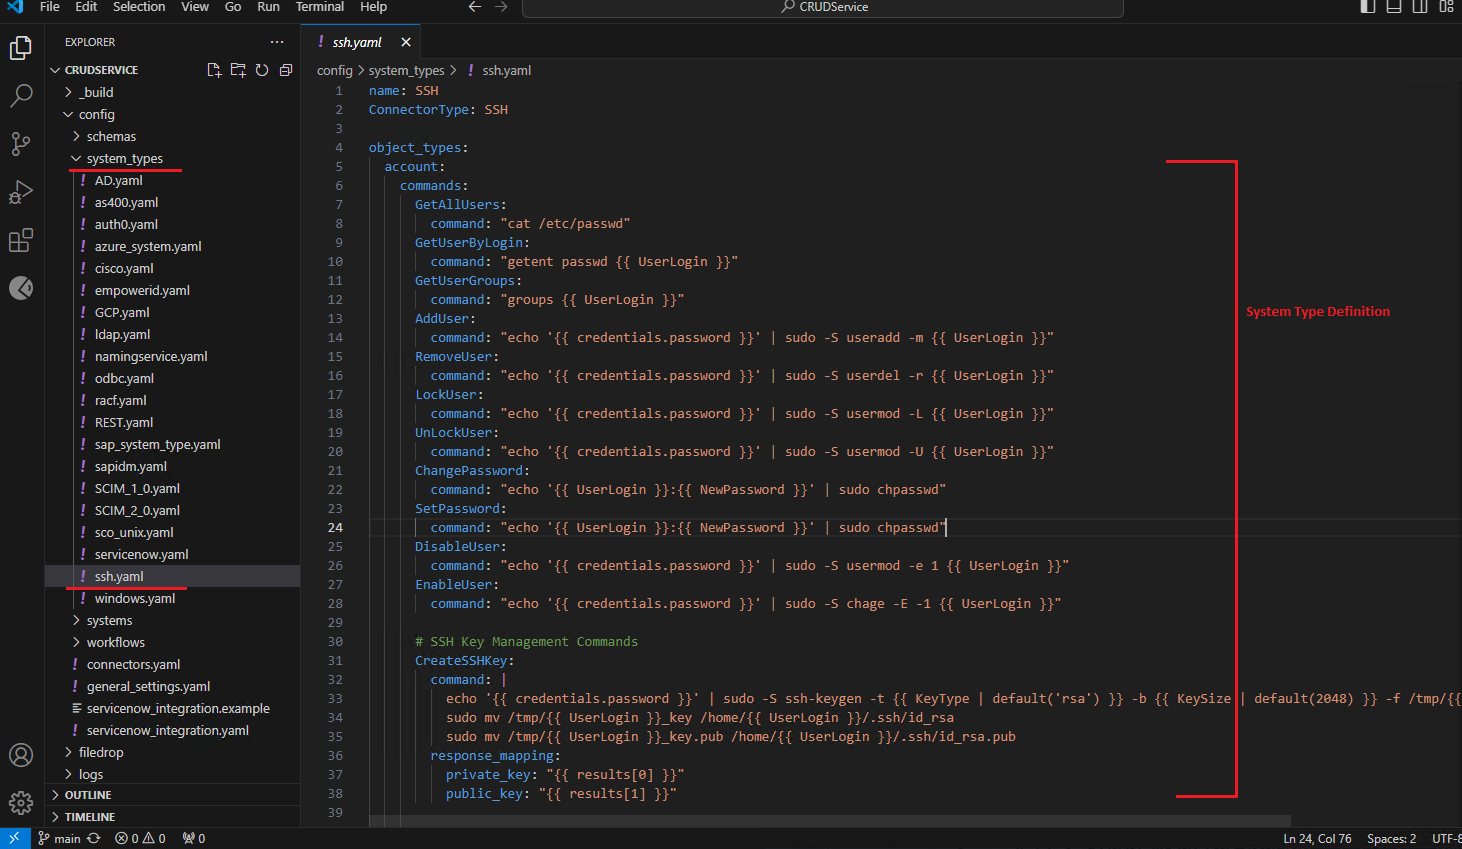
The system_type folder contains .yaml files. Let us examine one file to understand its structure. The ssh.yaml file serves as a configuration blueprint for the CRUD Service's SSH connector. It defines various operations related to user accounts, groups, and SSH keys that the service can perform on remote systems via SSH.
-
Name (name):
Identifies the connector. In this case, it's named "SSH" to denote its functionality. -
Connector Type (ConnectorType):
Specifies the type of connector, which is "SSH," indicating that all defined operations will be executed over an SSH connection. -
Object Types (object_types):
Categorizes different entities the connector can manage.Account: Pertains to user account operations.
-
Commands: Here are some of the commands:
- GetUserByLogin: Fetches a specific user's details using their login name.
- GetUserGroups: Lists all groups a specific user belongs to.
- AddUser: Creates a new user account.
Placeholders and Variables
The ssh.yaml utilizes placeholders enclosed within double curly braces ({{ }}) which are dynamically replaced with actual values during runtime. Here's a breakdown of the commonly used placeholders:
{{UserLogin}}: The username of the account being managed.{{credentials.password}}: The password used for sudo operations.{{NewPassword}}: The new password to be set for a user.
Response Mapping
Some commands include a response_mapping section which defines how the output of the command should be interpreted or stored.
- response_mapping:
- private_key: Maps the first result (
results[0]) of the command toprivate_key. - public_key: Maps the second result (
results[1]) of the command topublic_key.
- private_key: Maps the first result (
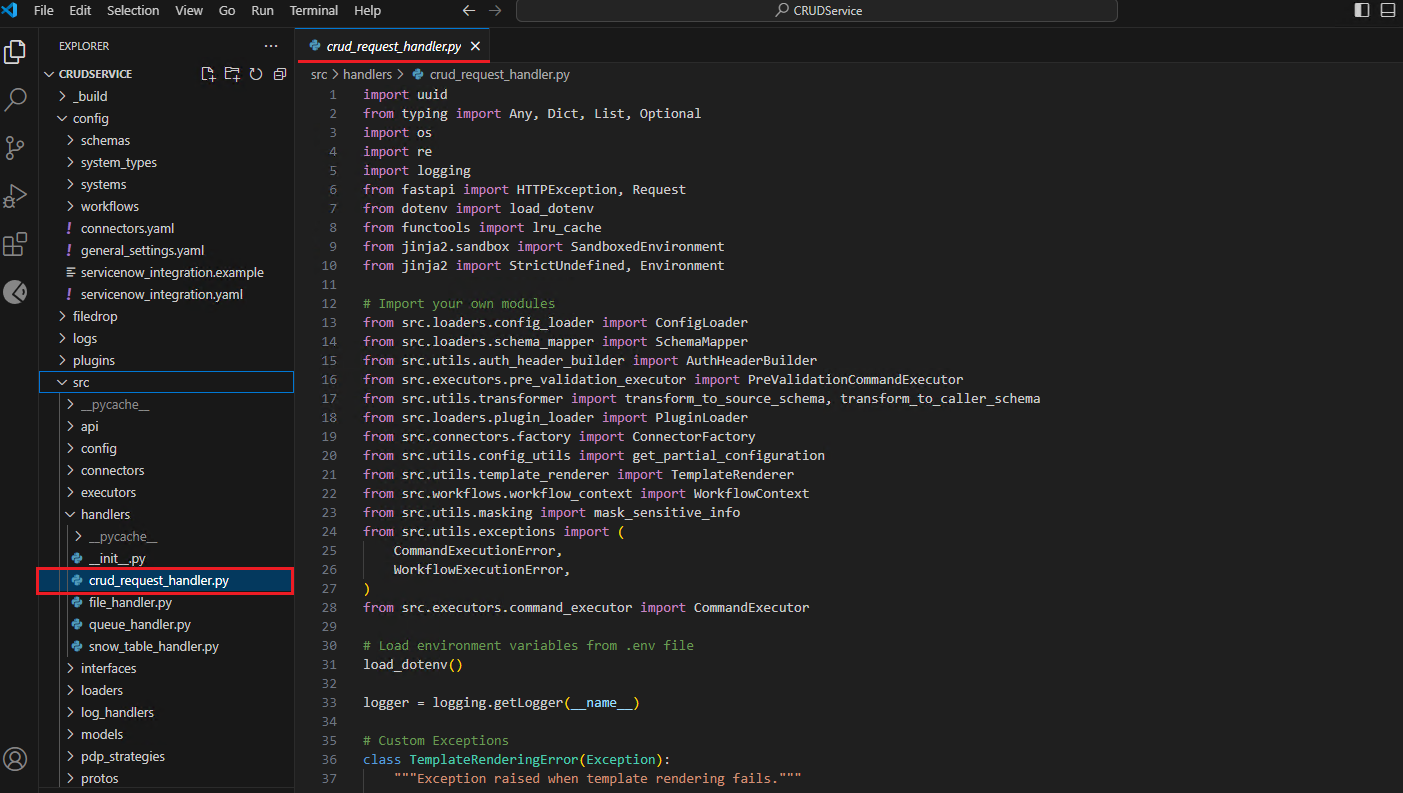
CRUD Request Handler (crud_request_handler.py)
The crud_request_handler.py module serves as the backbone of the CRUD Service and orchestrates the core logic of the service. It leverages configurations, schema mappings, and plugins to execute commands securely and efficiently, ensuring that interactions with target systems are handled seamlessly. This file serves as the entry point for all CRUD requests.
A Unified Entry Point for Diverse Requests
CRUD service is designed to be agnostic to the request's origin and target system. The crud_request_handler.py file acts as this unified entry point, accepting requests from diverse sources and routing them to the appropriate handlers.
Enabling Bring Your Own Credentials in EmpowerID's CRUD Service
Mechanism for Providing Credentials
The CRUD Service offers multiple mechanisms for users to provide their own credentials:
- In-Header Tokens:
Users can supply credentials directly in the request header, which is particularly suitable for cloud-based systems that typically employ token-based authentication. For example, a user can include a bearer token in a header likex-command-bearer-tokento authenticate their request. - PAM Vault Strategies:
"PAM Vault Strategies" model is where a user can send a pointer in the header that identifies a specific vaulted credential to be used. The service supports a plugin architecture allowing integration with various PAM systems, including CyberArk, Delinea, EmpowerID, Azure Key Vault, Beyond Trust, and HashiCorp. This approach provides flexibility and security by leveraging existing credential management solutions.
Motivations for Bring Your Own Credentials
The primary reasons for allowing users to bring their own credentials stem from security concerns and the desire for greater flexibility:
- Zero Trust Principles:
Customers are concerned about violating zero trust principles by requiring a single superuser account with excessive privileges for managing external systems. Allowing users to supply specific credentials for each action mitigates this risk by enabling credential specification on a per-system, per-object, and per-call basis. For instance, a user could use a low-privilege credential for reading user data and a higher-privilege credential for creating accounts.
- Addressing Customer Security Requirements:
In scenarios where customers are unwilling to trust the CRUD Service with access to their privileged accounts—particularly in PAM environments where credentials are carefully vaulted and access controls are strictly enforced—the bring-your-own-credentials approach allows customers to maintain complete control over their sensitive credentials. - Enabling External Agents:
AI agents interacting with the CRUD Service might need to perform actions on behalf of users without direct access to the credentials stored within EmpowerID. By supplying the necessary credentials during the request, these agents can seamlessly interact with external systems while maintaining appropriate authorization.
The bring-your-own-credentials model within EmpowerID's CRUD Service is a crucial design element. It significantly enhances security, provides greater flexibility, and enables seamless integration with external systems and agents. This approach reflects a deep understanding of modern security concerns and the need to respect diverse customer requirements.
Understanding Coarse-Grained vs. Fine-Grained Authorization in EmpowerID's CRUD Service
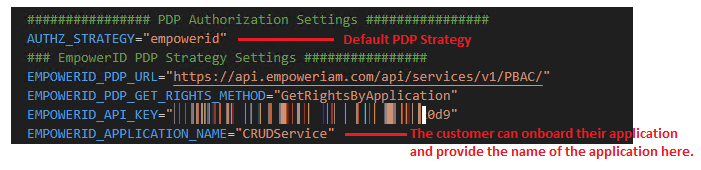
The CRUD service utilizes a "PDP Strategy" model for authorization, allowing for the integration of different Policy Decision Points (PDPs).
Coarse-Grained Authorization: The First Line of Defense
Coarse-grained authorization acts as an initial, high-level check to determine if a user has general permission to perform a specific action on a particular resource type within a given system. Upon receiving a request, the CRUD service contacts the designated PDP, such as EmpowerID's authorization engine, to determine the caller's rights for the specified application, resource type, and system.
Example:
Imagine a user, Alice, attempts to update a user account in an Auth0 tenant. The coarse-grained check would determine if Alice generally has the "update user account" permission for that Auth0 tenant. This check wouldn't consider specific attributes of the user account being modified, just the overall action and resource type.
Implementation:
The CRUD service achieves this by leveraging a "PDP Strategy" model, allowing integration with various Policy Decision Points (PDPs), such as EmpowerID's own authorization engine or external solutions like Amazon Cedar. Upon receiving a request, the CRUD service contacts the PDP, providing information about the user, application, resource type, and target system.
Caching for Performance:
Once the PDP returns a decision, the CRUD service caches this result to avoid redundant checks for subsequent requests with the same parameters. This significantly improves performance, especially when dealing with frequent requests from the same user.
Fine-Grained Authorization: Contextual Access Control
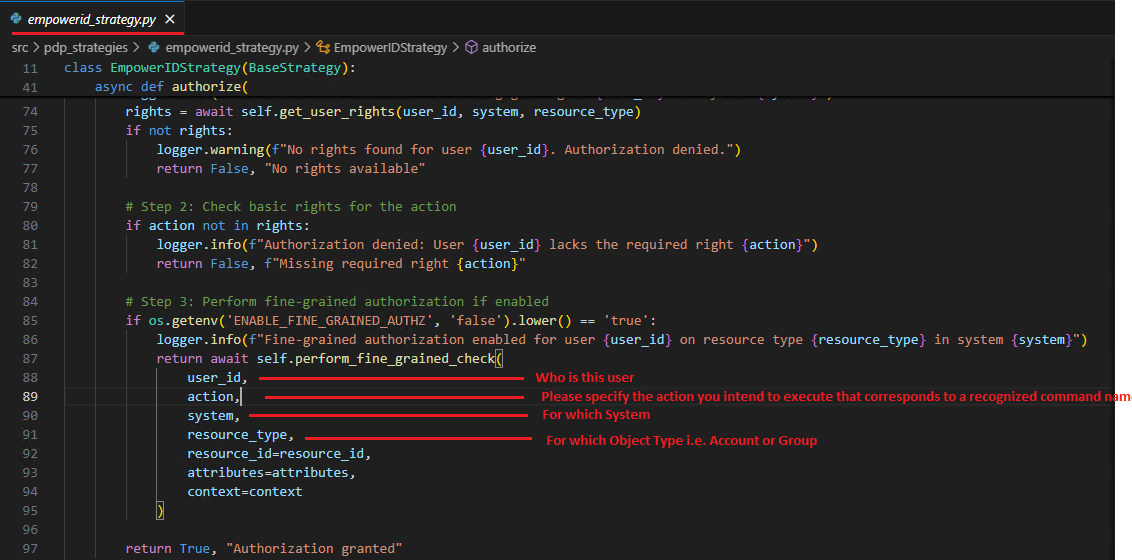
Fine-Grained Authorization refers to a detailed access control mechanism that allows permissions to be defined at a highly specific level. Unlike coarse-grained authorization, which may grant or deny access based on broad categories (e.g., user roles), fine-grained authorization considers multiple attributes and contextual factors to make precise access decisions.
If fine-grained authorization is enabled, the CRUD service proceeds with a more granular check based on the context of the request:

Attribute-Based Access Control:
Fine-grained requests will include all relevant attributes, such as the user's department, company, and specific properties being modified. This allows the PDP to make more nuanced decisions based on attribute values.
Example Use Case:
For instance, a policy might restrict a user named Hammad to updating user accounts only in a specific Active Directory domain and only for accounts belonging to the company "EmpowerID".
EmpowerID Integration:
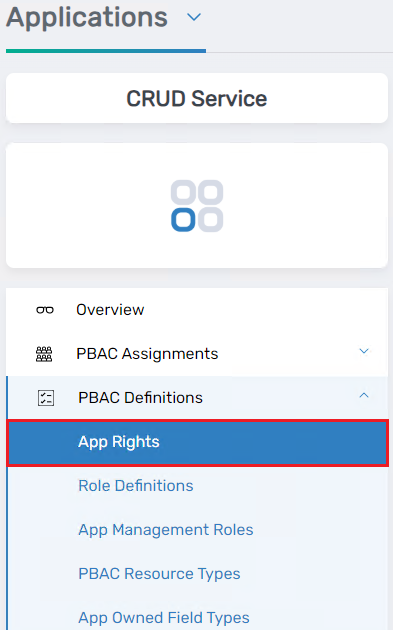
Within the EmpowerID ecosystem, fine-grained authorization leverages EmpowerID's App Rights. These templates map command names to specific EmpowerID rights, enabling granular control over actions performed on external systems.
Pluggable PDPs: A Key Advantage
A key advantage is the ability to use external PDPs. This enables organizations to integrate with existing authorization solutions or leverage specialized PDPs like Amazon Cedar, Axiomatics Alpha, or OPA.
Flexibility and Control
- Granular Permissions:
The system provides the ability to grant or deny access at a very granular level, down to specific actions, systems, and even attribute values. This allows for precise control over who can perform what actions on which resources. - External PDP Integration:
The pluggable PDP strategy enables flexibility in choosing and integrating with the most suitable authorization solution for an organization's needs and security policies.
Understanding Hard and Easy Modes
Hard and Easy Modes primarily differ in how they handle the mapping of application rights to commands and how they leverage ABAC (Attribute-Based Access Control).
Hard Mode (Non-Easy Mode)
When ENABLE_CHECK_ATTRIBUTE_MODE=True, and this setting is turned on, if someone tries to execute a command or perform an action, it goes to the strategy file. In this case, it will go to the empowerid_strategy.py file and it's going to look for which feature of the strategy is implemented—either coarse-grained or fine-grained. In this case, it is fine-grained.


In hard mode, every command is treated as a separate application right. This means that for every action a user can perform, a corresponding right must be created and assigned.
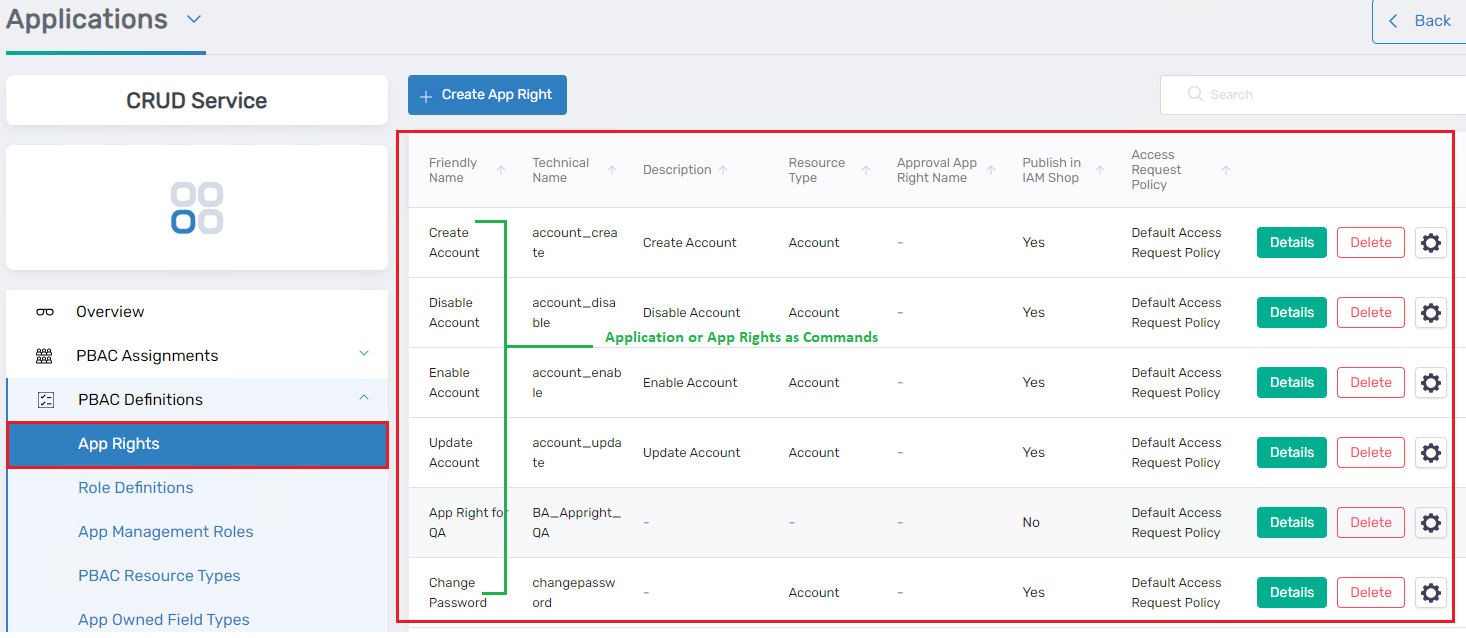
- Individual Rights for Each Command:
For instance, if a user needs to perform actions like "create user", "edit user", and "delete user", separate rights would be created for each action: "create user right", "edit user right", and "delete user right". - Strict and Granular Control:
This method offers very granular control over authorization, as administrators can assign specific rights for every command. - Cumbersome and Complex:
However, it becomes cumbersome to manage as the number of commands and systems within the identity fabric grows. Administrators must create and assign numerous rights, leading to increased complexity.
Example:
If a user named Hammad needs permissions to "create group" in three different systems, three separate "create group" rights would need to be created and assigned to Hammad, each specific to a particular system.
Easy Mode (Lazy Mode)
Easy mode simplifies the authorization process by leveraging ABAC principles and treating commands as attributes within a single, overarching right.
- Single "Execute Command" Right:
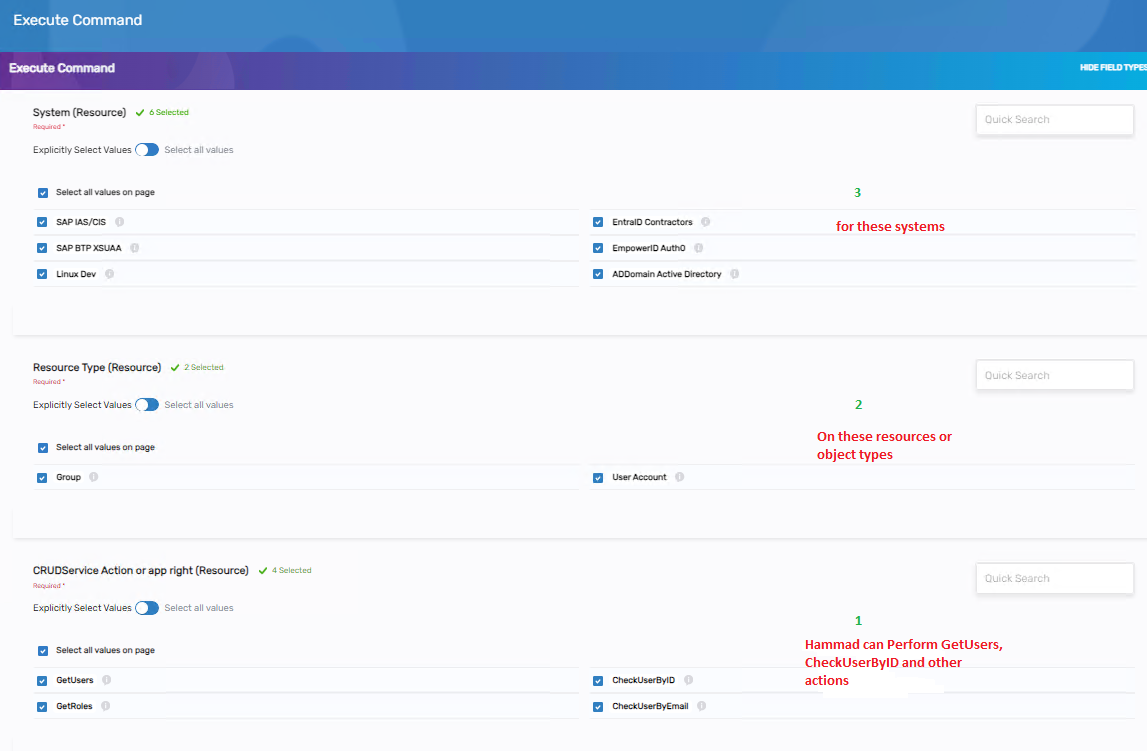
Instead of creating numerous individual rights, a single Execute Command right is defined. - ABAC Attributes for Command Control:
This right is associated with ABAC attributes such as System, Resource Type, and Command Name. These attributes are used to specify which commands a user is allowed to execute. - Efficient and Streamlined Management:
Administrators can assign the "Execute Command" right to a user and then configure the ABAC attributes to grant access to specific commands within specific systems. This approach significantly reduces the number of rights that need to be managed, making the process more efficient.
Example:
In easy mode, Hammad would be assigned the Execute Command right. Administrators would then configure the "Command Name" attribute to include values like "GetUsers", "GetRoles", and "Edit Users", while also defining the permissible systems and object types through the System and Resource Type attributes. This allows Hammad to perform multiple actions within defined constraints through a single right assignment.
Instead of defining commands as Rights, our approach categorizes commands as field type values, treating them as ABAC (Attribute-Based Access Control) attributes. Consequently, each command is uniquely identified by its field type, allowing for a diverse array of commands distinguished by their unique names.
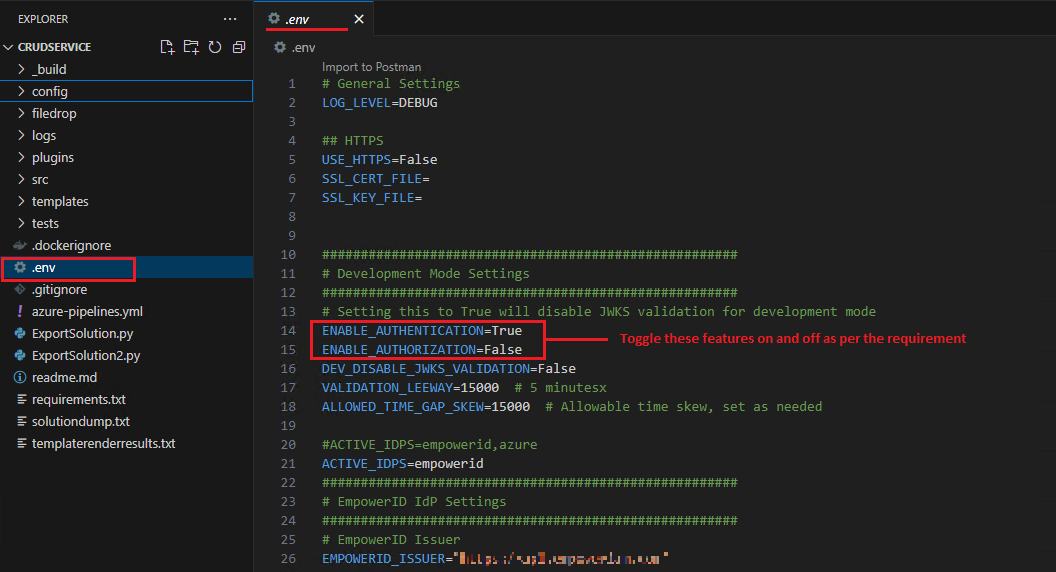
Environment Variable File (.env)
The .env file contains the configuration for all the systems. For example, it includes information for our internal Auth0 tenant.
The client ID and Client Secret used in the auth0_eid.yaml file within the Systems folder obtain their values from this .env file.

If you are developing or testing a new connector and you don’t want to authenticate to the CRUD service or perform authorization, you can toggle these features on and off. Once you have toggled the features on or off, restart the application.