Exploring the CRUD Service
In this section, we will demonstrate how to run and test the CRUD Service using a Postman collection. Following that, we will explore how to operate the CRUD Service from a Workflow to understand the end-to-end process. Finally, we will cover how to debug the CRUD Service.
Postman Collections
There are collections in Postman designed for testing the CRUD Service. They contain pre-configured requests that target specific endpoints within the service.
To use them:
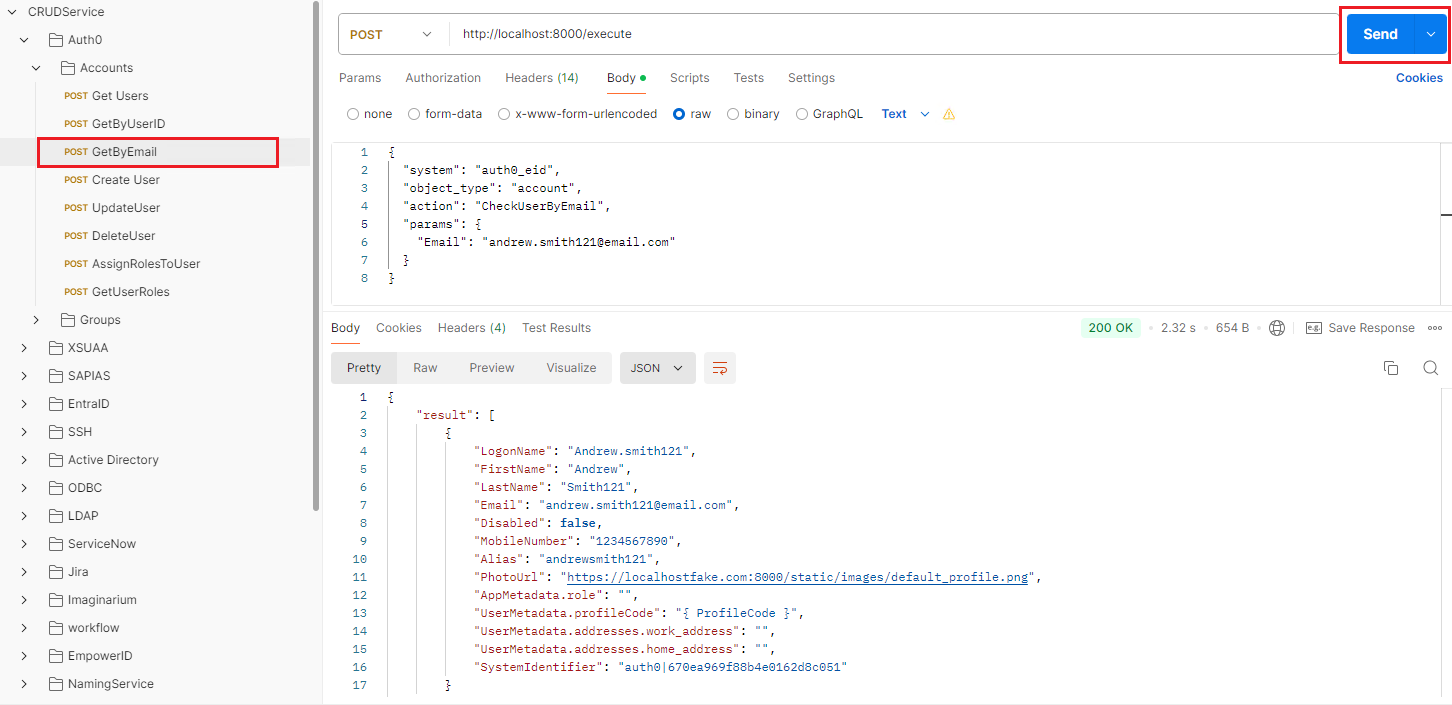
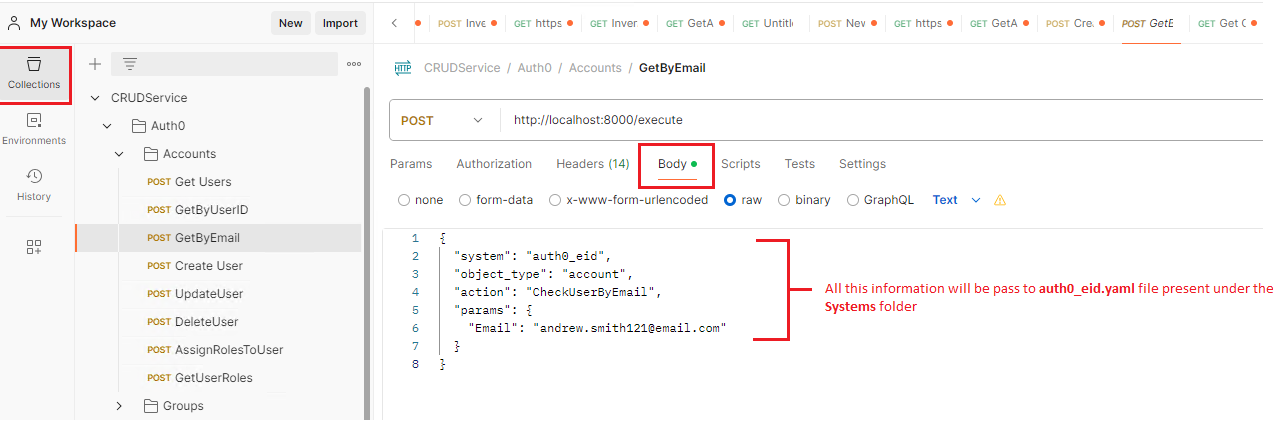
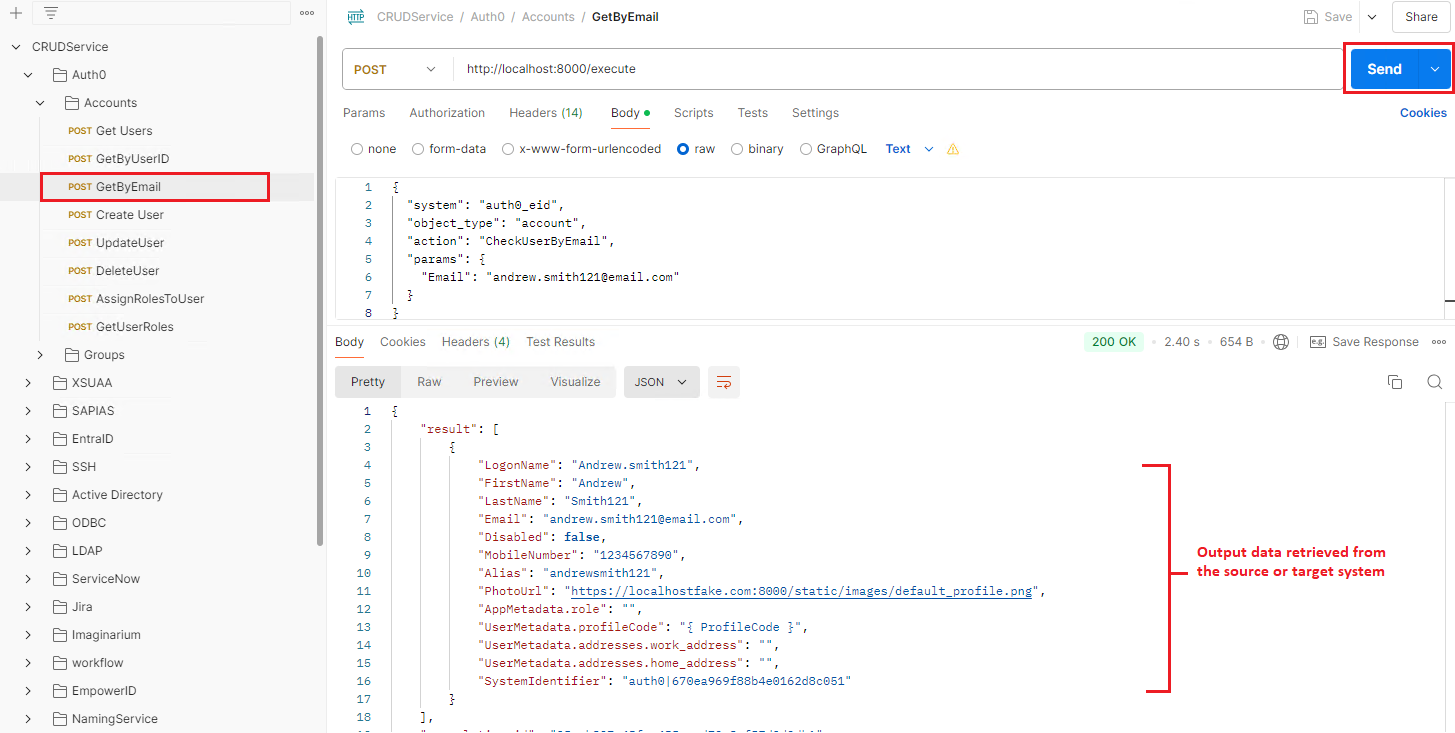
- Open Postman, expand the CRUD Service folder, and navigate to the GetByEmail call located under the Accounts folder.
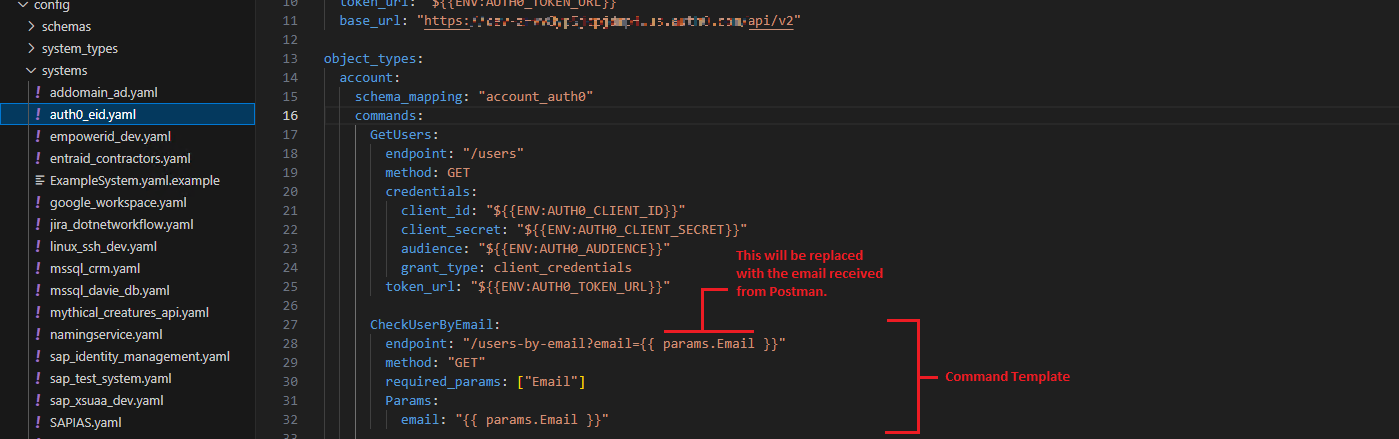
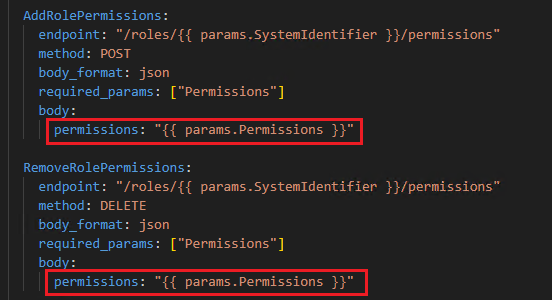
- If you examine the request body, you will notice that we are passing the system, action, and parameters. The action here is CheckUserByEmail, so based on the action, the service will locate the corresponding command template in the auth0_eid.yaml file located under the Systems folder.
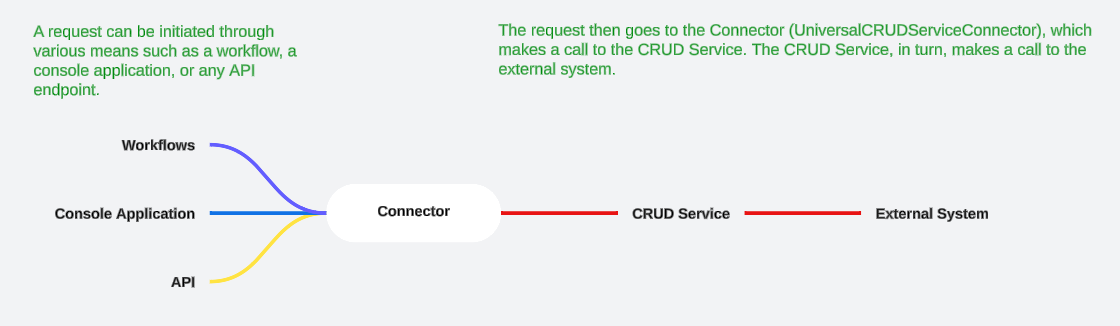
The execute endpoint is called from the Connector or EmpowerID.

Running and Testing the CRUD Service
-
Open Visual Studio Code, launch the terminal, and run the following command.
python -m src.main

-
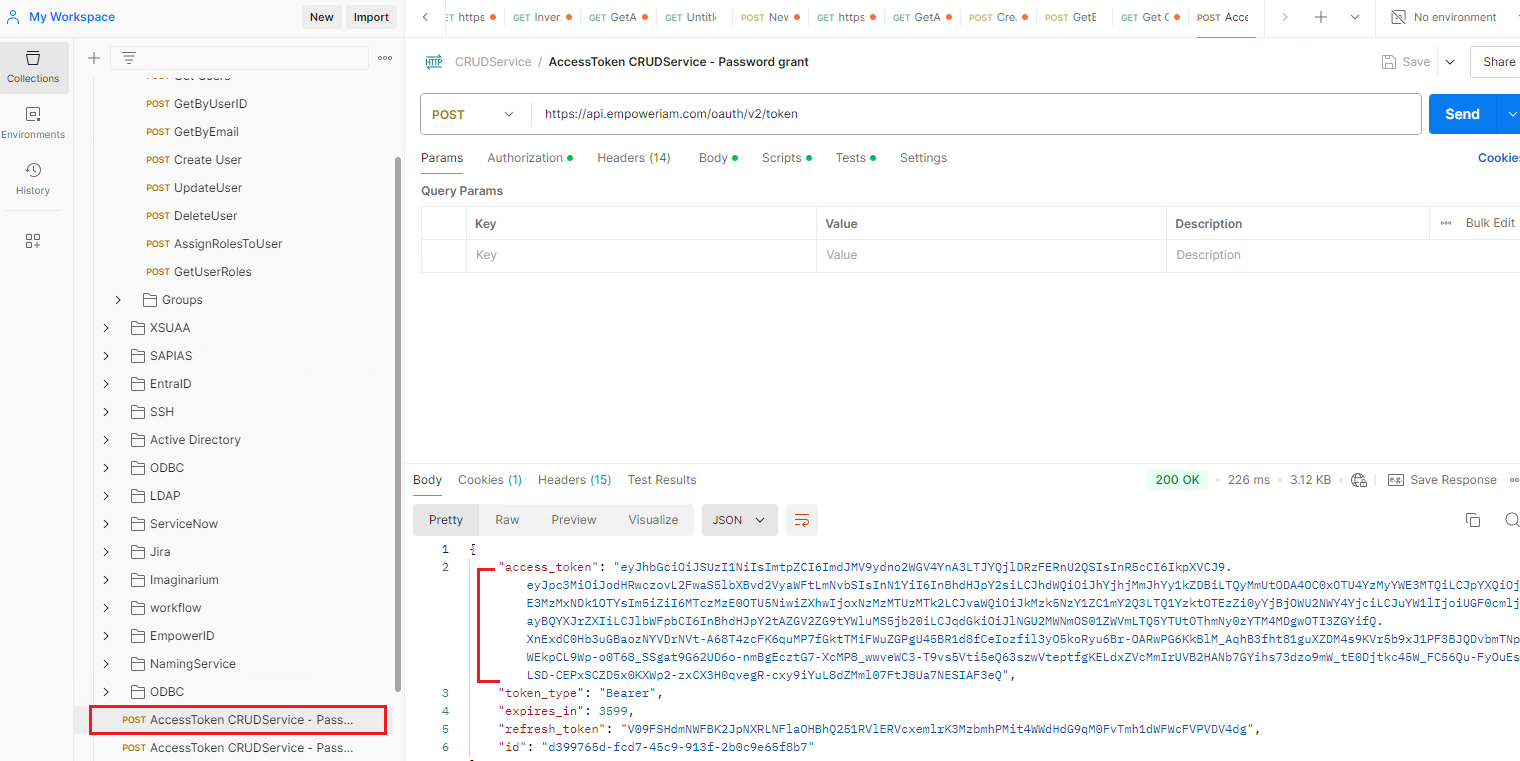
Open Postman, execute the AccessToken CRUDService - Password grant POST call, and copy the access token.
-
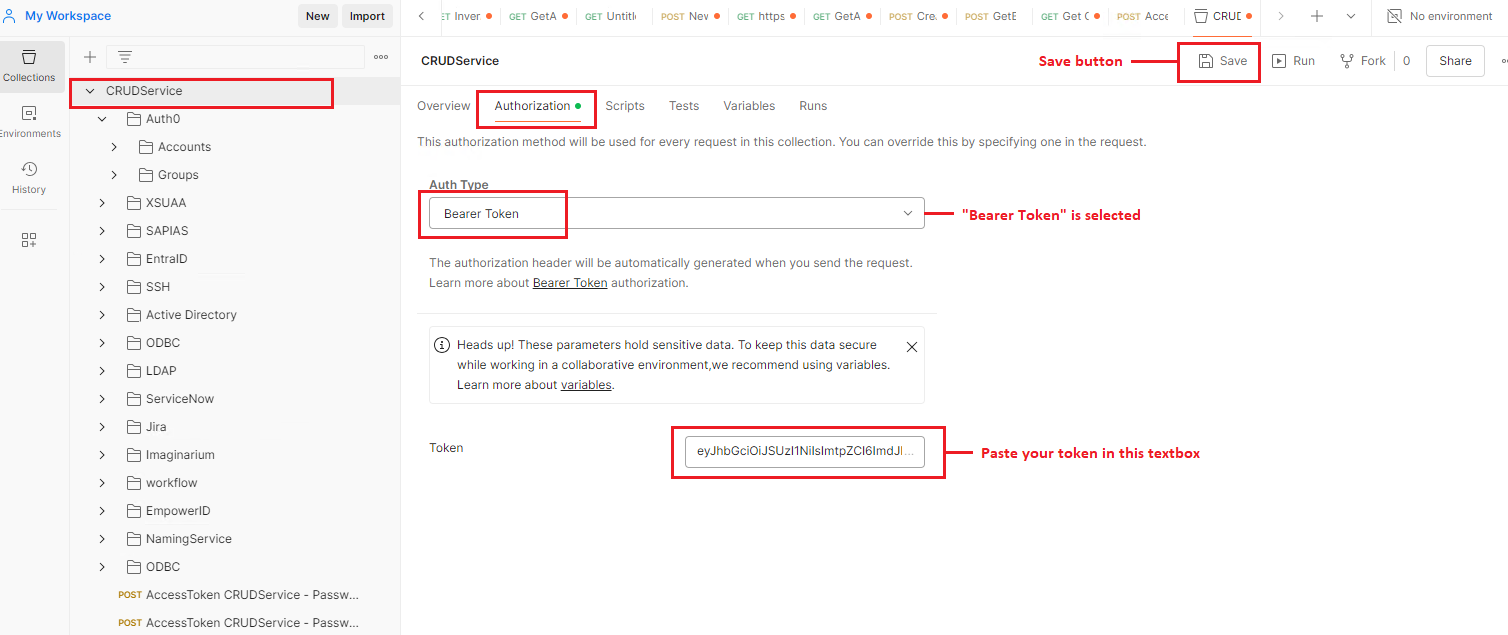
Within the CRUD Service directory, proceed to the Authorization tab. Confirm that Bearer Token is selected from the Auth Type dropdown and enter the access token in the Token textbox. Save the configuration.
-
Go to the GetByEmail call under the Accounts folder, click the Send button, and view the result.
1. Request Handling Workflow
Initiation: When a request is received by the CRUD Service's handle_request function, it utilizes the object type, system name, and parameters to retrieve the corresponding command template from the auth0_eid.yaml file located in the Systems folder.
Command Template Processing:
- Action-Based Selection: Based on the specified action (e.g., CheckUserByEmail), the service identifies the appropriate object type (e.g., account) and fetches the necessary configurations.
- Schema Mapping: If a schema mapping file exists, the service employs a schema mapper to transform data to the caller schema, ensuring compatibility and consistency in data handling.
Configuration Management:
- Combined Configuration: The term combined config refers to the comprehensive configuration settings that are not filtered by object type. When filtered by object type, the service accesses specific configurations relevant to that object (e.g., account).
Template Rendering:
Templating engines facilitate the separation of business logic from presentation logic, enabling developers to generate dynamic content efficiently. Jinja and Python-based templates are two such mechanisms, each with its unique advantages and considerations. Our CRUD Service supports both Jinja and Python-based templates.
-
Jinja Template Evaluation: The service performs variable replacements within the .yaml file using Jinja templates, incorporating values such as the system name and parameters.
Syntax:
- Double Curly Brackets (
{{ }}): Denote variables to be evaluated and replaced with their corresponding values.
- Double Curly Brackets (
-
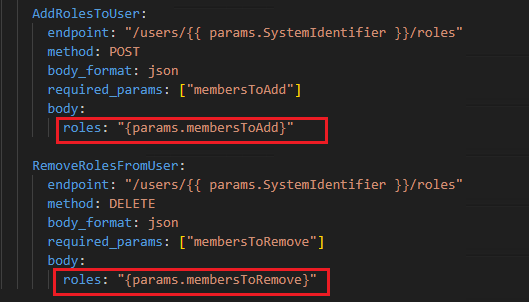
Python Template Evaluation: The service performs variable replacements within the .yaml file using Python templates, incorporating values such as the system name and parameters.
Syntax:
- Single Curly Brackets (
{ }): Denote variables to be evaluated and replaced with their corresponding values.
- Single Curly Brackets (
Key Differences Between Jinja and Python Templates
- Output Data Types:
- Jinja Templates: All outputs are strings. Regardless of the original data type (list, Boolean, integer), the rendered output is a string.
- Python Templates: Preserve original data types. Outputs can maintain their inherent data types unless explicitly converted.
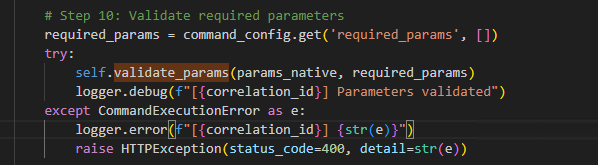
2. Parameter Validation and Execution
Validation:
The service verifies that all required parameters specified in the command template are present in the incoming request. If any required parameters are missing, the service raises an error; otherwise, it proceeds.
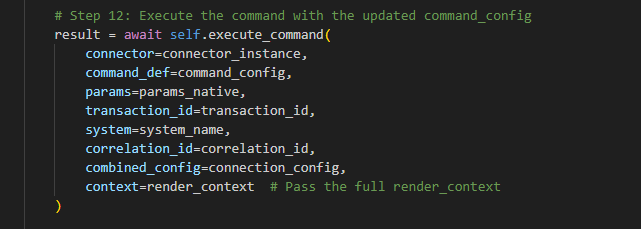
Command Execution:
- Body Construction: Using the validated parameters and command template, the service constructs the request body and determines the target URL for the REST API call.
- Executing the Command: The execute_command function sends the constructed request to the specified endpoint and retrieves the result back.
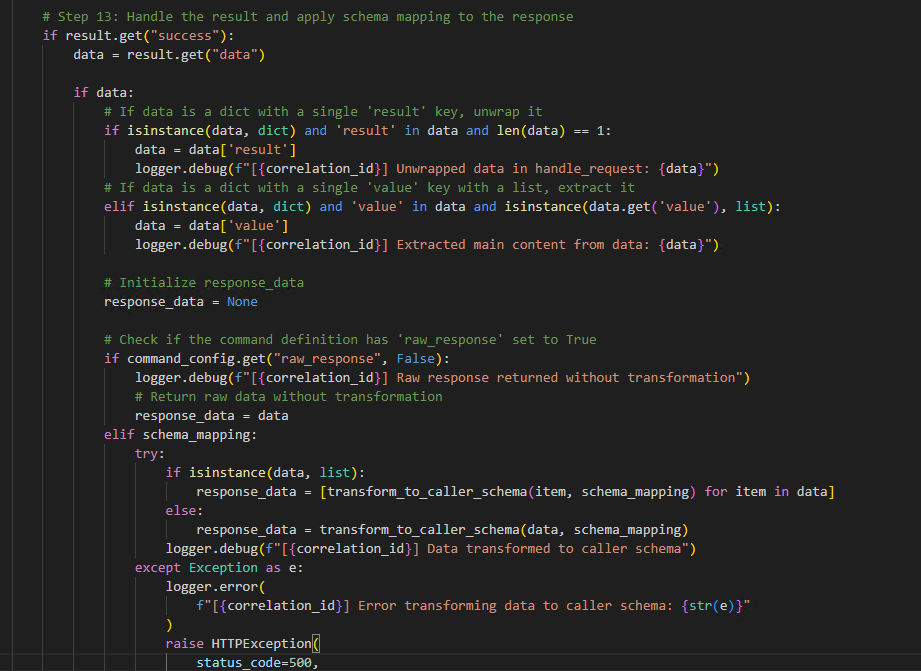
- Response Handling: If the result contains data, it is transformed back to the caller schema before being returned to the requester.
Running the CRUD Service from the EmpowerID UI: Understanding the Universal CRUD Service Connector
Let’s create a role and that role will be created in auth0 and also in EmpowerID.
-
Run the CRUD service.
-
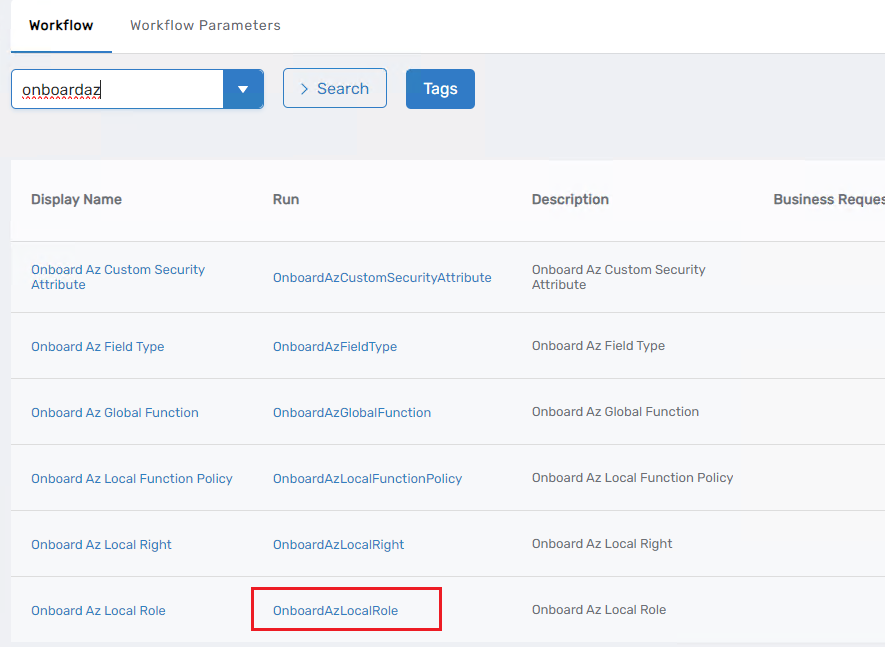
Run the Onboard Az Local Role workflow from the UI.
-
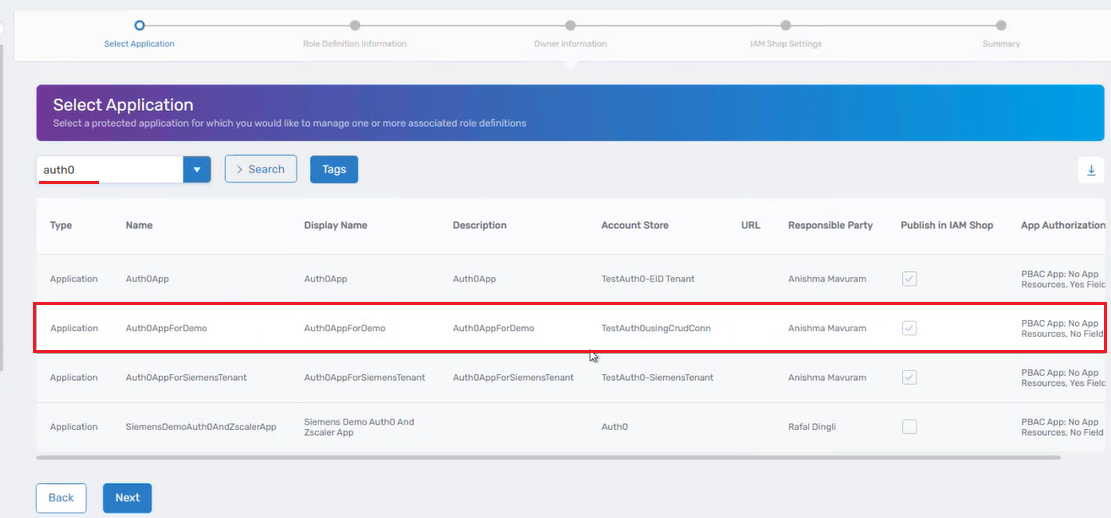
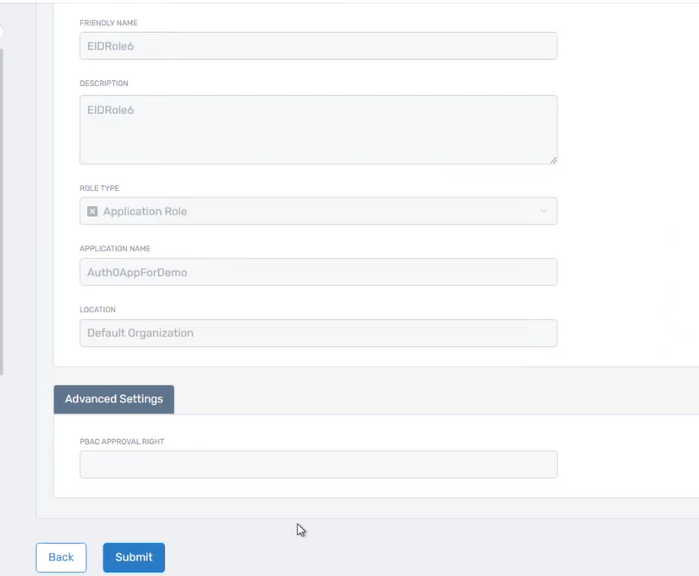
First I will select the Application I have created for my account store that I am testing with.
-
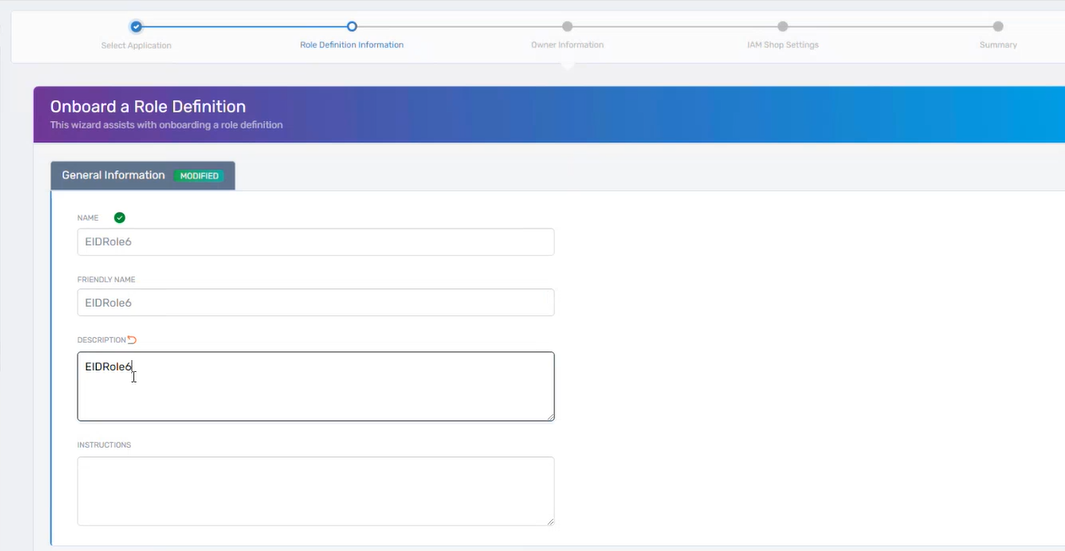
Complete all required fields in the workflow and click on the Submit button.
- Open the Terminal in Visual Studio Code and check if it has run successfully.

So here it was authenticated, connected to the CRUD service, processed, and created the Az local role.
Now, let's understand the flow of it.
Initially, the Workflow invokes the operation activity titled Create Az Local Role Operation. To explore further, open the executor for this operation activity and locate the method named InsertWithAsie.
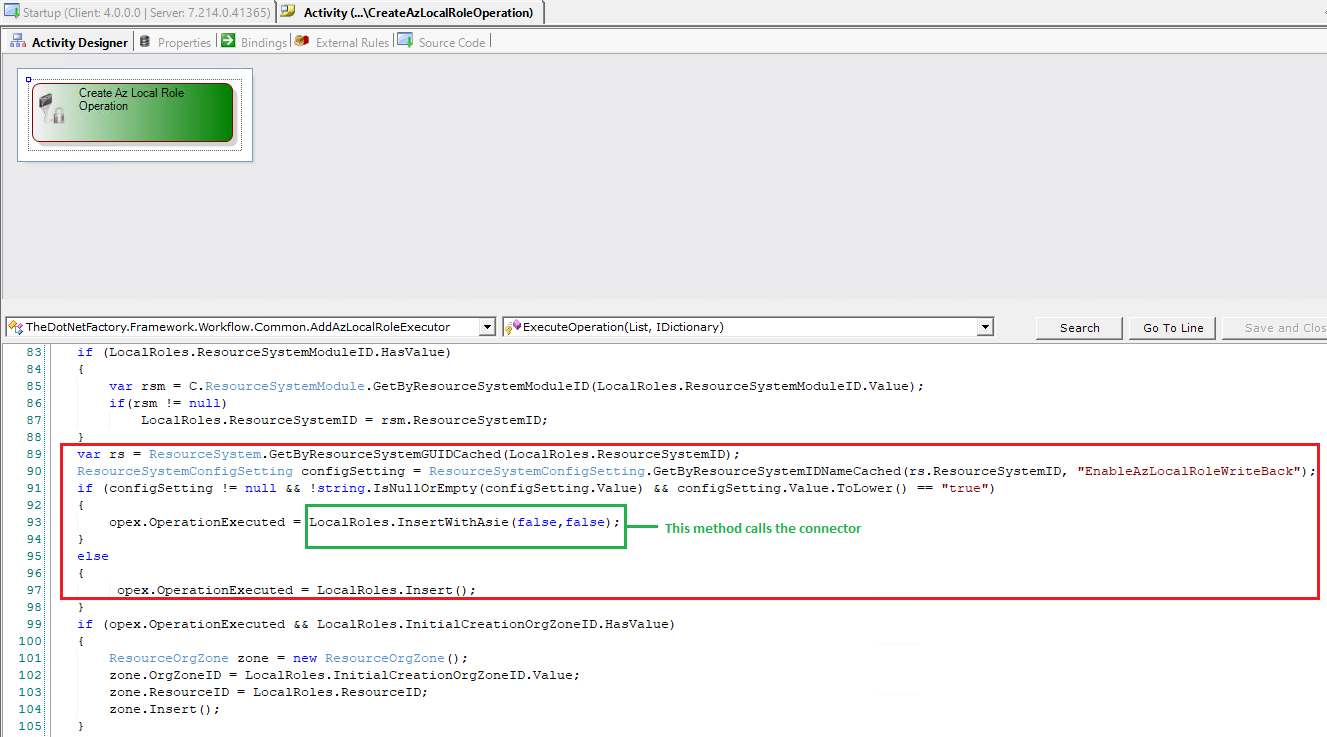
The InsertWithAsie method invokes the Insert method of the connector, which is defined within the Business Layer.
High-Level Flow of CRUD Service from Start to End
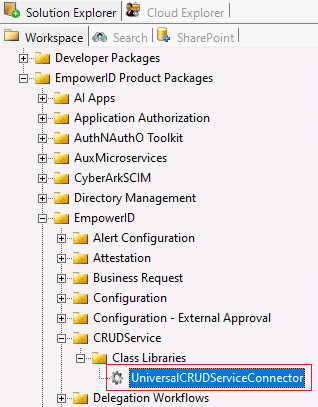
Navigate to the UniversalCRUDServiceConnector to review its Insert method. In the ObjectClass parameter we are passing AzLocalRole. This value is set in the Business Layer.

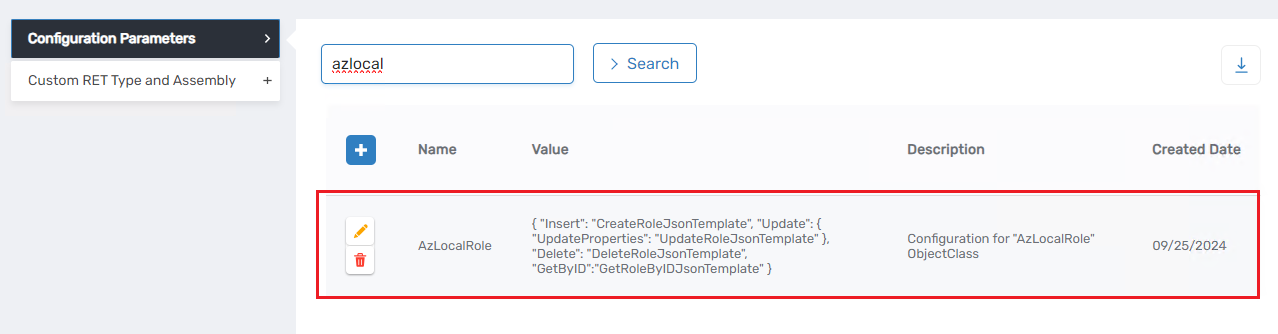
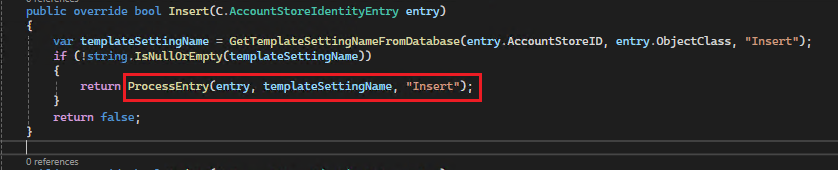
The GetTemplateSettingNameFromDatabase method retrieves a configuration value. To view the stored value for AzLocalRole, visit the Configuration Parameters tab in your account store. The returned values are in JSON format, which will be deserialized for further processing.
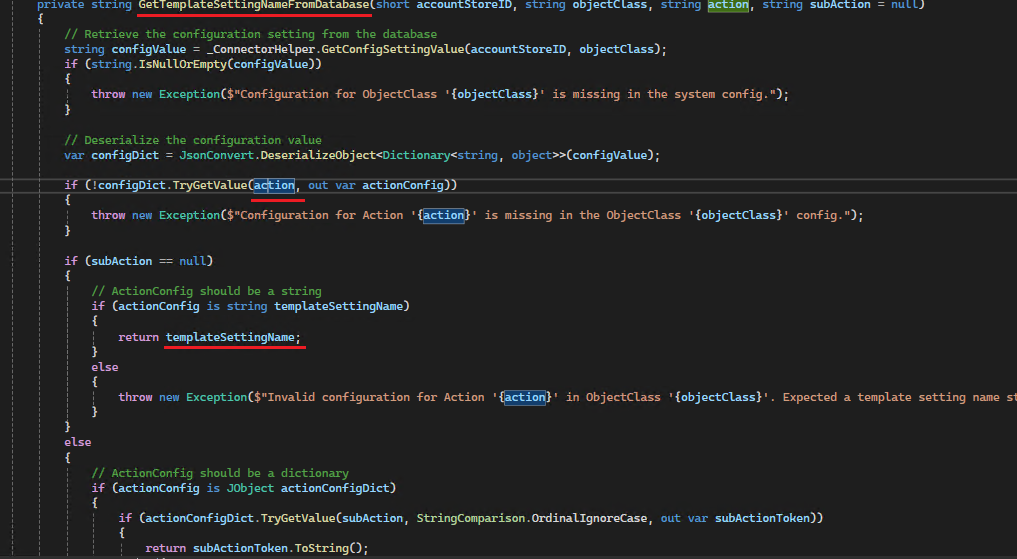
Upon inspecting the JSON, the action associated with the template name will be clearly visible.

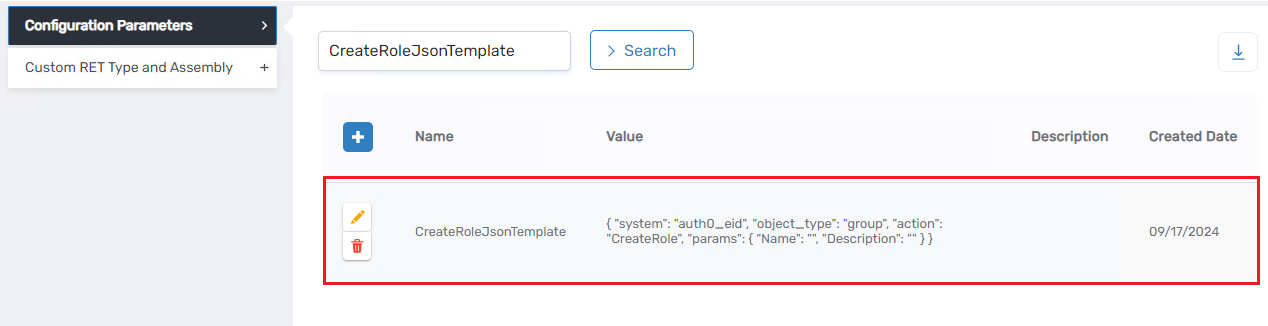
Following deserialization, the system identifies the template name associated with the specified action. The action provided is Insert, and the corresponding template setting name retrieved is CreateRoleJsonTemplate.
Let's examine the structure of the CreateRoleJsonTemplate. Within this template, the parameters Name and Description are initially empty. These parameters will be populated with data derived from the AccountStoreIdentityEntry.
Having acquired the template name, the ProcessEntry method will be invoked. During this process, the entry, templateSettingName, and the action specified are passed as parameters.
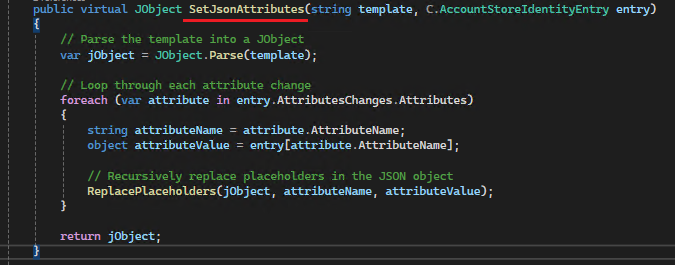
While developers can comprehend the ProcessEntry code, the critical aspect to focus on is the SetJsonAttribute function. This function is responsible for mapping values from the entry to their corresponding placeholders in the template. We have established a Security Boundary Type that incorporates Security Boundary Attributes, covering all permissible account columns within EmpowerID. This setup explicitly excludes any columns that should remain unaltered.
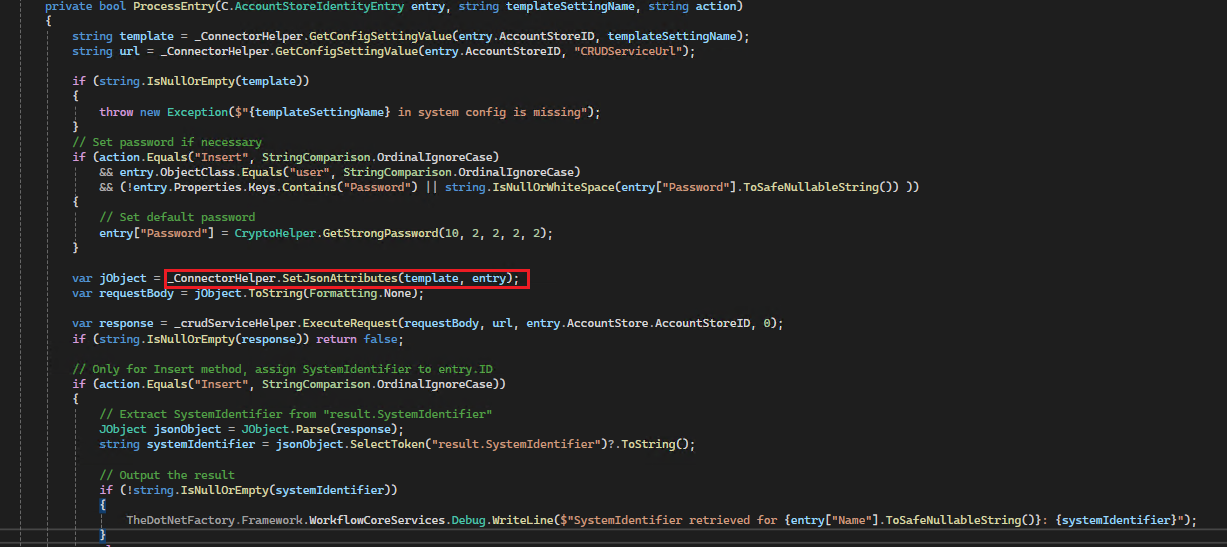
With the template in hand, the ExecuteRequest method is invoked, passing the requestBody and URL parameters. The URL consistently targets the execute action, utilizing the POST method for the /execute endpoint. The requestBody is the variable component, dynamically configured through JSON templates. This mechanism illustrates how EmpowerID workflows, or other processes, can interact with the CRUD Service. Upon receiving a response, if the operation is an Insert method, the systemIdentifier of the specific system is mapped to the entryID.
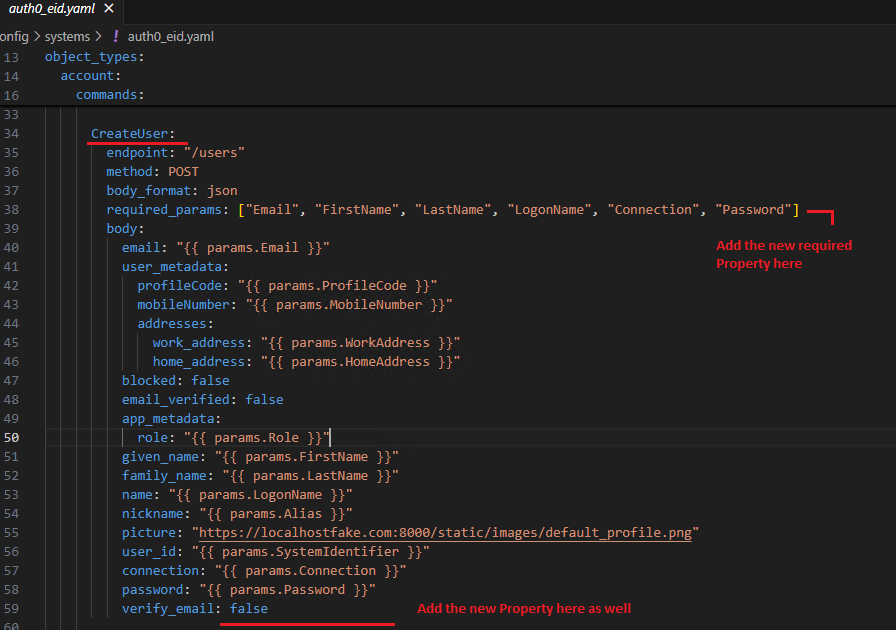
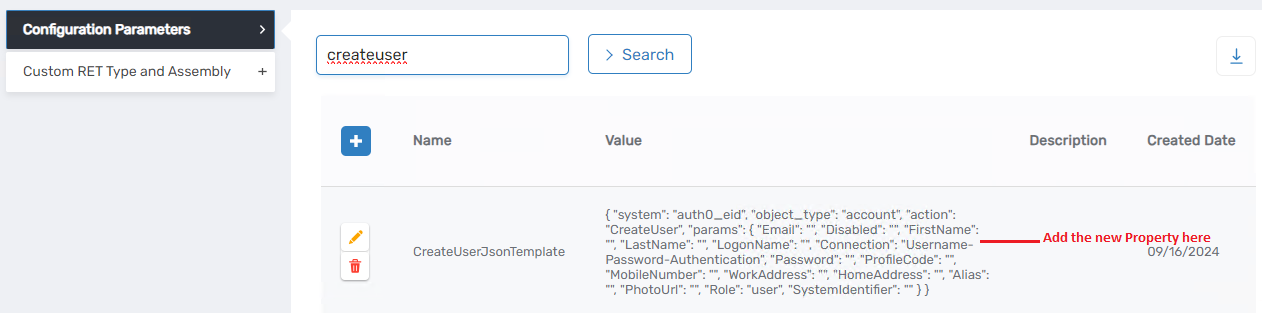
Anytime a change occurs on the REST API side, we typically need to go to the Custom Connector and modify the code where we are interacting with the API. However, with this approach, we simply adjust the command template in the CRUD Service. For instance, if tomorrow a new required parameter is added for Auth0 in the CreateUser function, all you need to do is add that required property to the command template. Then, go to EmpowerID, search for CreateUserJsonTemplate, and incorporate that property there. Also, create a security boundary attribute if it does not exist or if there isn't a corresponding column for it in EmpowerID.
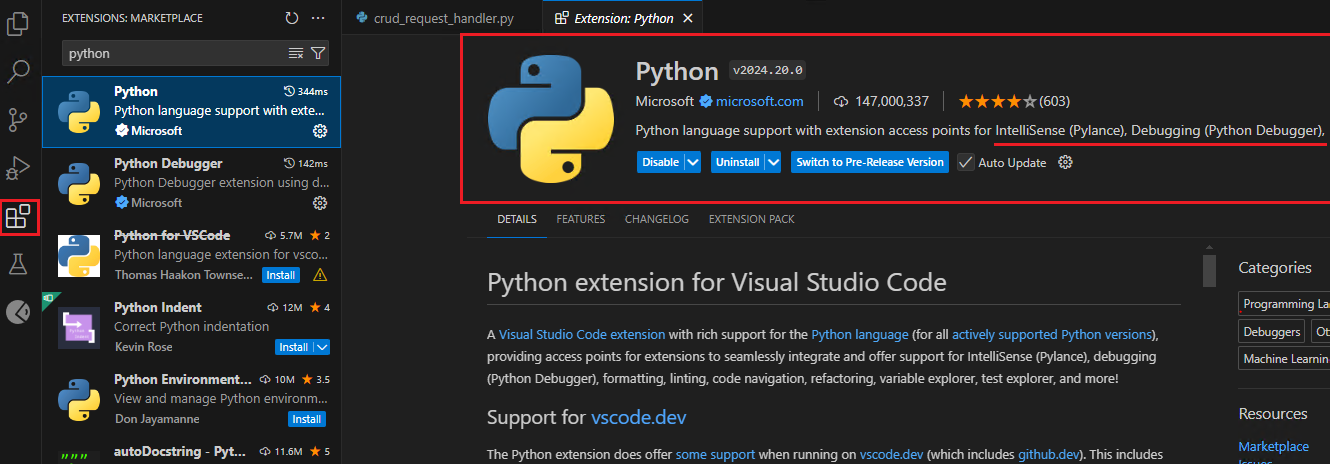
Steps for Debugging the CRUD Service
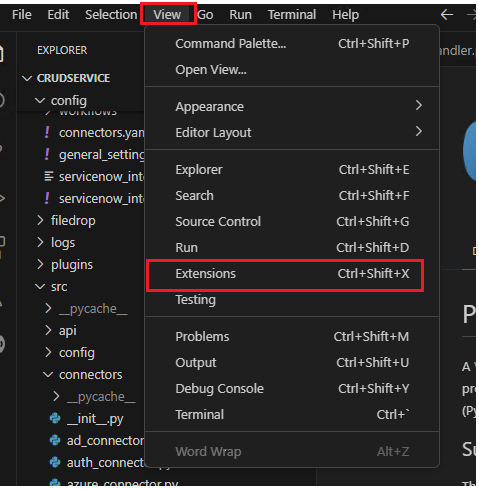
- To debug Python applications in Visual Studio Code, ensure that the Python extension is installed. If the extension is not already installed, navigate to the Extensions pane via the side navigation bar or by selecting Extensions from the View menu. In the search bar, type "Python" and locate the appropriate extension designed for Python application debugging.
-
Once it is installed, go to the terminal and run this command.
python -m src.main
-
Locate the Python debugger icon on the upper right corner of the screen and select Python Debugger: Debug using launch.json file from the options. Note that depending on your screen layout, this play button might appear in the upper left corner. Click on the button and choose the specified option accordingly.
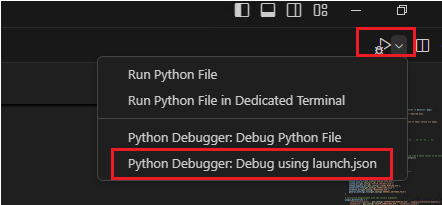
-
A dropdown menu will appear. From this menu, choose the Python Debugger: Module option.

-
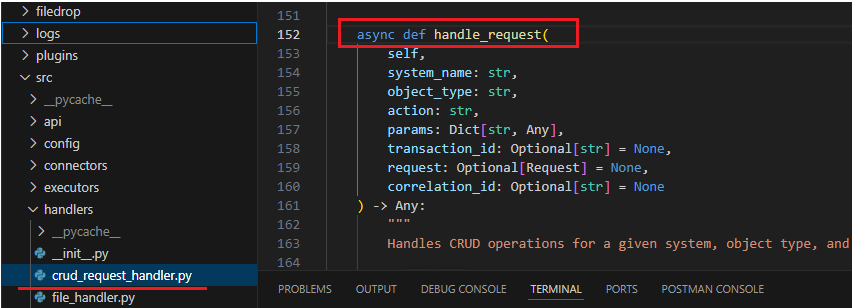
Set breakpoints at the precise locations in the code where you intend to initiate debugging. Currently, breakpoints have been placed in the
crud_request_handler.pyfile.
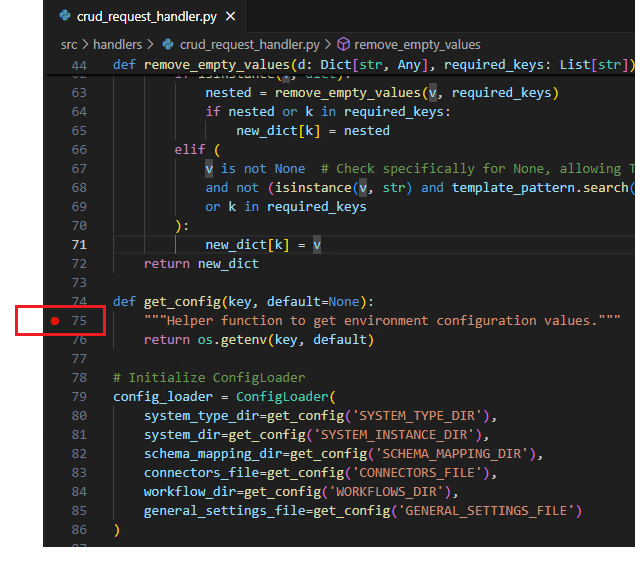
- Launch Postman and initiate the GetByEmail POST request. This action will activate the breakpoint within your code, enabling you to proceed with the debugging process seamlessly.