EmpowerID API Lab
- This lab will guide you through creating a basic anonymous GET API that returns a static string.
- This lab will guide you through creating a GET API that returns a list of groups to which specified person belongs.
Prerequisites:
- Access to EmpowerID Workflow Studio.
- Familiarity with the EmpowerID development environment.
- Basic understanding of API concepts.
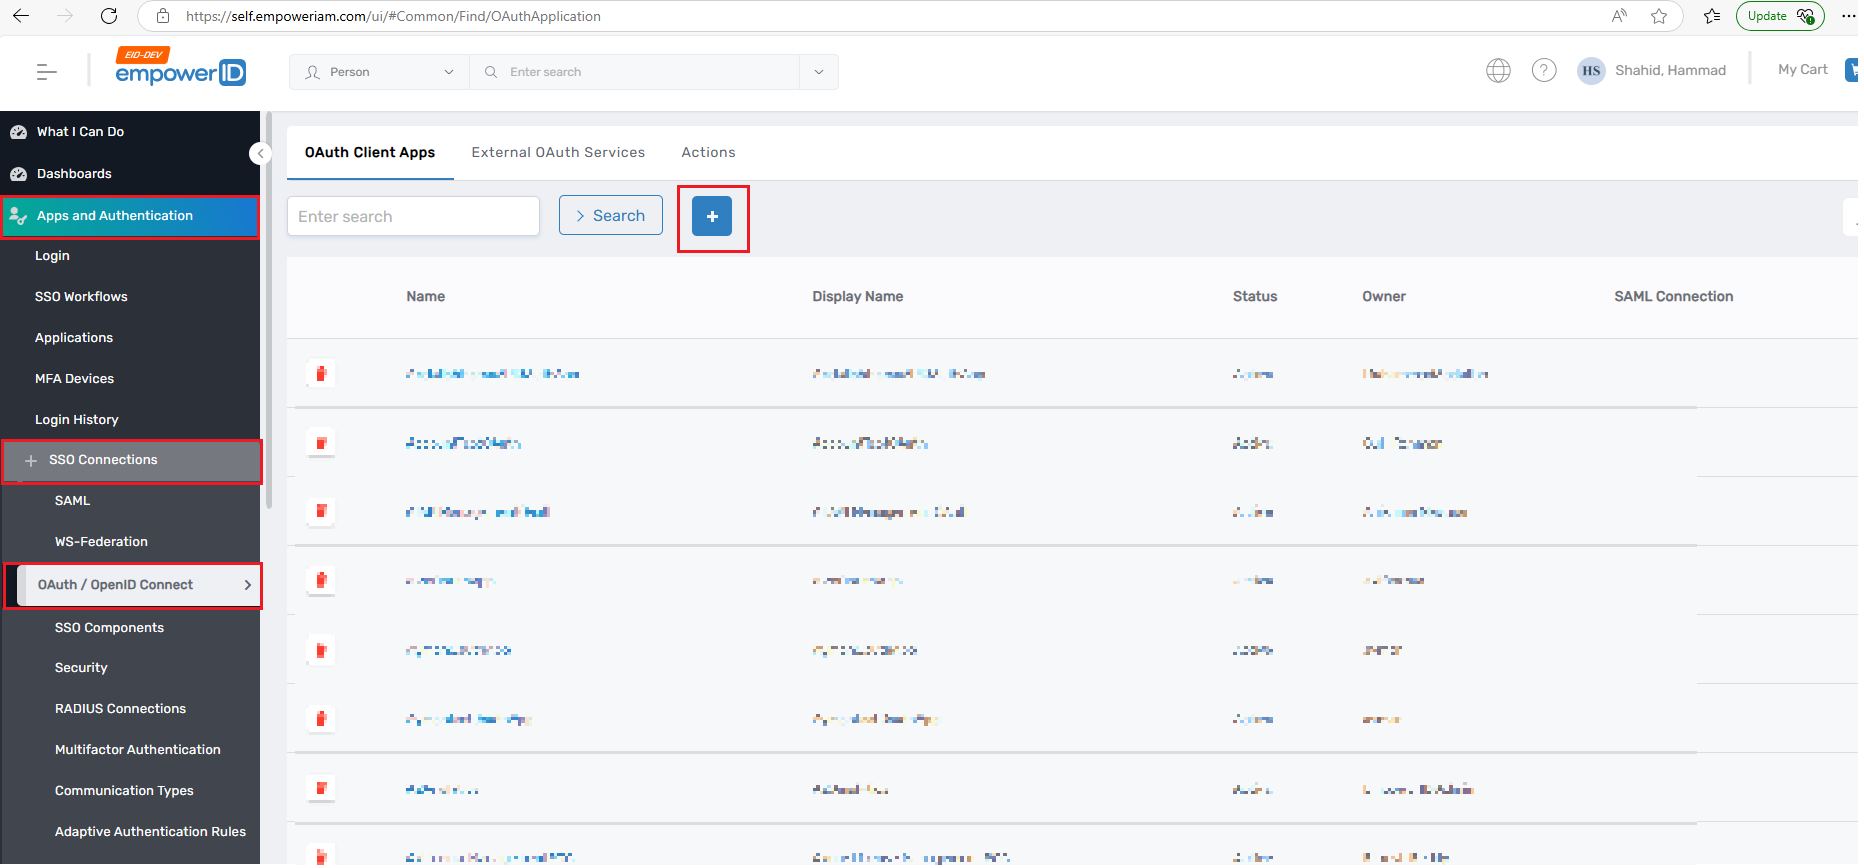
Before we create the API using workflow studio first create the Oauth Application by going to EmpowerID Web UI.
OAuth Client Apps
Before creating the API using Workflow Studio, first create the OAuth application by navigating to the EmpowerID Web UI.
-
Navigate to Apps and Authentication → SSO Connections → OAuth / OpenID Connect, and click the "+" button.
-
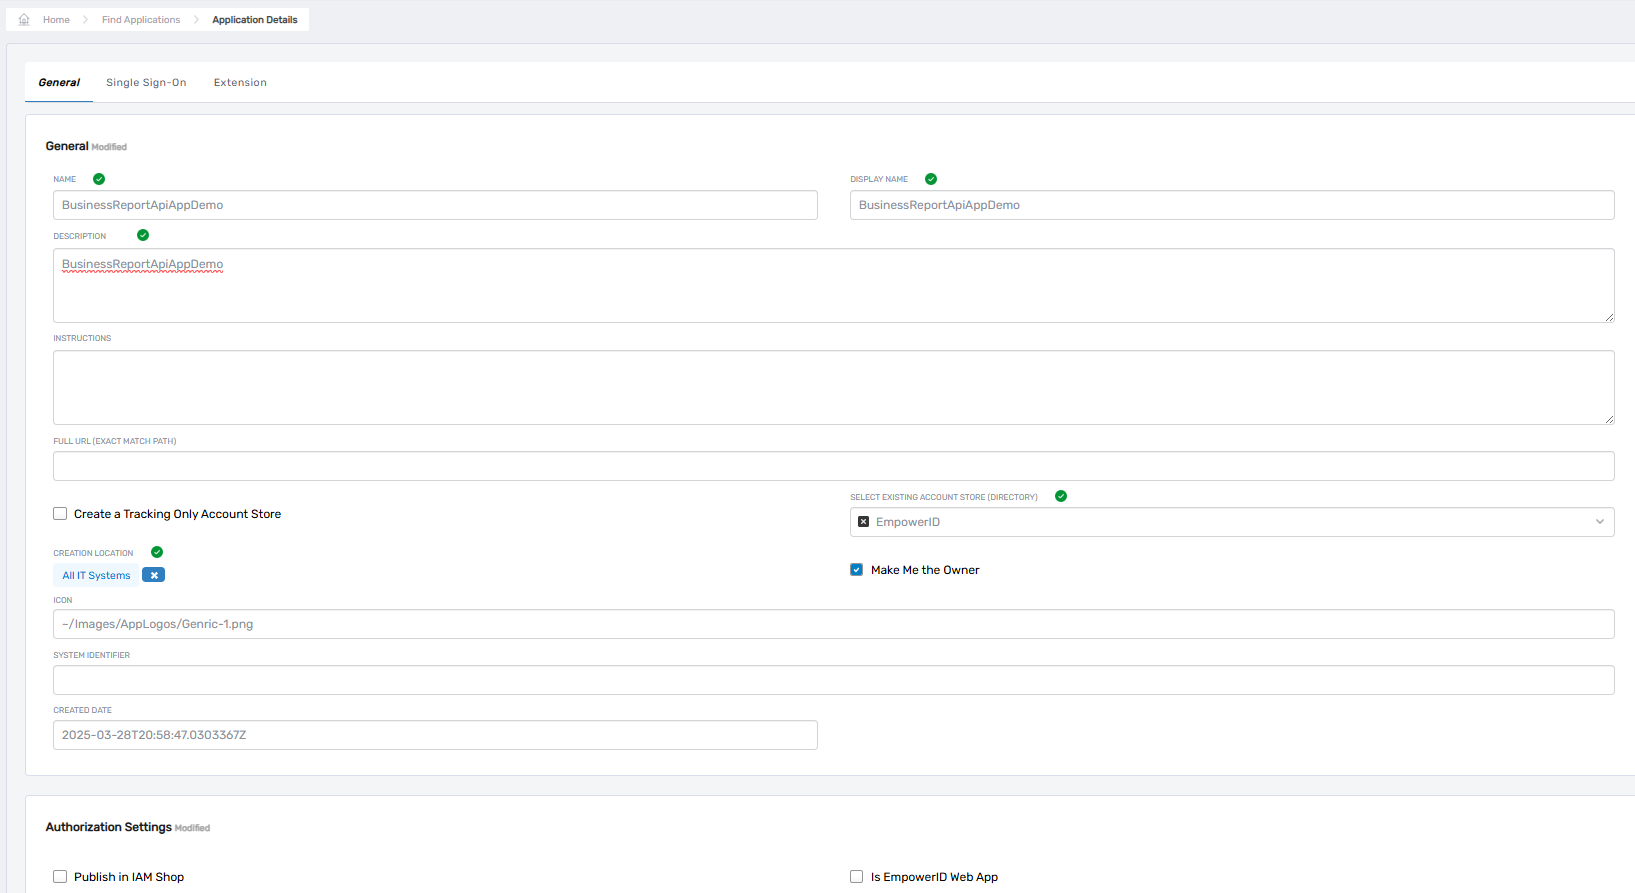
This will take you to the OAuth Provider Application page. Fill out the fields as shown below:
Name: BusinessReportApiAuthDemo
Display Name: BusinessReportApiAuthDemo
Description: BusinessReportApiAuthDemo
Application Type: Web Application
Certificate: CN=*.empowersso.com, OU=Domain Control Validated
-
Click on the Save button.

Application
-
Navigate to Apps and Authentication → Application, and click the Create Application button/link.
-
This will take you to the Application Details page. Fill out the fields as shown below:
General TabName: BusinessReportApiAppDemo
Display Name: BusinessReportApiAppDemo
Description: BusinessReportApiAppDemo
Publish in IAM Shop: Uncheck the checkbox
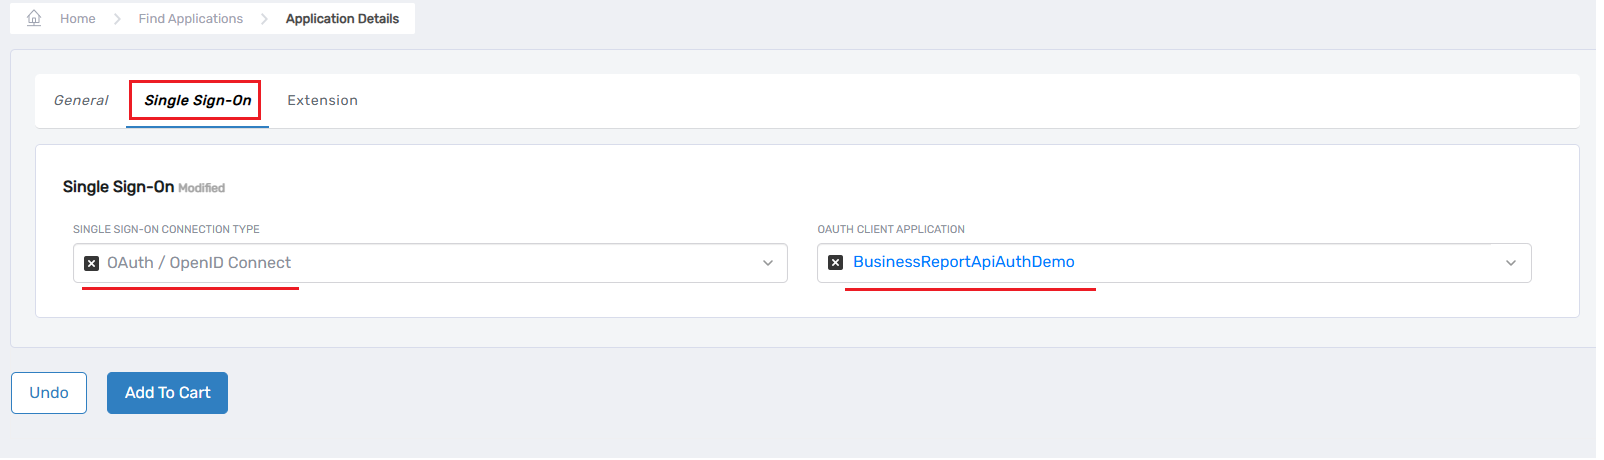
Single Sign-On TabSingle Sign-On Connection Type: OAuth / OpenID Connect
OAuth Client Application: BusinessReportApiAuthDemo
-
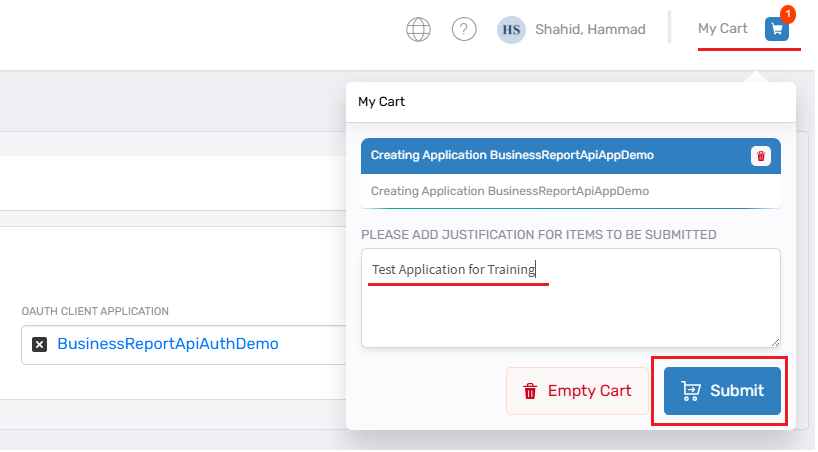
Click the cart icon in the top-right corner. In the description text box, enter any text, then click the Submit button.
Create EmpowerID API Project
-
Open EmpowerID Workflow Studio.
-
In Solution Explorer, right-click on the Developer Packages folder, create a new folder called DemoLabs, and click the Ok button.

-
Add New Folder dialog box will appear. From it, select the following options:
- APIs
- User Interface > Lookup Control
- User Interface > Forms
- User Interface > UI Pages
- Workflows > Applications
- And click the Ok button.

-
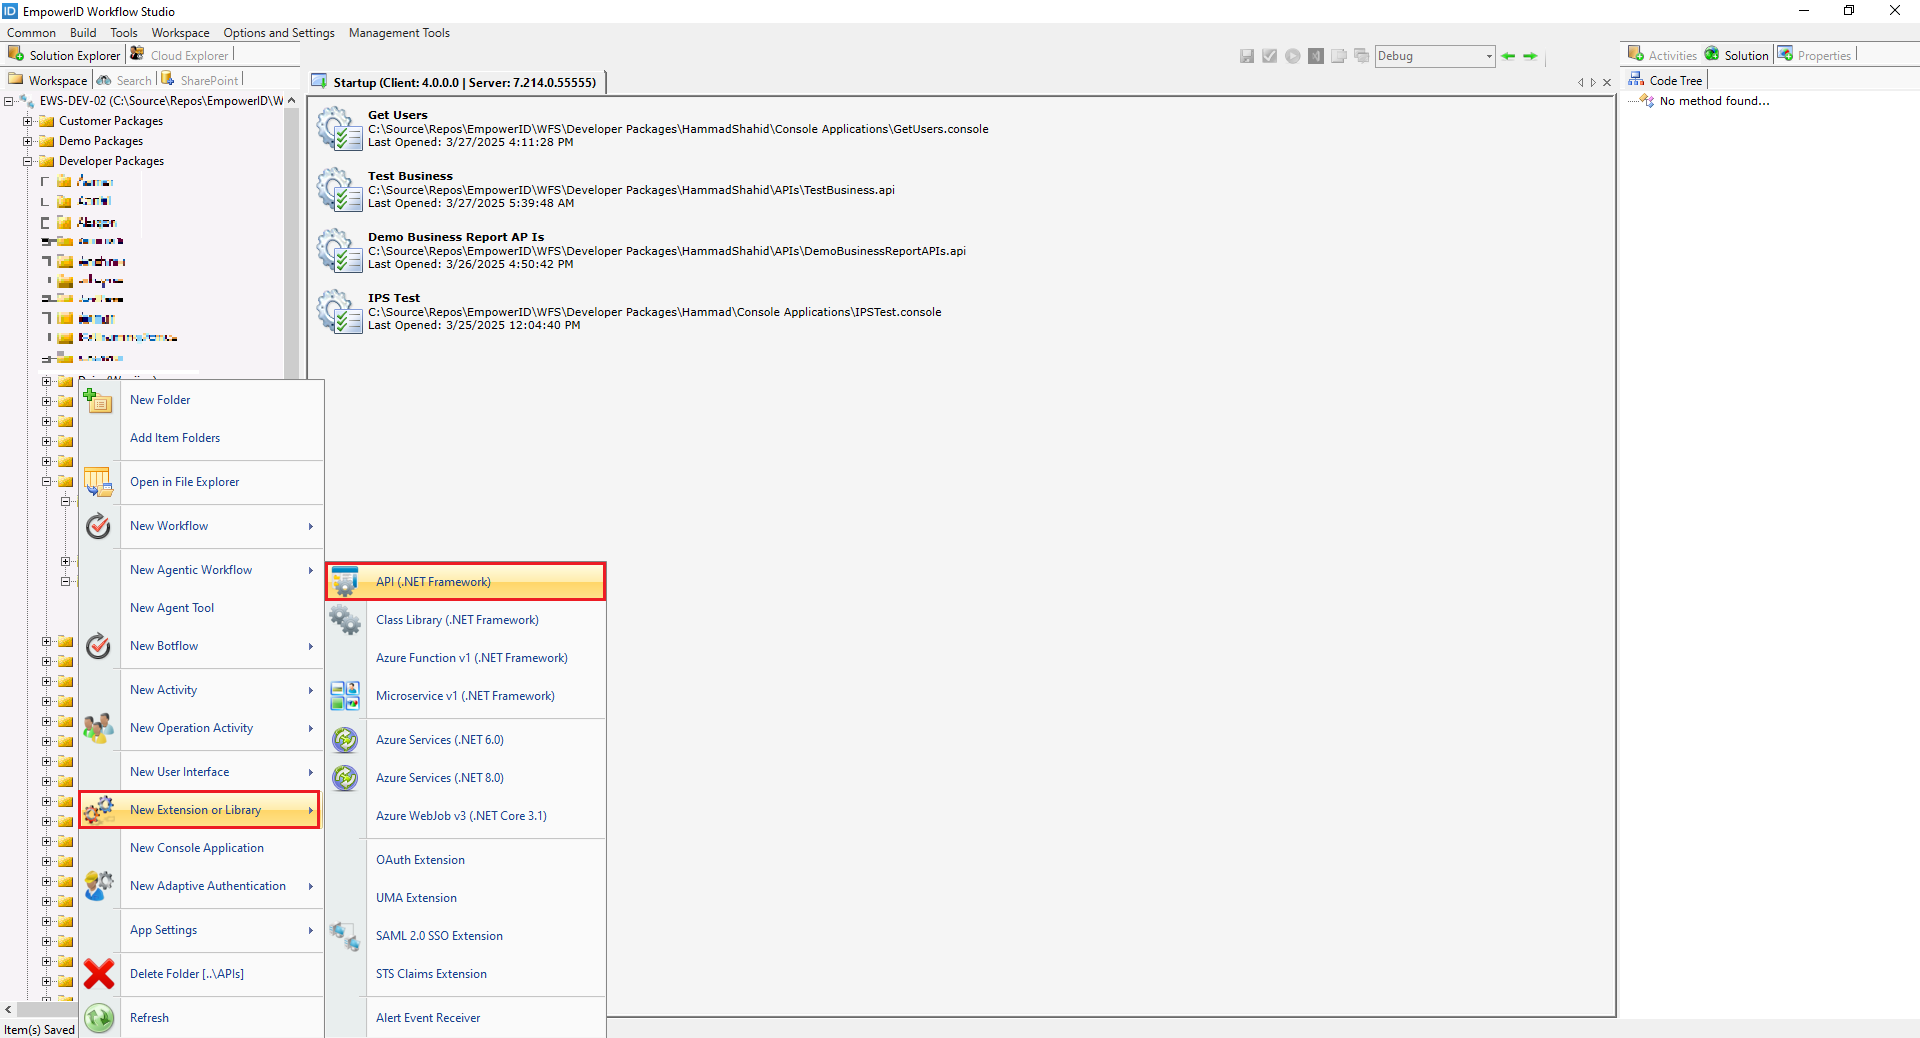
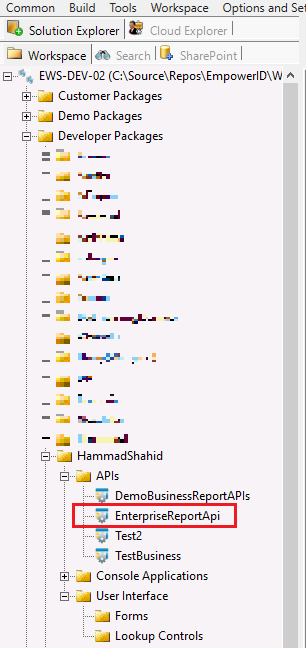
Expand the Developer Packages folder, find the DemoLabs folder, expand it, then under the DemoLabs folder, expand the APIs folder, right-click on the APIs folder, hover your mouse on the New Extension or Library option, and click on API (.NET Framework).
-
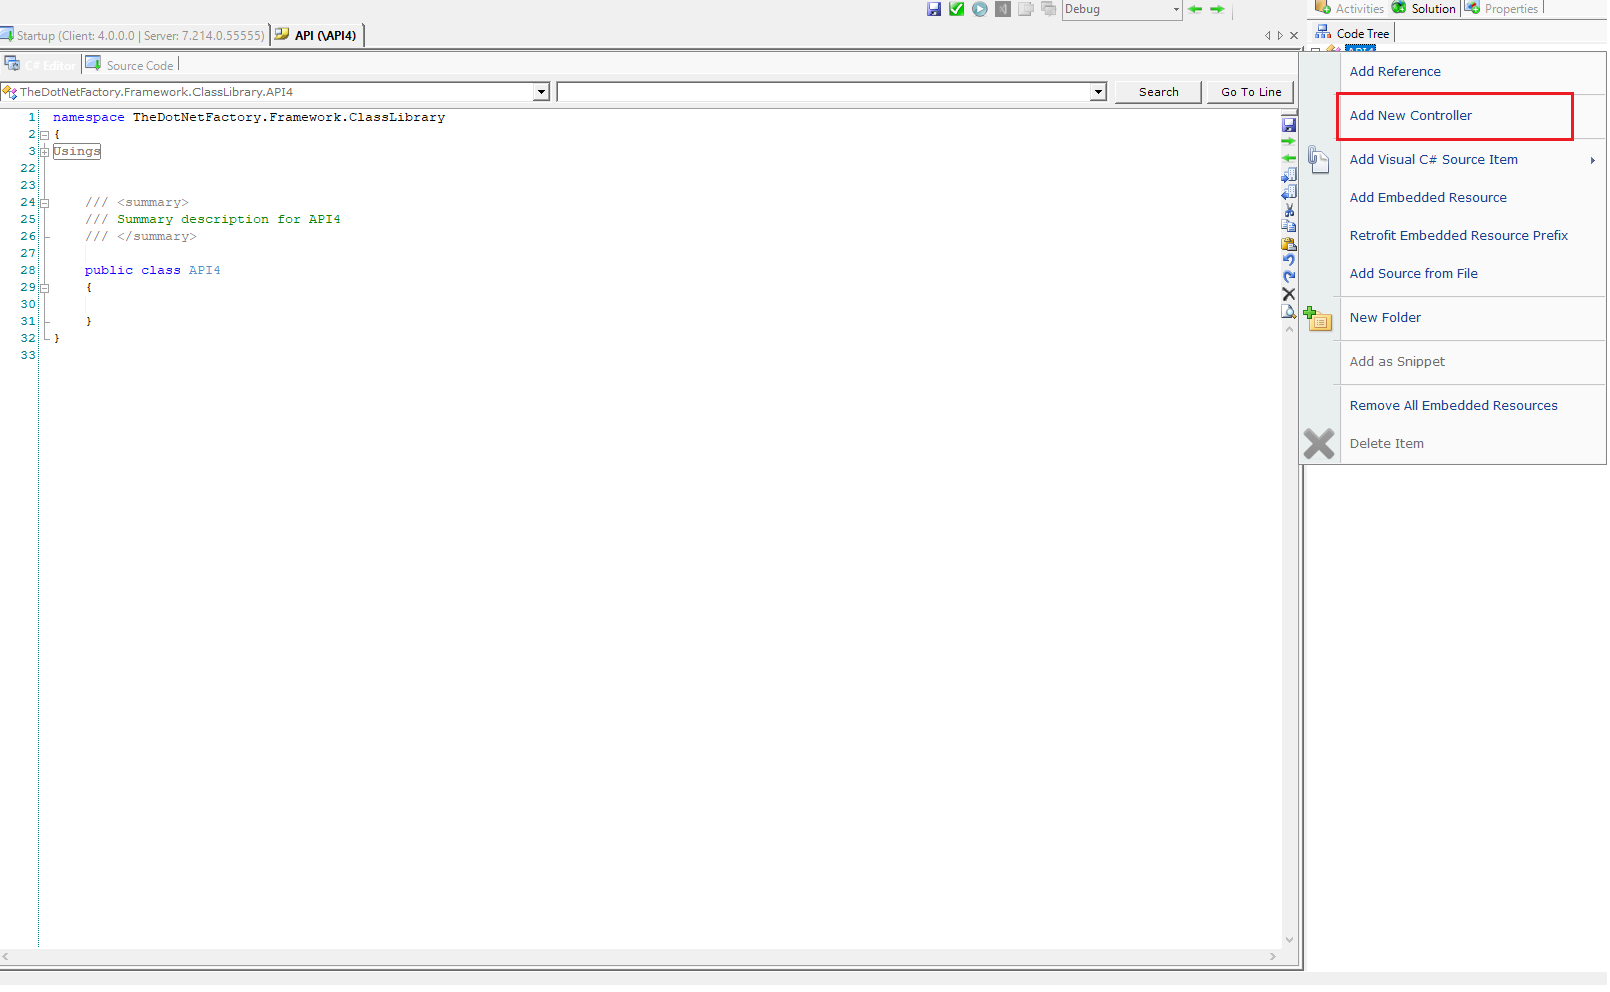
In your newly created API project in Workflow Studio, right-click on the project name or a relevant project name in the Solution tab.
-
Select Add New Controller option.
-
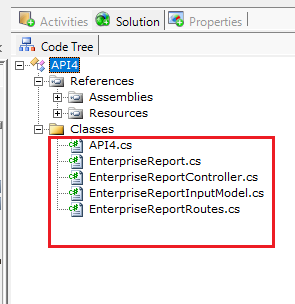
Give your controller a name that reflects its purpose (e.g., EnterpriseReport). Click "Ok". This will generate a template controller file (EnterpriseReportController.cs), a service class (EnterpriseReport.cs), and a model (EnterpriseReportInputModel).
-
Give your API project a suitable name (e.g., EnterpriseReportApi) and click "OK".

Here, we first created the API project, then added a controller and gave it a meaningful name. After adding the controller, we saved the API project.
This approach differs from the practice we follow for Lookups, Forms, Page Designer, and Workflows, where we typically save the item first and then start working on it.
-
Save all the changes in Workflow Studio. Close the project in Workflow Studio and open the corresponding Visual Studio project for the next steps.
-
To open it in Visual Studio, simply double-click on the EnterpriseReportApi in Workflow Studio.
-
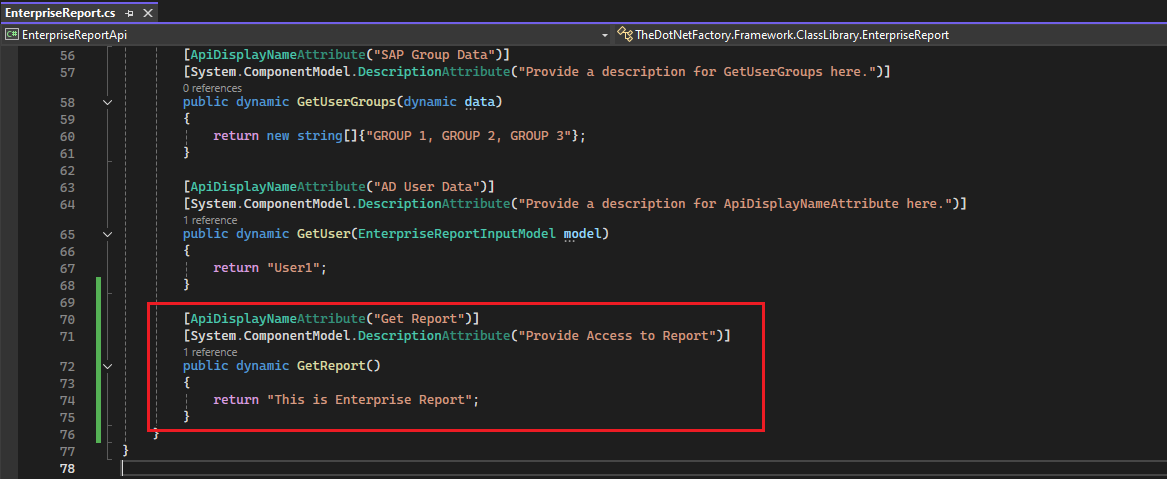
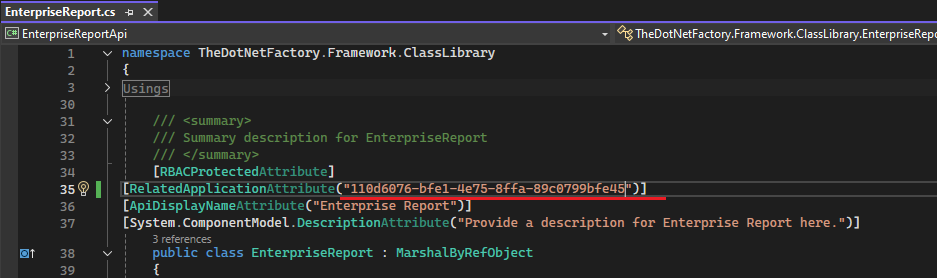
Open the generated service class file (EnterpriseReport.cs).
-
Implement the method to return the desired data. In this simple example, it returns a static string.
[ApiDisplayNameAttribute("Get Report")]
[System.ComponentModel.DescriptionAttribute("Provide Access to Report")]
public dynamic GetReport()
{
    return "This is Enterprise Report";
}
-
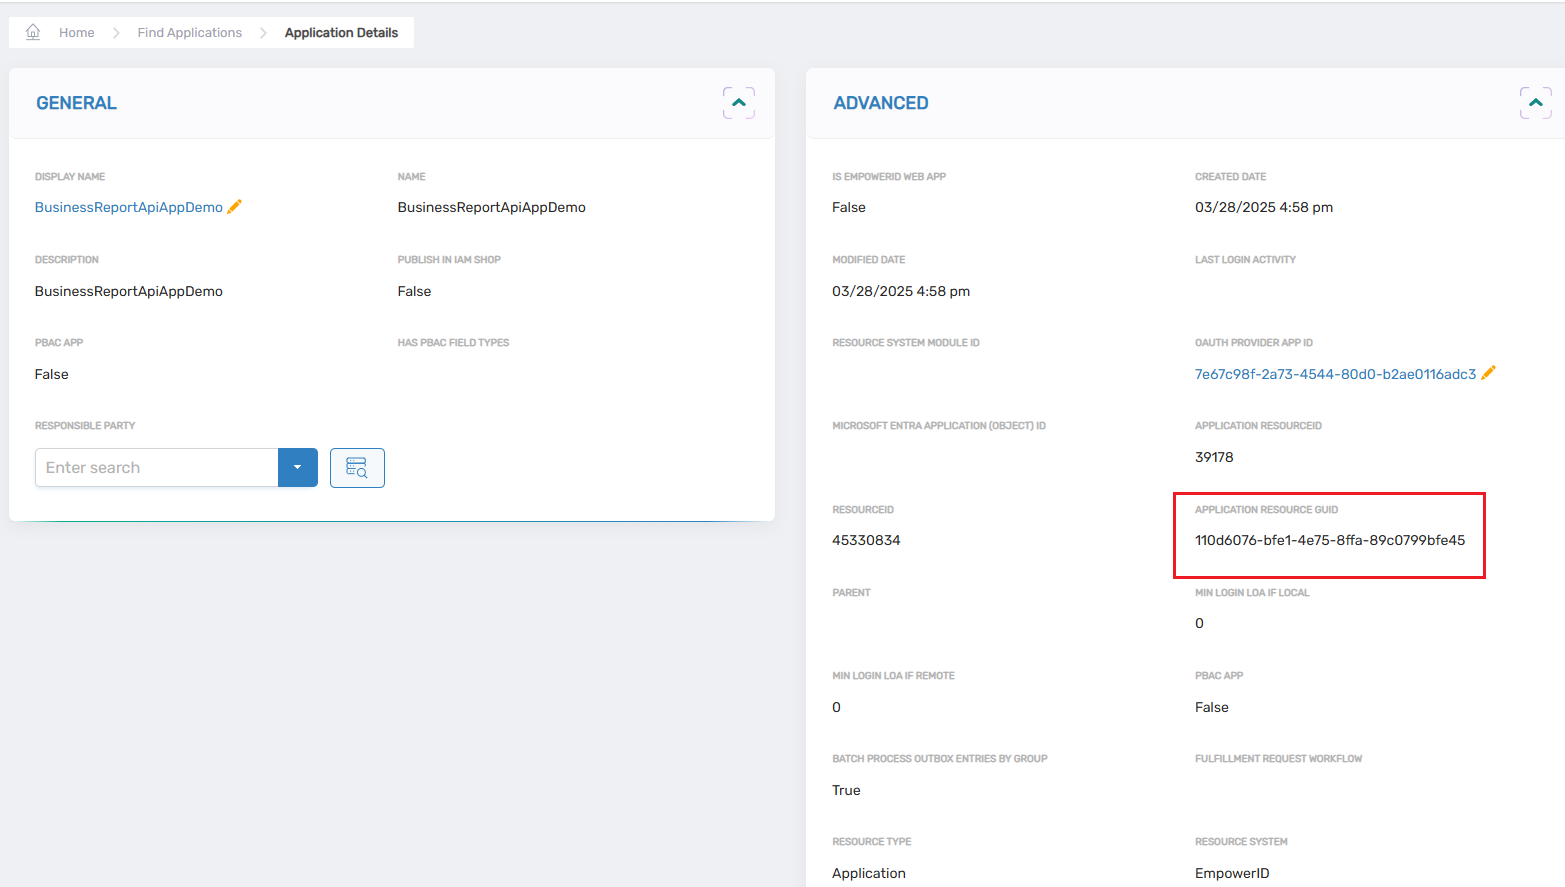
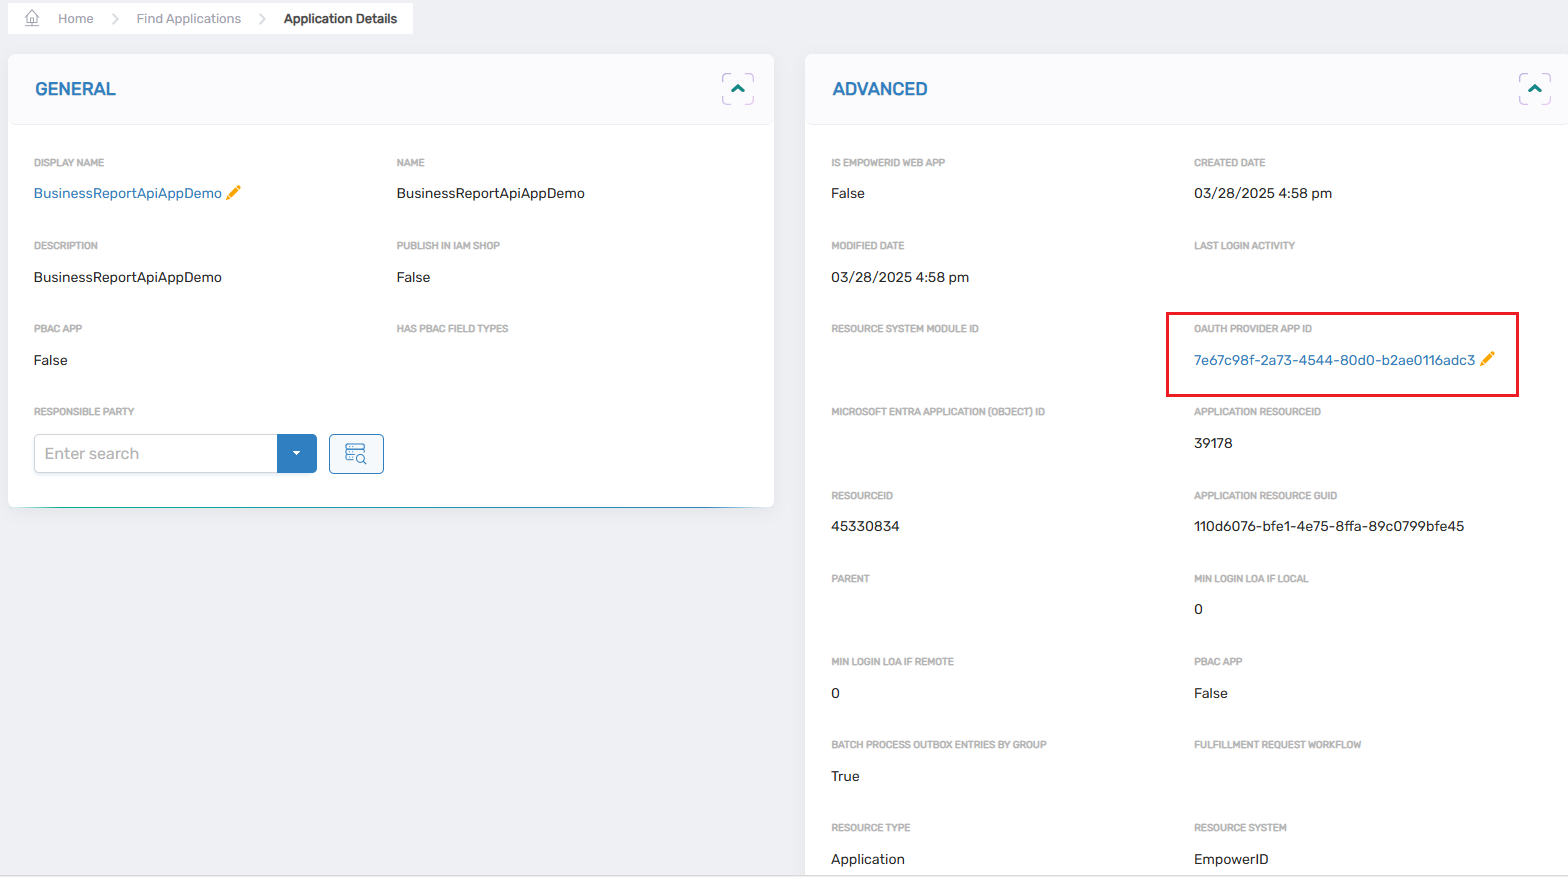
Obtain the Application Resource GUID of an existing application from the EmpowerID web interface Apps and Authentication -> Applications -> select an application(BusinessReportApiAppDemo) Expland the Advanced section Note down Application Resource GUID.
-
Replace the default GUID in your API project with the GUID of your chosen Application. This associates your API with the security context of that application.
-
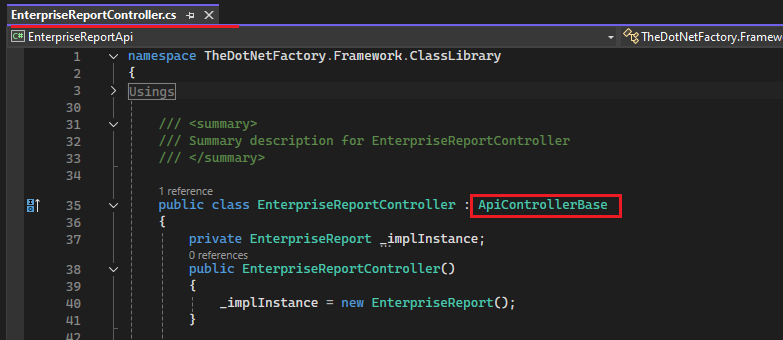
Open the generated controller file (EnterpriseReportController.cs).
-
Ensure that your controller class inherits from ApiControllerBase
-
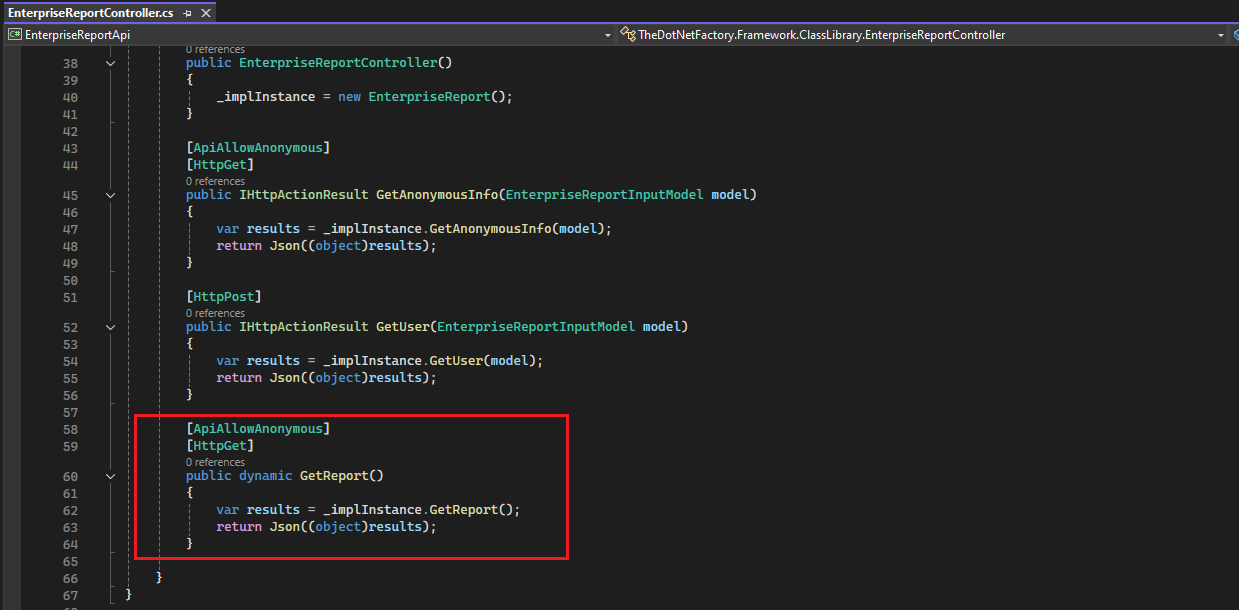
Add a new action method to handle the GET request. Decorate it with the [HttpGet] attribute and give it a descriptive name (e.g., GetReport)
[ApiAllowAnonymous]
[HttpGet]
public dynamic GetReport()
{
    var results = _implInstance.GetReport();
    return Json((object)results);
}
-
Build your API project in Visual Studio. This will trigger a post-build event that generates the metadata file required for publishing. You can find this metadata file (a JSON file) in the publish items folder of your project.
Publish the API to EmpowerID:
-
Log in to the EmpowerID web interface.
-
Navigate to Low Code/No Code Worklows --> Low Code Workflows.
-
Look for an option like Publish Workflow Studio Item.
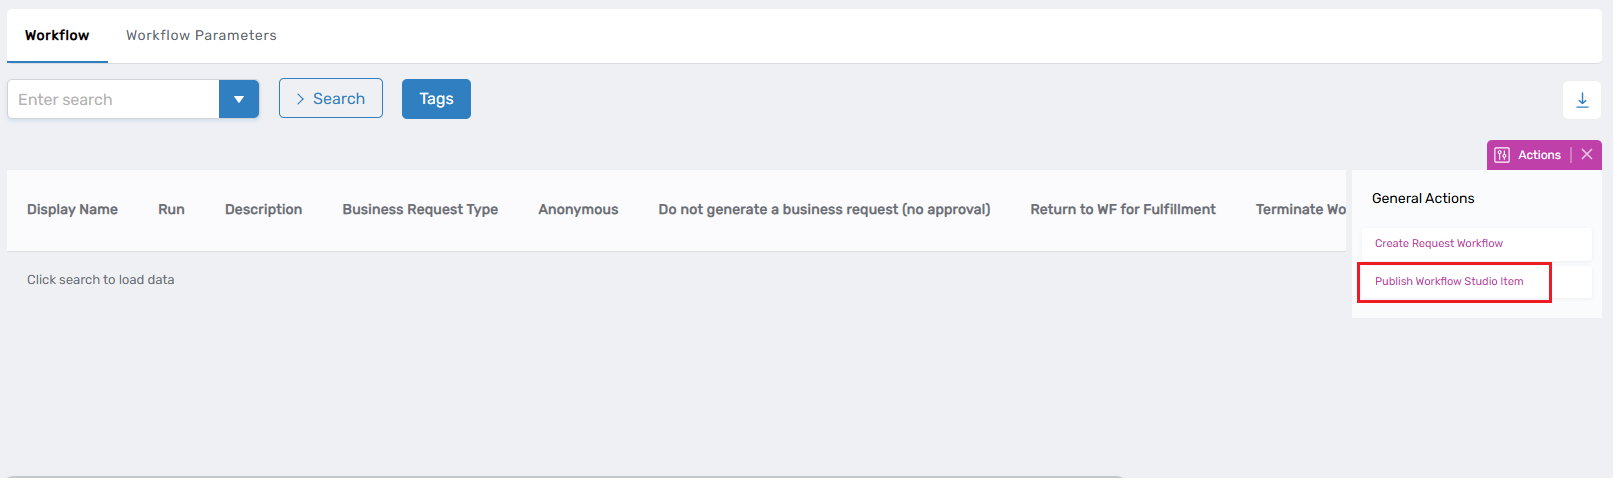
-
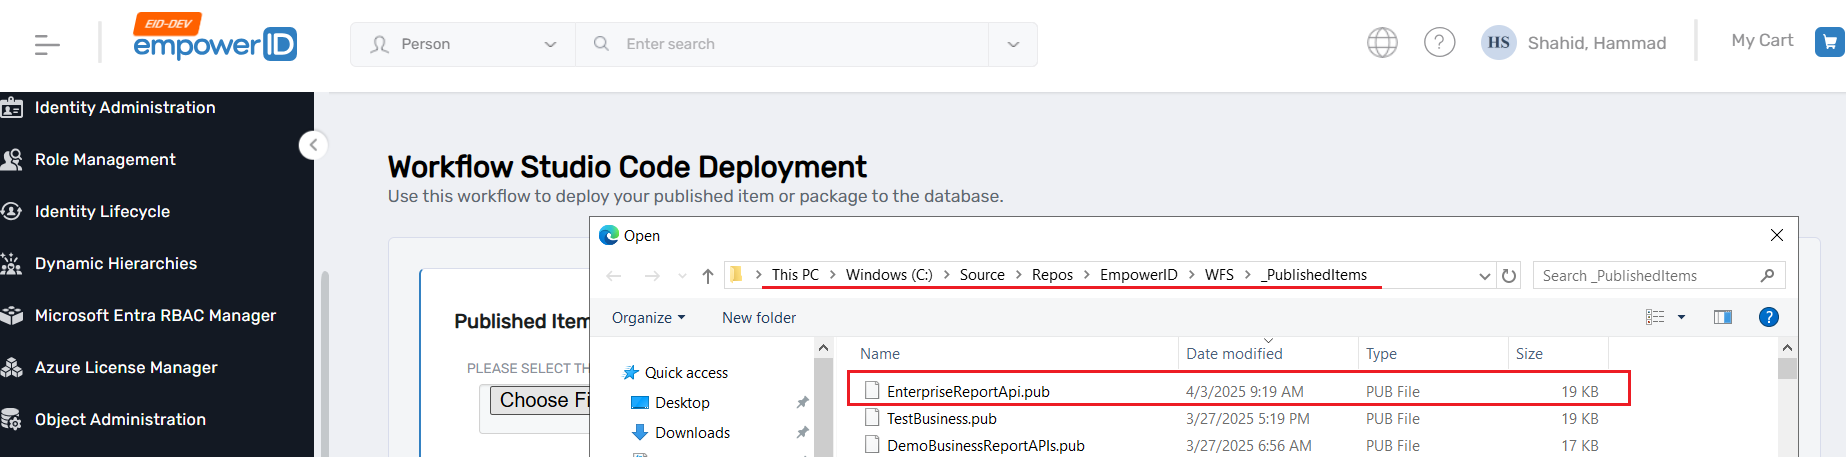
Select this workflow and browse to the metadata file generated in the publish items folder of your API project.
-
Submit the workflow to publish your API.
infoAlso, verify that the DLL created in the bin folder of your API project has been moved to the EmpowerID.Web.Api folder. If it has not been moved automatically, copy the DLL manually from your API project's bin folder and place it in the EmpowerID.Web.Api folder.

API project's bin folder 
EmpowerID.Web.Api
Verify the Published API:
-
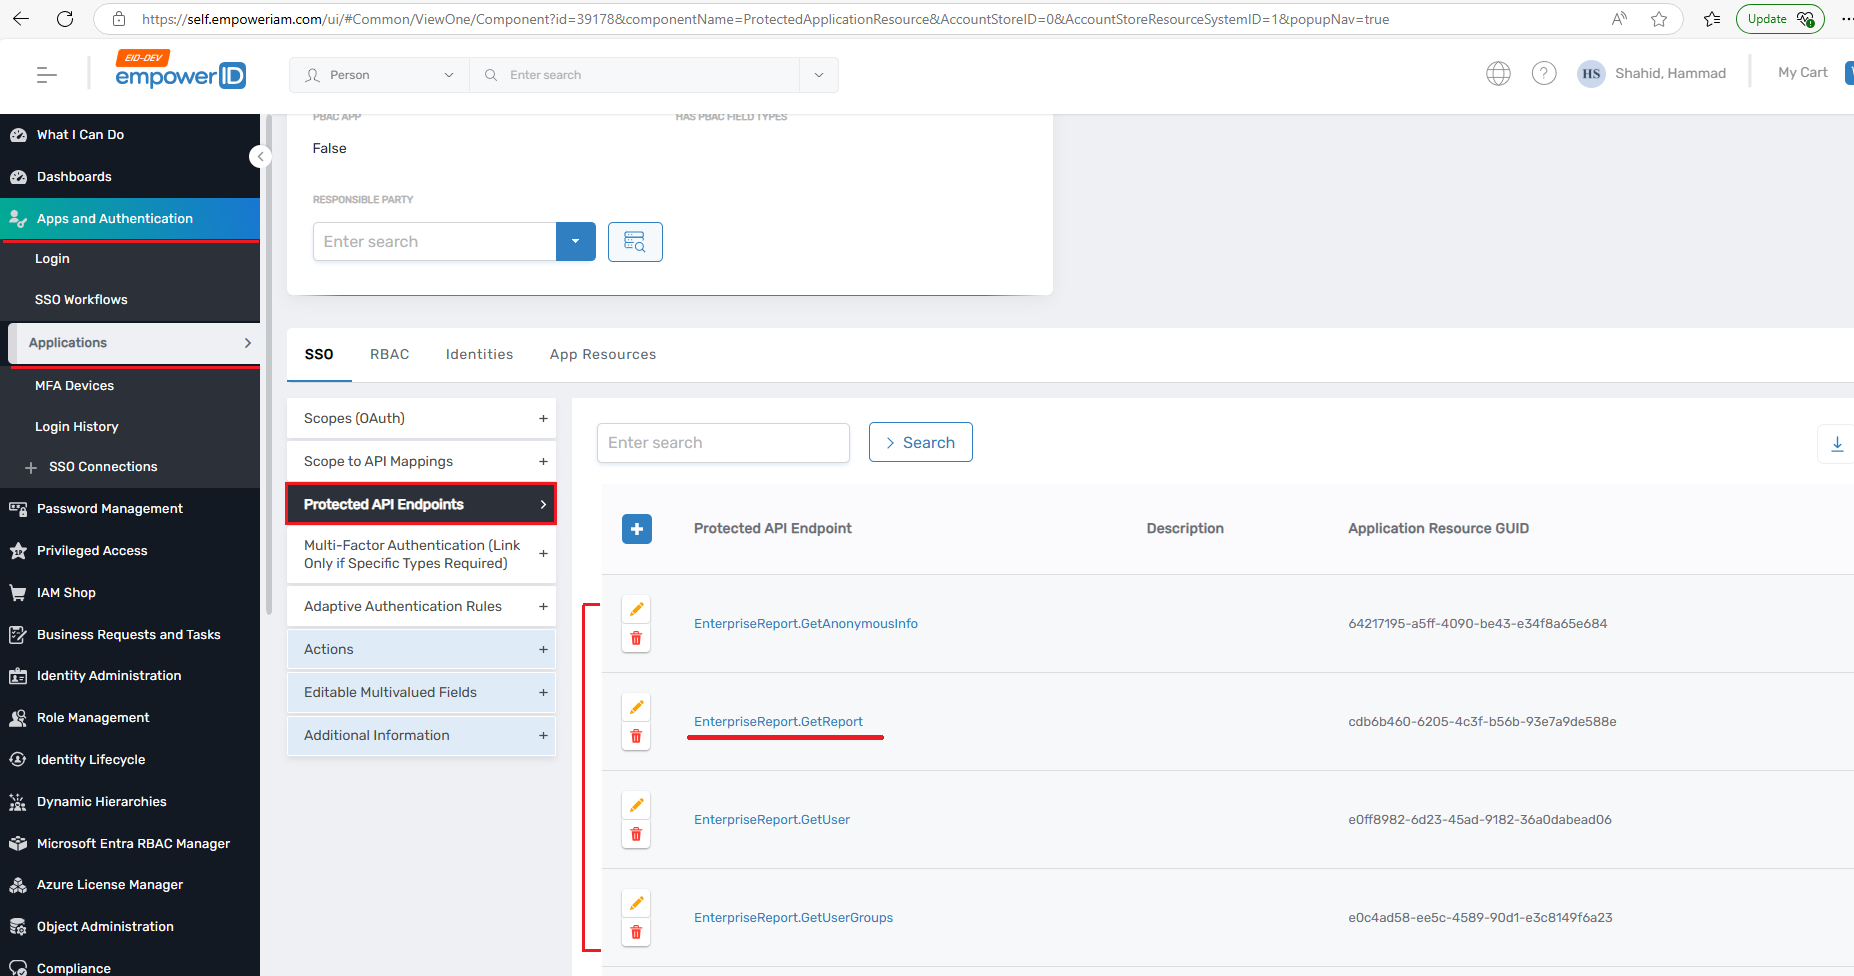
Navigate to Apps and Authentication -> Applications and Application in the EmpowerID web interface.
-
Find the application (BusinessReportApiAppDemo) associated with your API.
-
Go to the Protected API Endpoints section. You should see your newly created API endpoint listed (e.g., EnterpriseReport.GetReport).
Test the API (using Postman as an example):
-
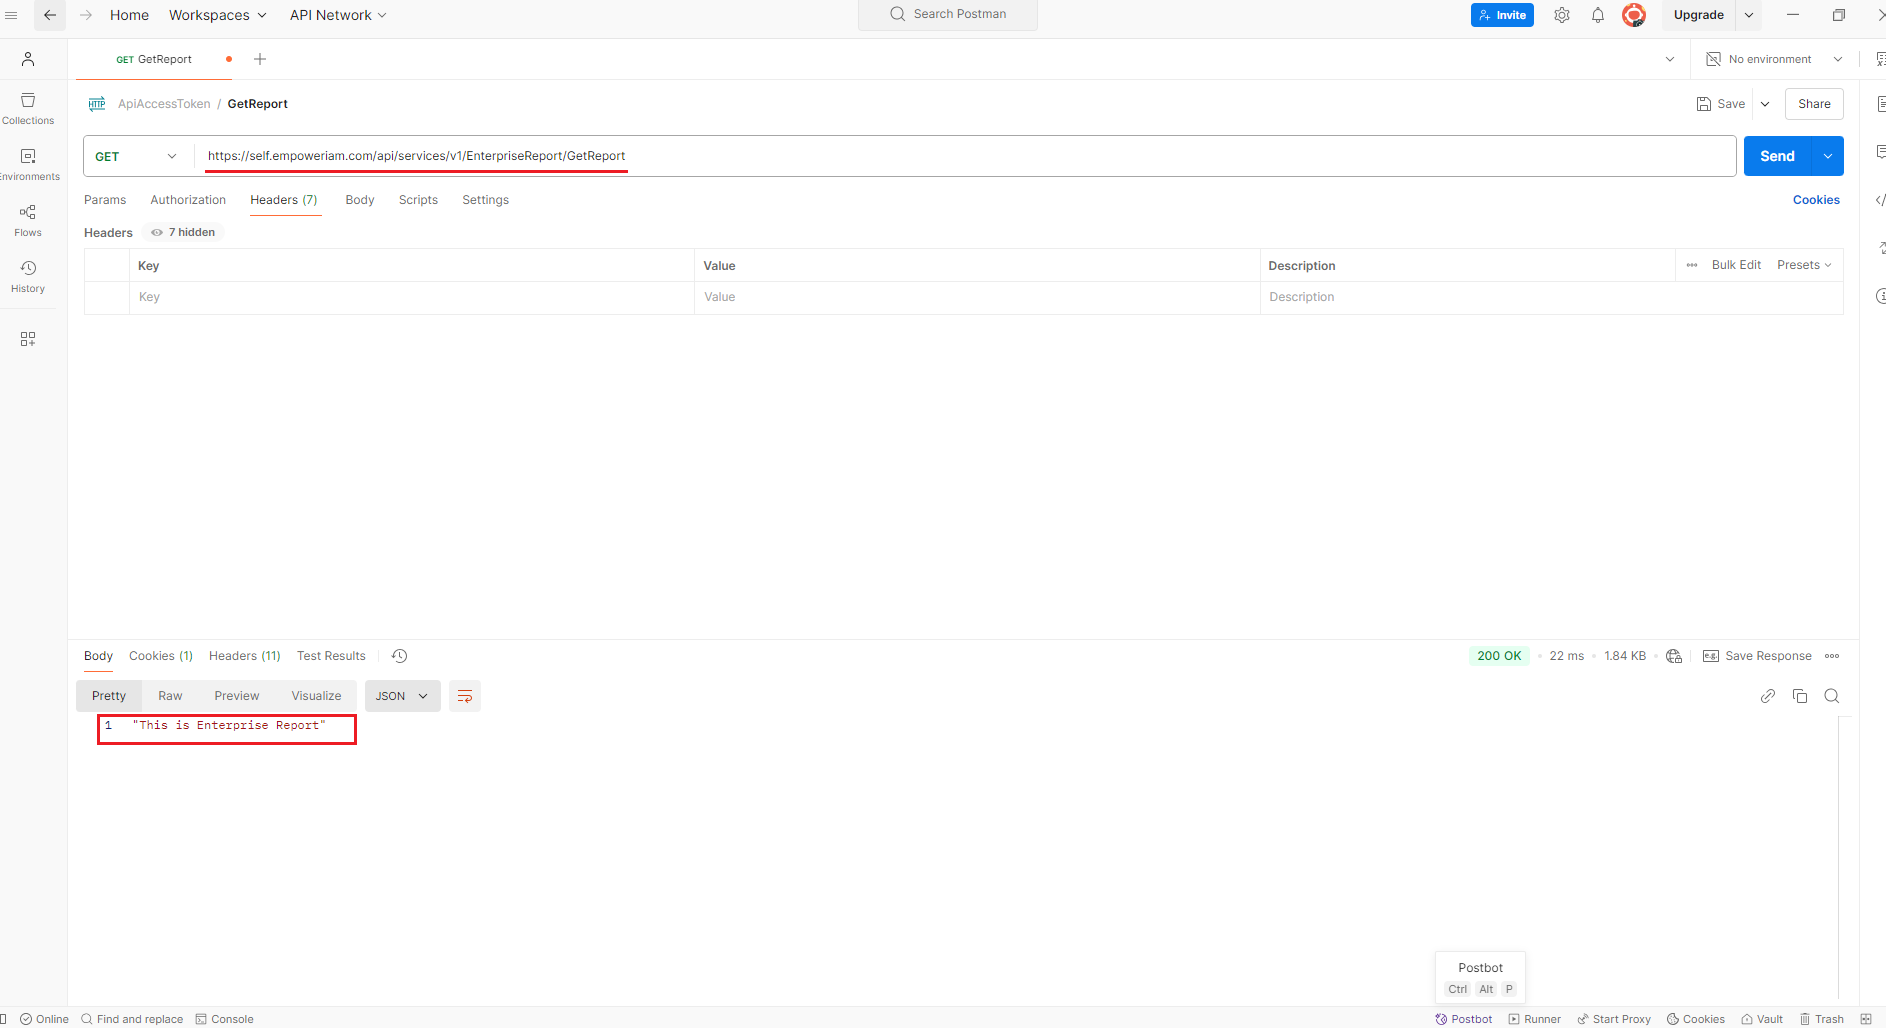
Open Postman.
-
Construct the API endpoint URL. Following the default route, it would be something like: HTTPS://[YourEmpowerIDURL]/api/Services/V1/EnterpriseReport/GetReport. Remember that [YourEmpowerIDURL] will be the base URL of your EmpowerID environment.
noteIn my case, the URL looks like this: https://self.empoweriam.com/api/services/v1/EnterpriseReport/GetReport
-
Since our GetReport endpoint is currently not protected (we have added [ApiAllowAnonymous]), you will see the result.
Let's Implement the second part of the lab
-
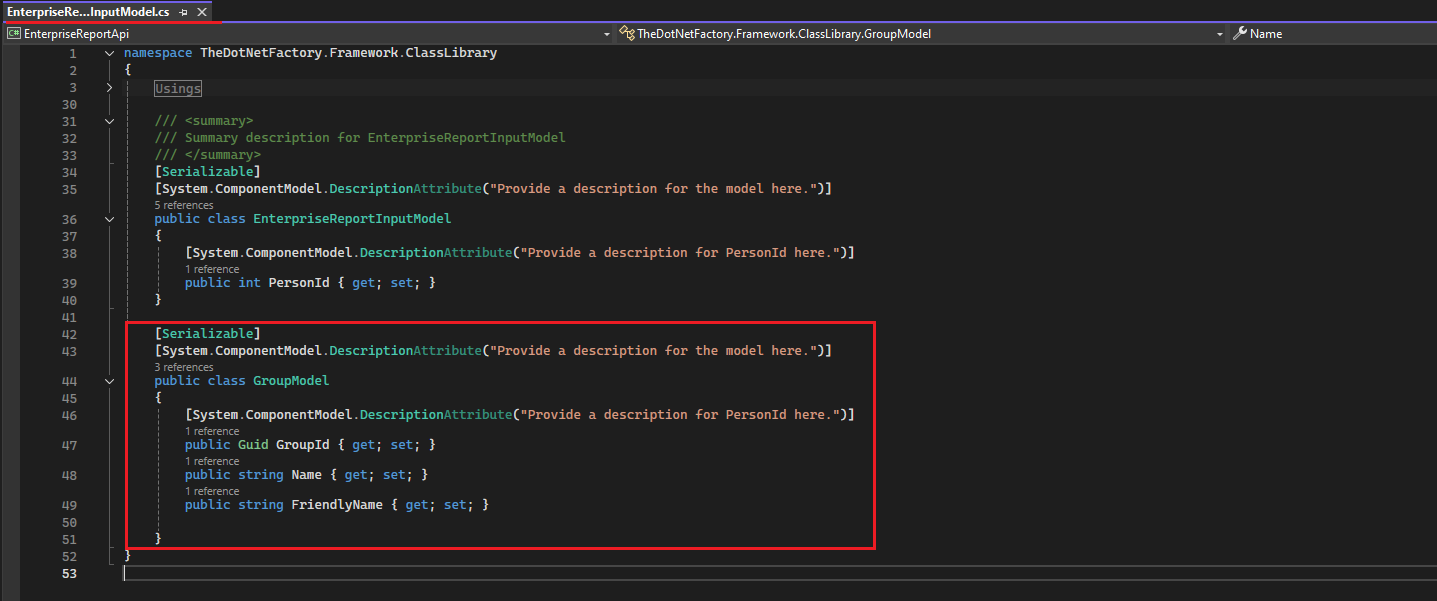
Open the model class (e.g., EnterpriseReportInputModel.cs) and add the following code:
    [Serializable]
    [System.ComponentModel.DescriptionAttribute("Provide a description for the model here.")]
    public class GroupModel
    {
        [System.ComponentModel.DescriptionAttribute("Provide a description for PersonId here.")]
        public Guid GroupId { get; set; }
        public string Name { get; set; }
        public string FriendlyName { get; set; }

    }
-
Next, open the service class (e.g., EnterpriseReport.cs) and add the following code:
    [ApiDisplayNameAttribute("Load User Groups")]
    [System.ComponentModel.Description("Returns a list of groups that the specified person belongs to.")]
    public dynamic LoadUserGroups(EnterpriseReportInputModel model)
    {
        List<GroupModel> groups = new List<GroupModel>();
        var list = Group.GetByPersonID(model.PersonId);

        foreach (Group p in list)
        {
            groups.Add(new GroupModel { GroupId = p.GroupGUID, Name = p.Name, FriendlyName = p.FriendlyName });
        }
        return groups;
    }
-
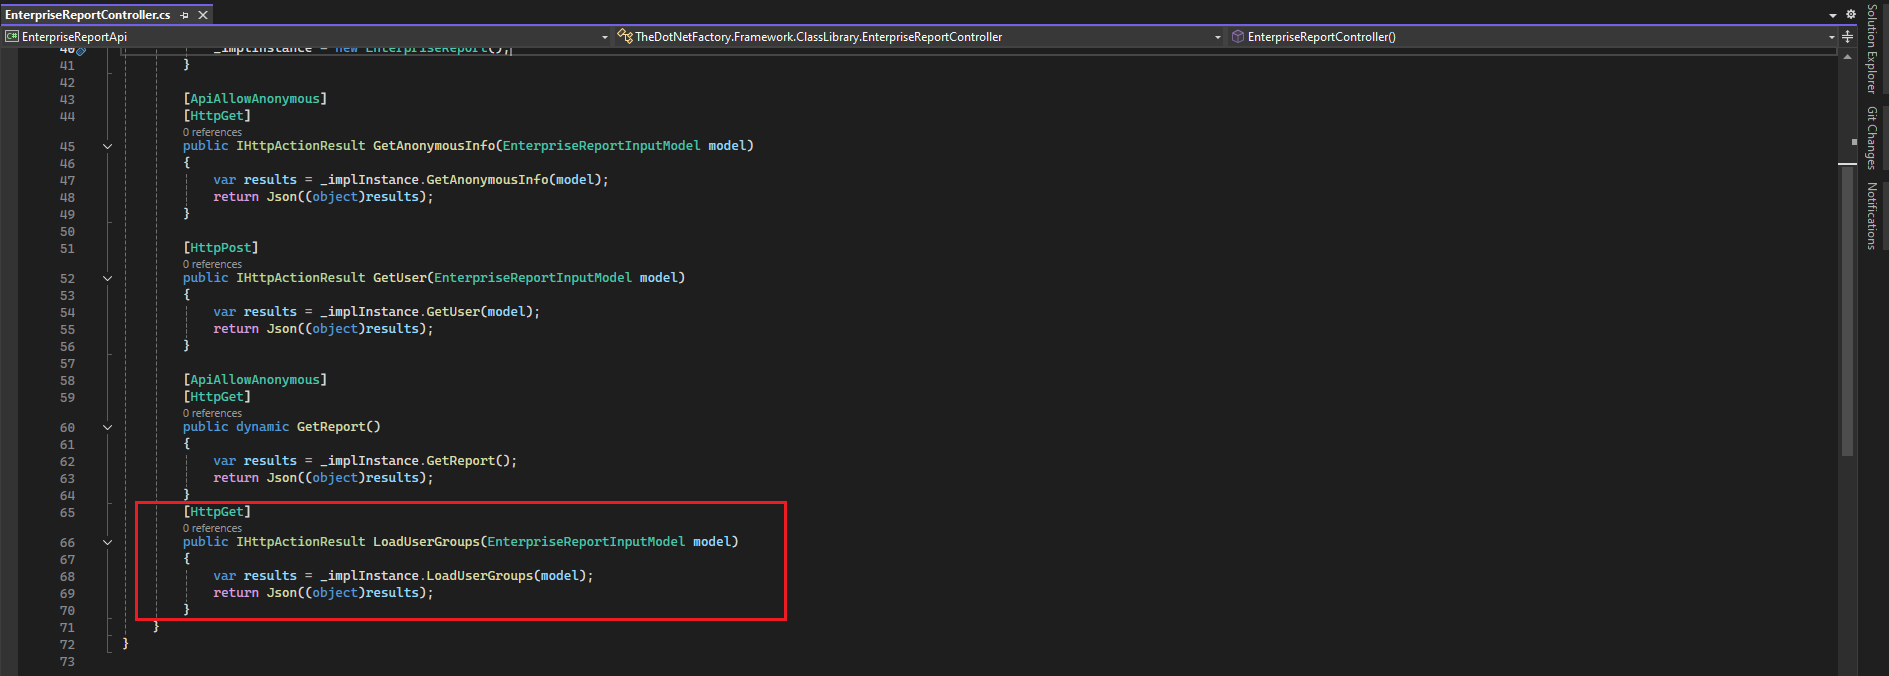
Finally, open the controller class (e.g., EnterpriseReportController.cs) and add the following code:
    [HttpGet]
    public IHttpActionResult LoadUserGroups(EnterpriseReportInputModel model)
    {
        var results = _implInstance.LoadUserGroups(model);
        return Json((object)results);
    }
-
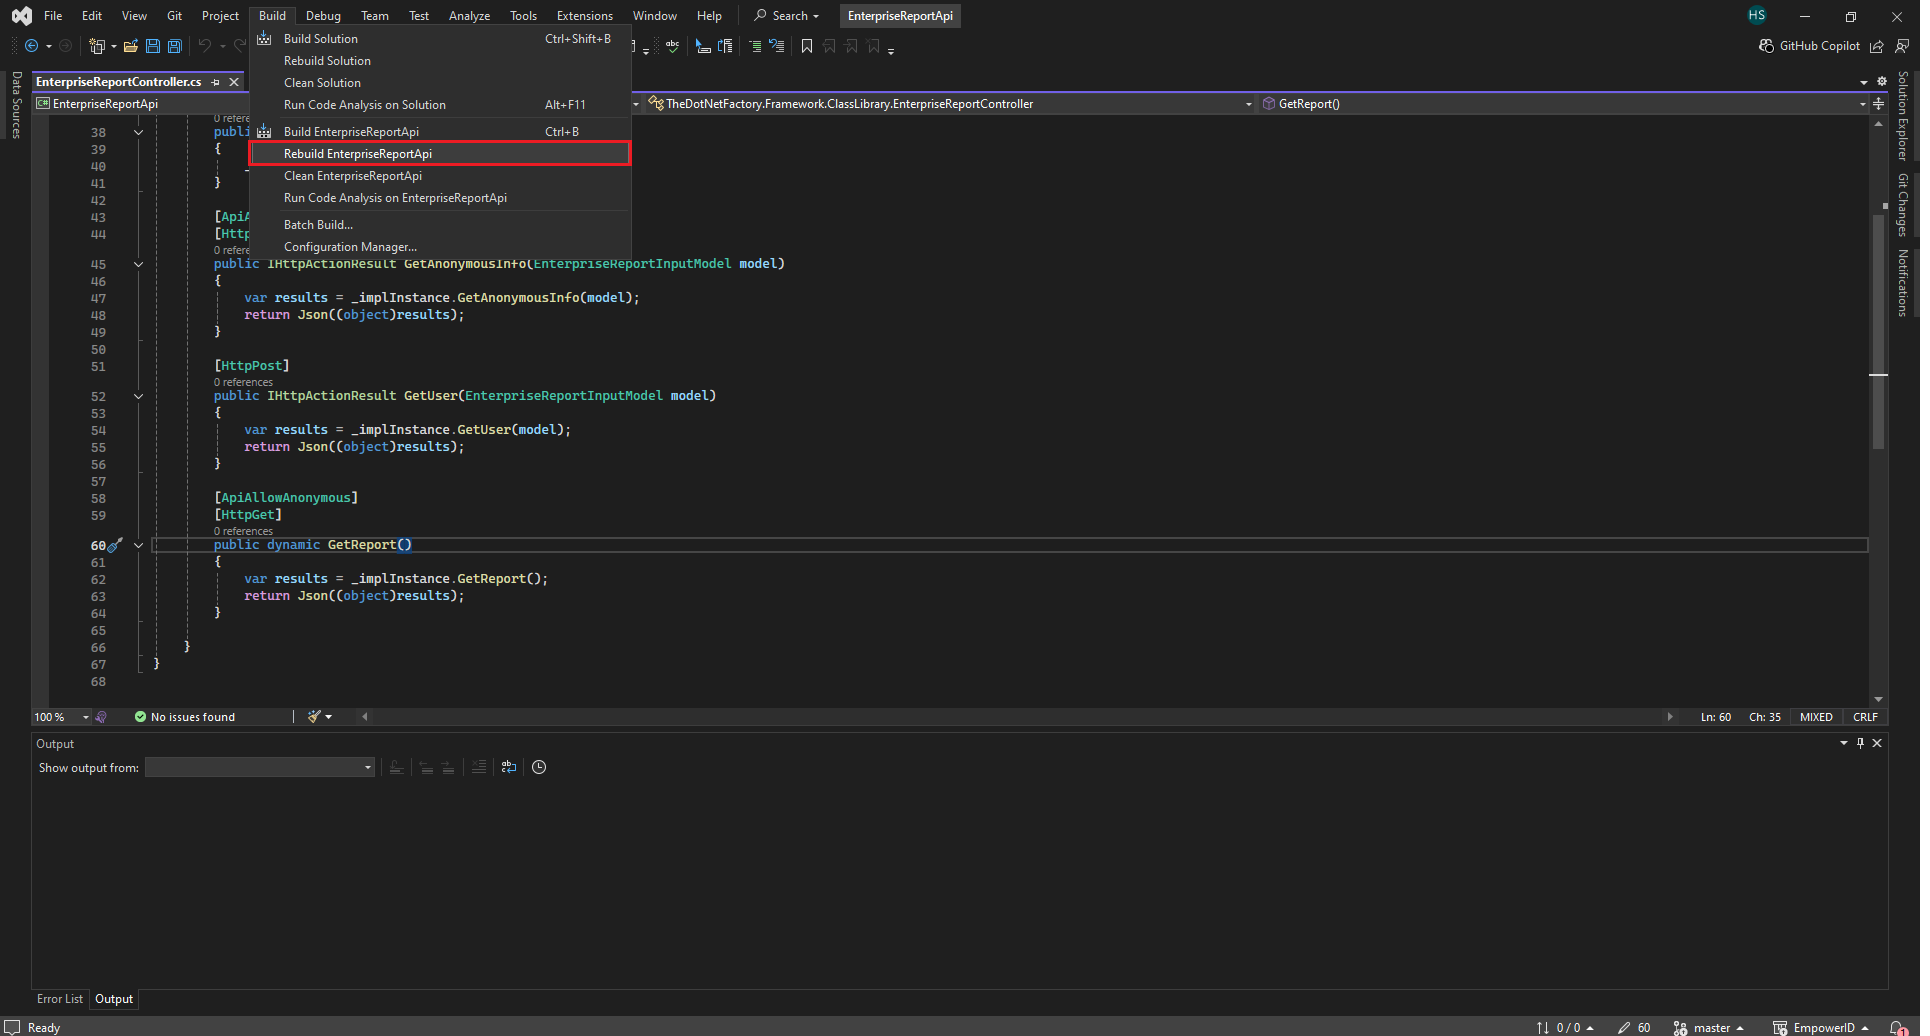
Go to the Build menu and click on Rebuild EnterpriseReportApi.
-
Manually move the DLL to the EmpowerID.Web.Api folder if it hasn’t already been moved.
noteIn my case I moved it from this path:
C:\Source\Repos\EmpowerID\WFS\Developer Packages\HammadShahid\APIs\EnterpriseReportApi_vsln\bin\DebugTo
this path: C:\Source\Repos\EmpowerID\Root\Api\EmpowerID.Api\EmpowerID.Web.Api\bin
Test Second part of the Lab
-
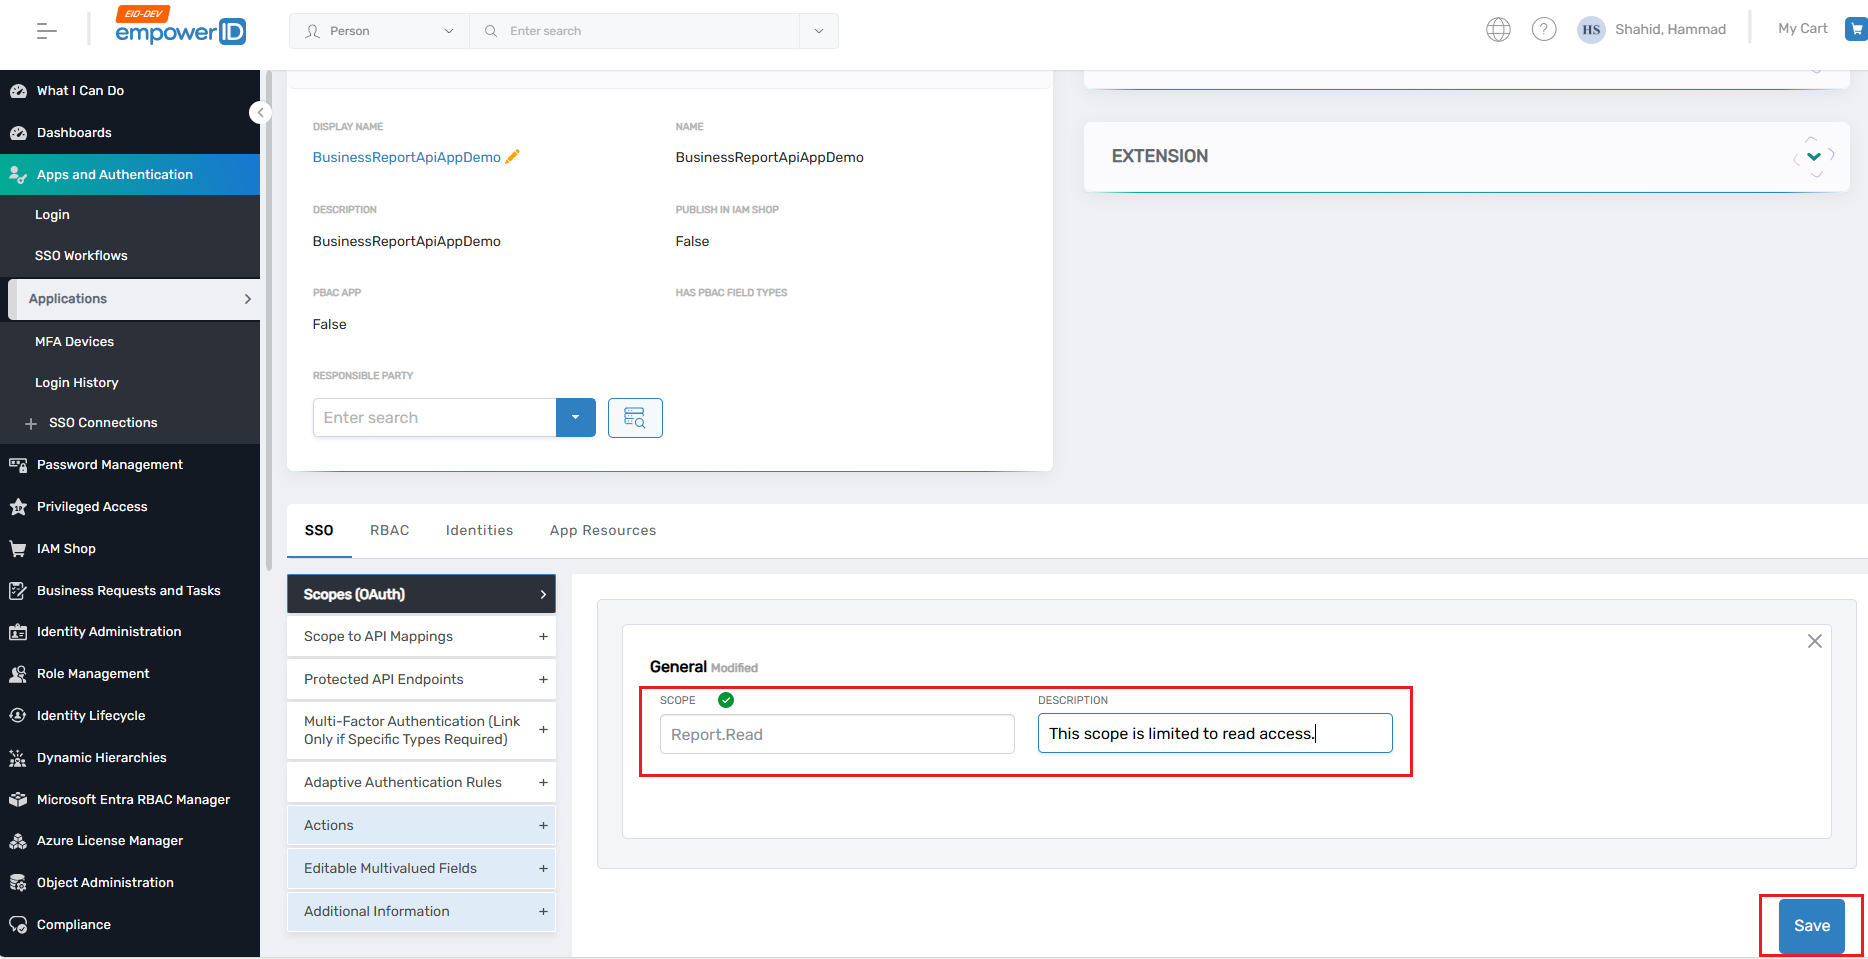
Go to your application named BusinessReportApiAppDemo, scroll down, ensure that the Scopes (OAuth) tab is selected, and then click on the + button to add a new scope.
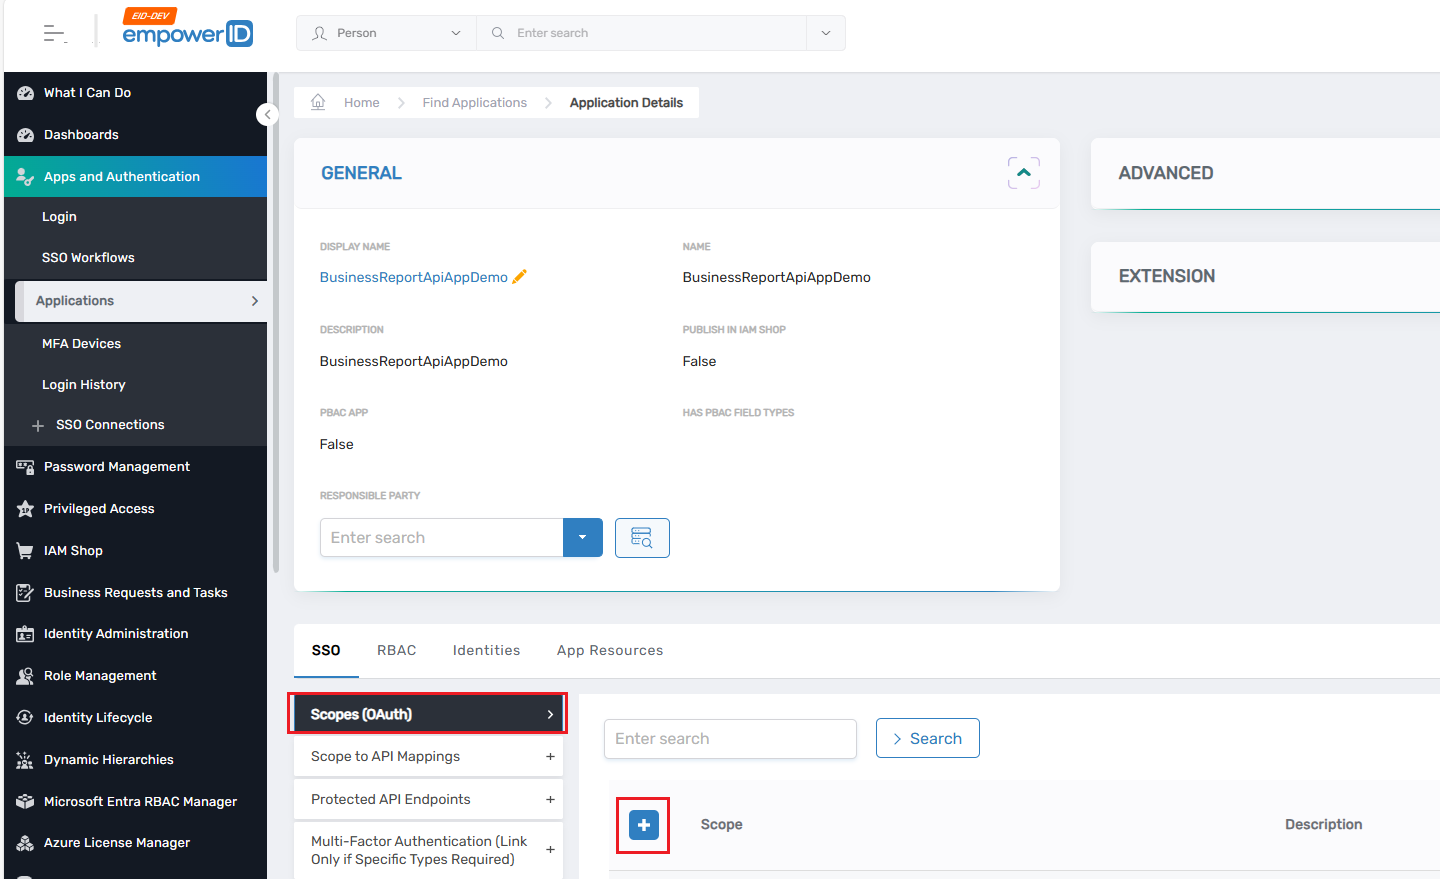
-
Give your scope the name Report.Read, enter any description you prefer, and click the Save button. Once saved, you will see the scope listed under the Scopes (OAuth) tab.
-
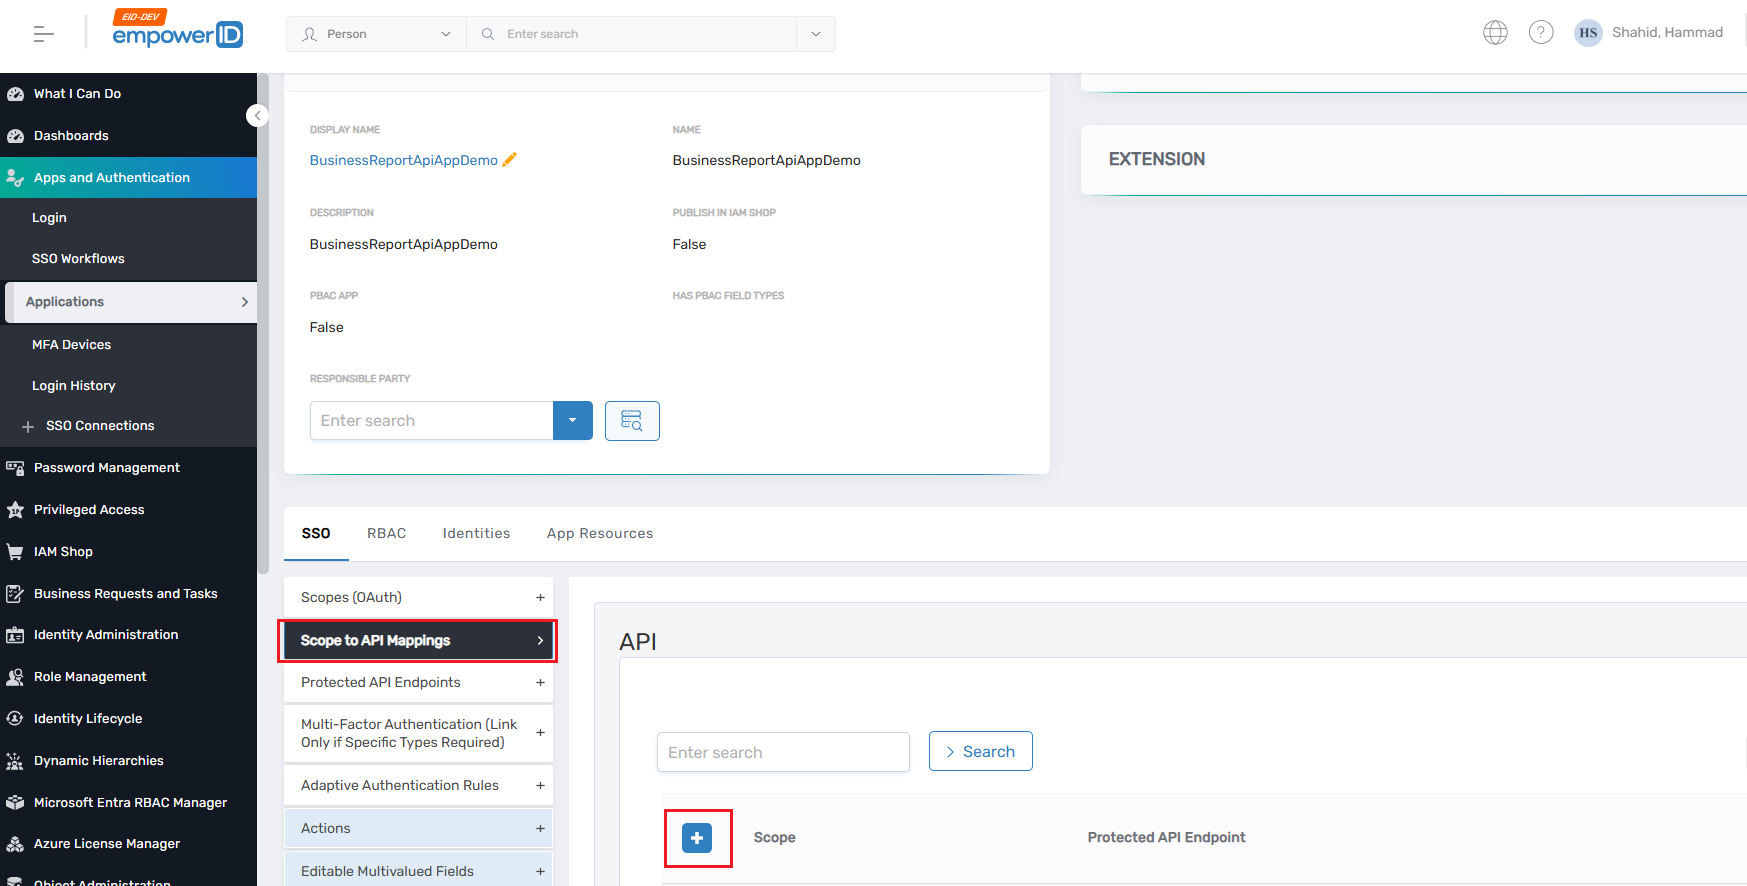
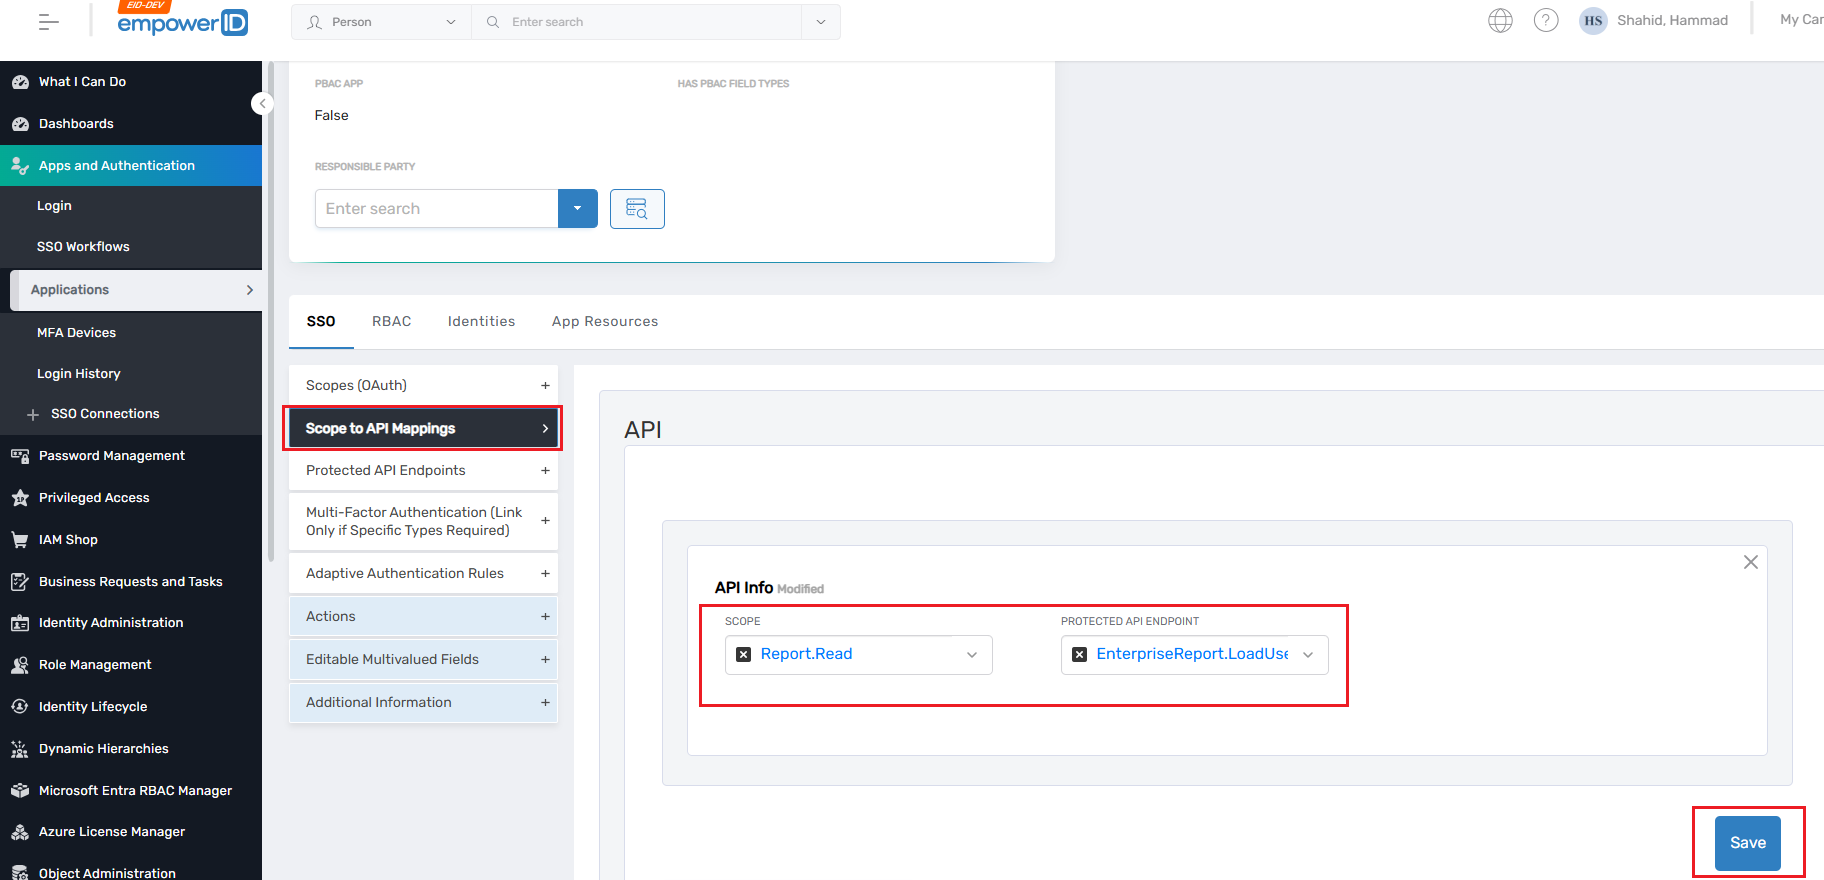
Next, navigate to the Scope to API Mappings tab and click on the + icon. Two dropdowns will appear. In the Scope dropdown, select your newly created scope named Report.Read. In the Protected API Endpoint dropdown, select your endpoint EnterpriseReport.LoadUserGroups, and then click the Save button.
-
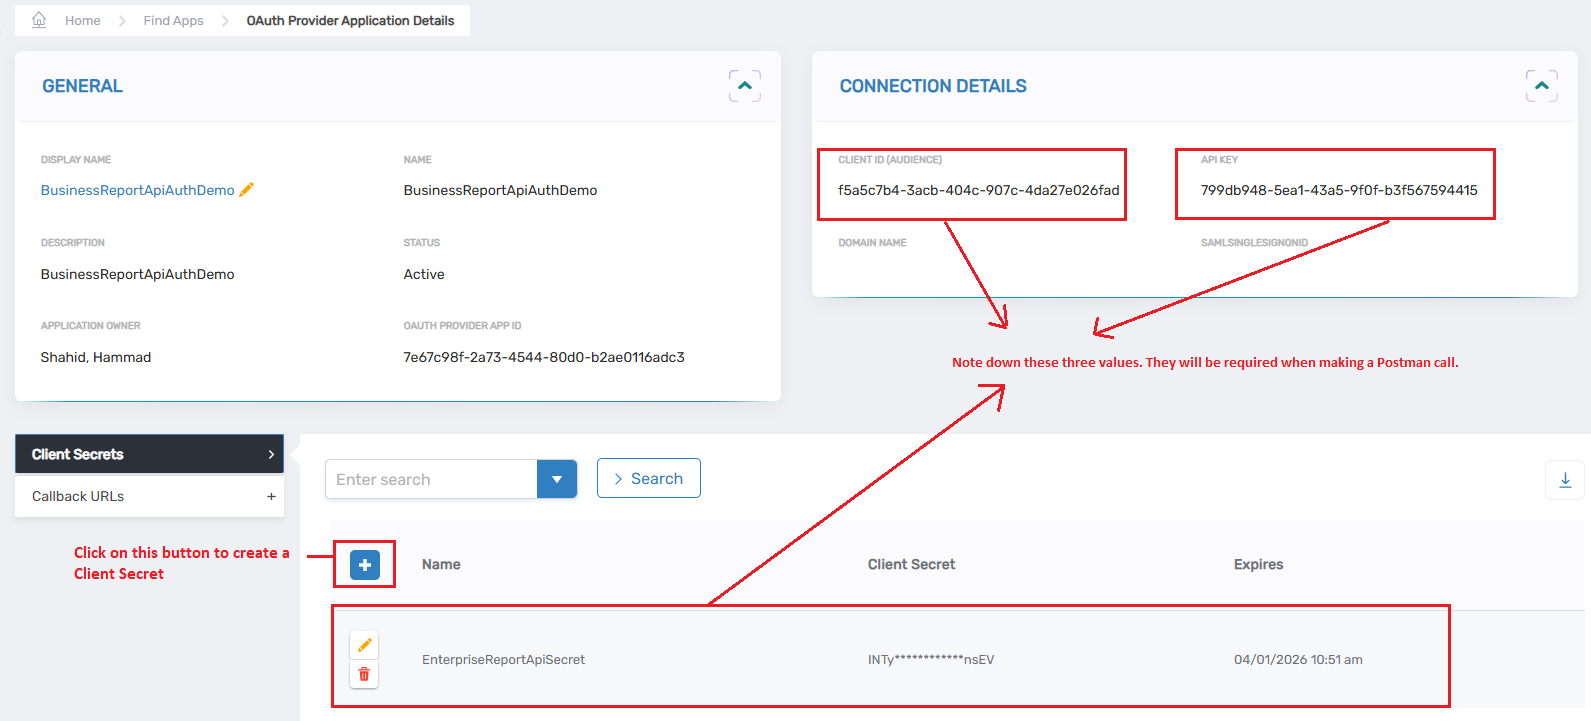
Go to your OAuth application in the UI, copy the Client ID (Audience) and API Key, and save them somewhere secure for future use.
noteThe easiest way to navigate to the OAuth application is to go to the Advanced section of your application, and from there, click on the OAuth Provider App ID.
-
While in the Client Secrets tab, click on the + button to create a new secret. Give it a name, such as EnterpriseReportApiSecret. After creating it, make sure to copy and save the secret immediately, as it will only be visible once and cannot be retrieved later.
-
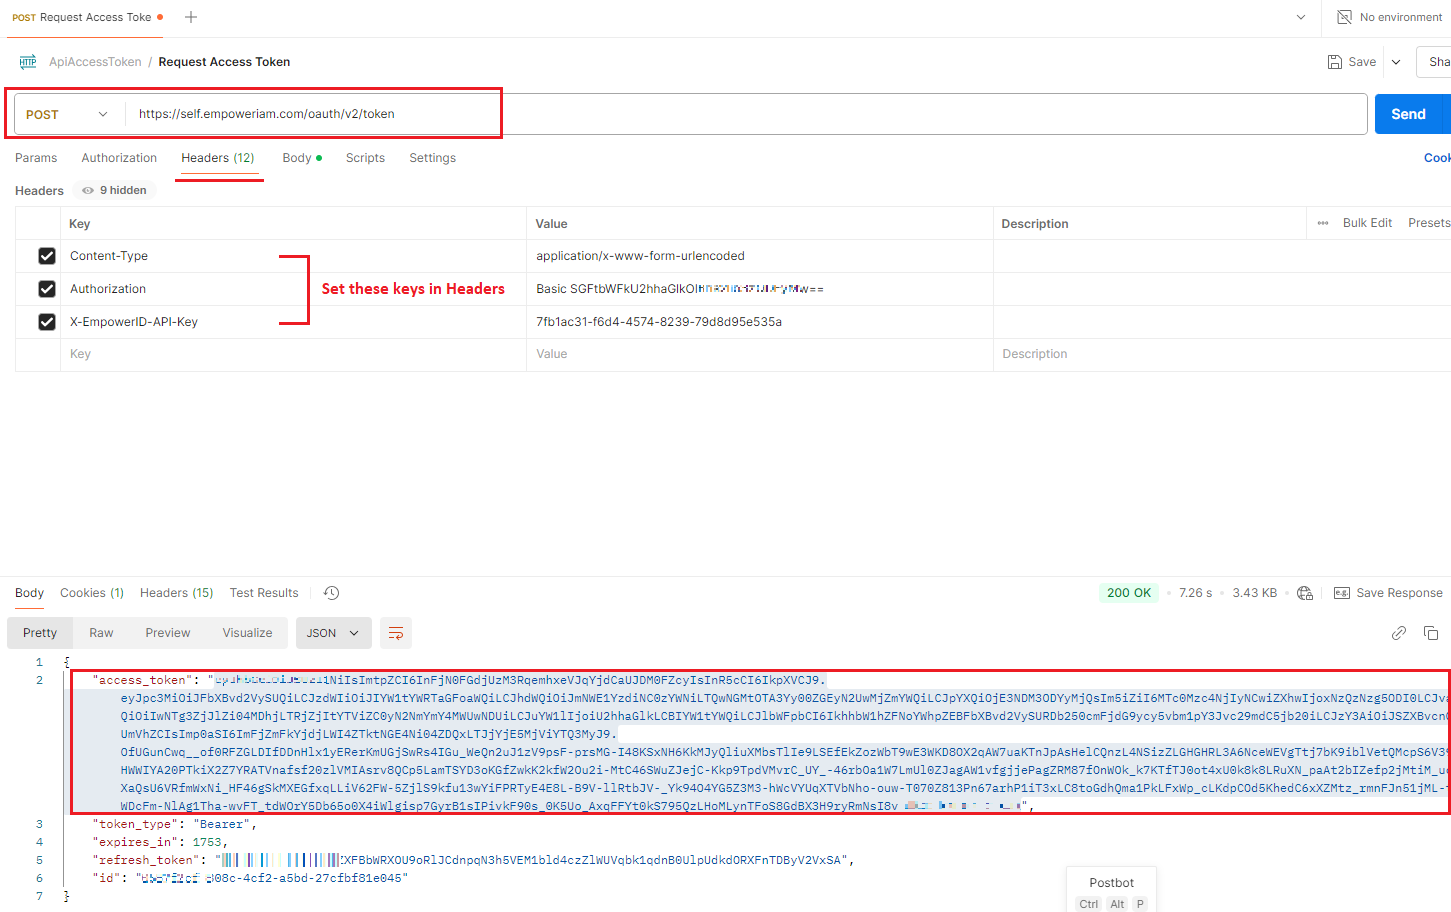
Since our LoadUserGroups endpoint is currently protected (we haven't added [APIAllowAnonymous]), you will need to obtain an access token.
In Postman, create a new request to your EmpowerID token endpoint (the specifics of this endpoint depend on your EmpowerID configuration, but it will be related to your OAuth application).
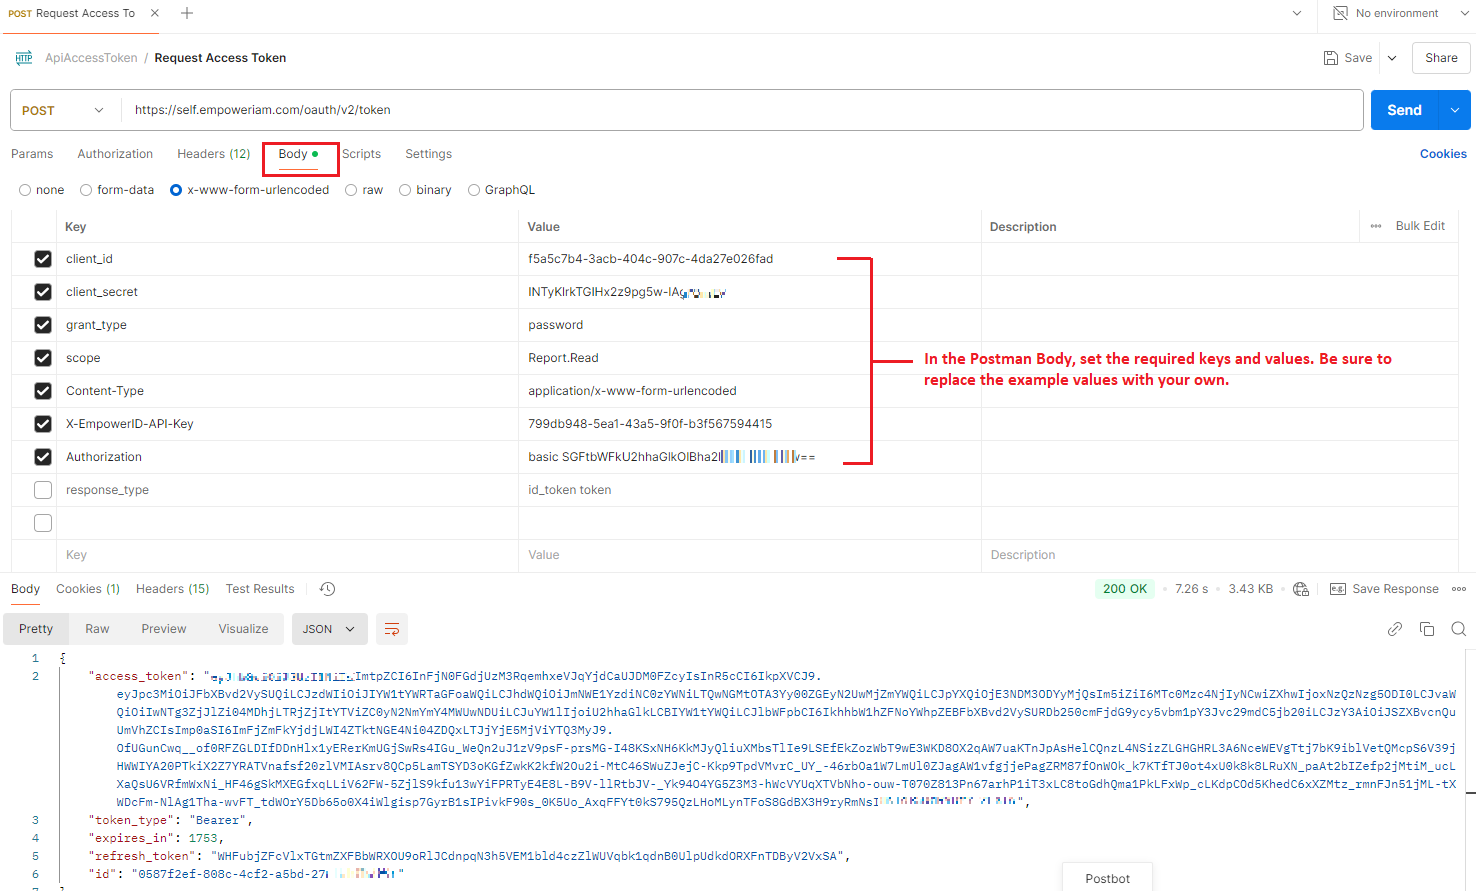
Provide the necessary credentials, including the Client ID, Client Secret, and your user credentials (if you are using the password grant type). You will also need to specify the grant_type as password and request the required scopes. (You must create and associate these scopes with your API endpoint in the EmpowerID application settings.)
client_id: f5a5c7b4-3acb-404c-907c-4da27e026fad
client_secret: INTyKlrkTGIHx2z9pg5w-lAg7QnsEV
grant_type: password
scope: Report.Read
Content-Type: application/x-www-form-urlencoded
X-EmpowerID-API-Key: 799db948-5ea1-43a5-9f0f-b3f567594415
Authorization:basic SGFtbWFkU2hhaGlkOlBha2lib3lzQDEyKt==
In the Headers tab of Postman
Content-Type: application/x-www-form-urlencoded
Authorization: Basic SGFtbWFkU2hhaGlkOlBha2lib3lzQDEyMw==
X-EmpowerID-API-Key: 7fb1ac31-f6d4-4574-8239-79d8d95e535a
Send the request to obtain an access token.
-
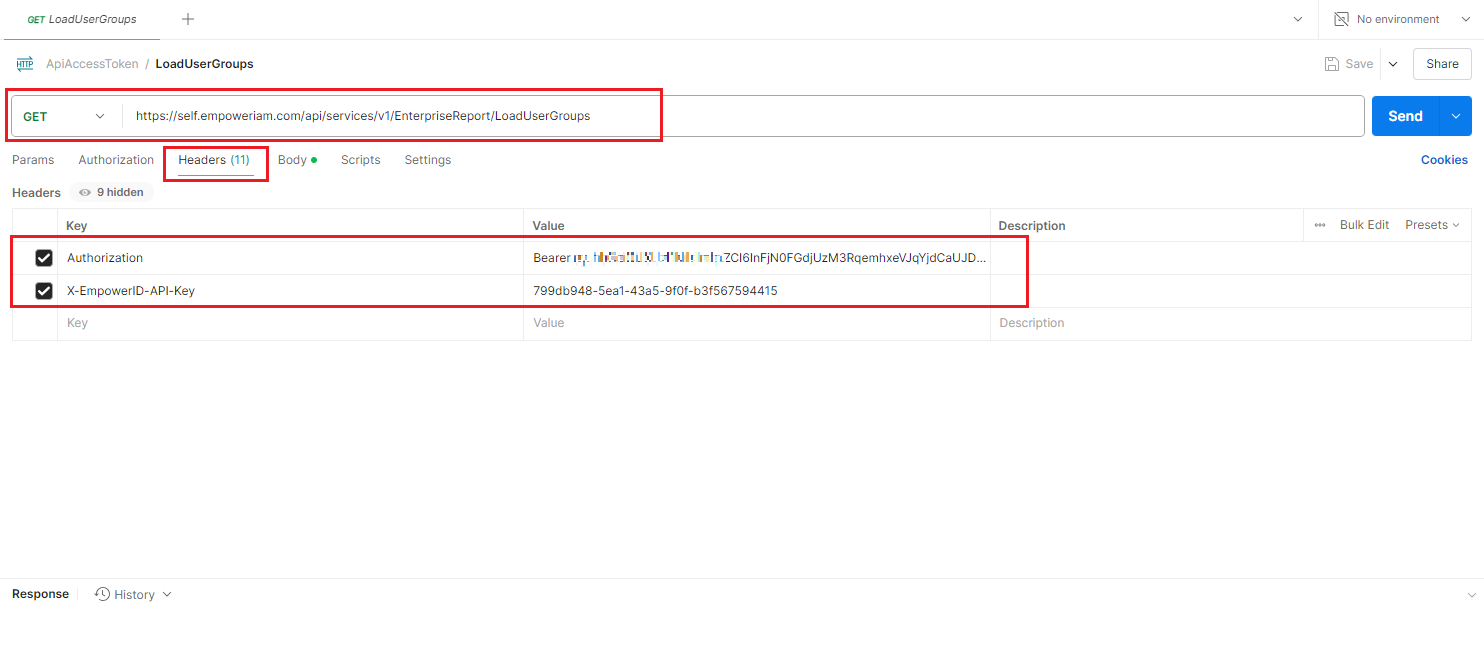
Create a new GET request in Postman to your LoadUserGroups endpoint URL.
-
In the Headers of this request, add an Authorization header with the value Bearer [your_access_token] (replace [your_access_token] with the actual token you obtained). You will also need to include the API Key in the headers.
-
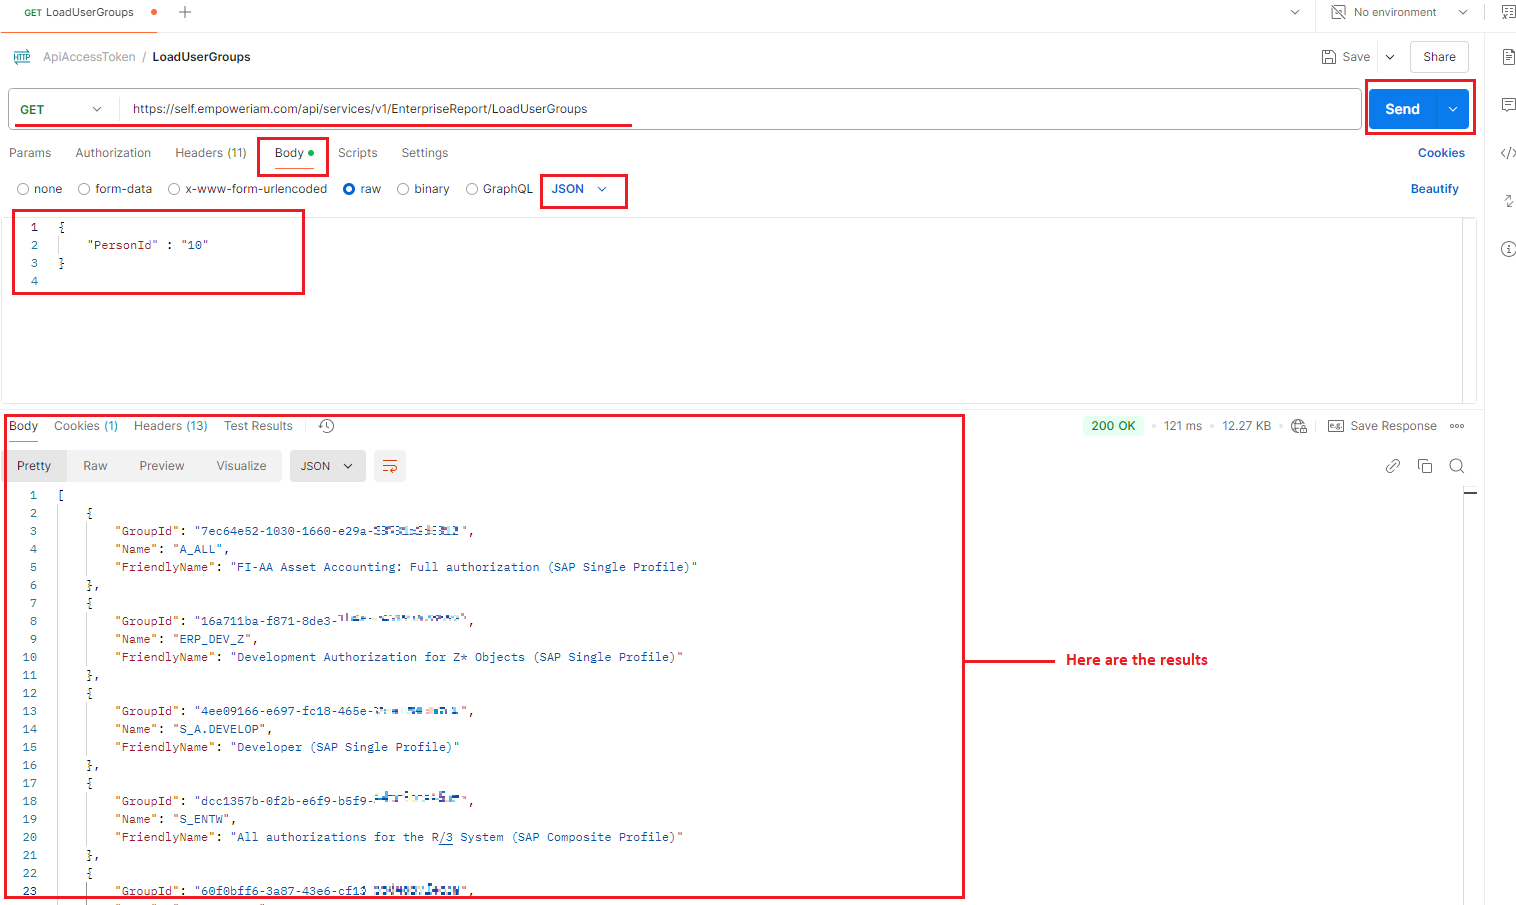
Go to the Body tab, select raw, and then choose JSON from the dropdown. In the body, type the following:
{
  "PersonId": 254
} -
Send the GET request. If everything is configured correctly, you should receive a response with the groups user is part of If you don't include the authorization header or the token is invalid, you will receive a 401 Unauthorized error.