Configuring Birthright Entitlement Assignments
Overview
In EmpowerID, birthright entitlement assignments refer to inherited access rights automatically granted to users based on their identity attributes such as business role, location, or organizational membership. These entitlements are typically implemented as group memberships or application roles, and they can also include provisioned resources such as user accounts, file shares, mailboxes, and SharePoint profiles. While the majority of these are managed through provisioning policies, birthright access—particularly group memberships—are managed via RBAC actor assignments.
The concept of eligibility is closely tied to birthright entitlements. In EmpowerID’s self-service model, users must be assigned eligibility before they can request access to roles or groups. Eligibility can take two forms:
- Regular Eligibility: Grants the user the ability to request access to a resource.
- Pre-Approved Eligibility: Allows the user to receive access immediately upon request, bypassing approval workflows.
While eligibility is typically addressed in the self-service module, it is a foundational concept in understanding how access is requested and provisioned in EmpowerID.
Birthright assignments often involve inherited group memberships, but the framework also supports more complex access models. For example, management roles—which can themselves be assigned to business roles and locations—act as inheritance vehicles for assigning access. These roles can include group memberships and other access rights as part of their configuration.
Assignments can be made at various RBAC actor points, including:
- Business Role and Location (BRL): Commonly derived from HR data, these define job functions and locations.
- Management Roles: Typically tied to functional responsibilities; they can be used to assign access to BRLs and groups.
- Query-Based Collections: Dynamically generated groupings based on attribute-based filters.
- Direct Person Assignments: These are not considered true birthright assignments, as they are explicitly targeted and not inherited.
EmpowerID utilizes three main engines to manage group assignments made via policy:
- RBAC Membership Assignments: Managed by scheduled RBAC jobs that handle assignments to RBAC actors.
- Dynamic Hierarchy Policies: Data-driven policy assignments managed through EmpowerID’s policy engine.
- PBAC Membership Policies: These use Policy-Based Access Control logic and are covered in a separate training module.
This foundational structure supports flexible, scalable, and policy-driven access assignments that align with business logic and identity lifecycle events. The rest of this guide explores how these assignments are created, managed, and reviewed using various interfaces provided by EmpowerID.
Assignment Approaches
EmpowerID offers multiple paths to assign birthright entitlements, and the method chosen often depends on whether you're starting from the perspective of the resource (such as a group) or the actor (such as a business role and location, or a management role). Additionally, EmpowerID provides a comprehensive management interface that enables administrators to handle all components of the assignment in a single step.
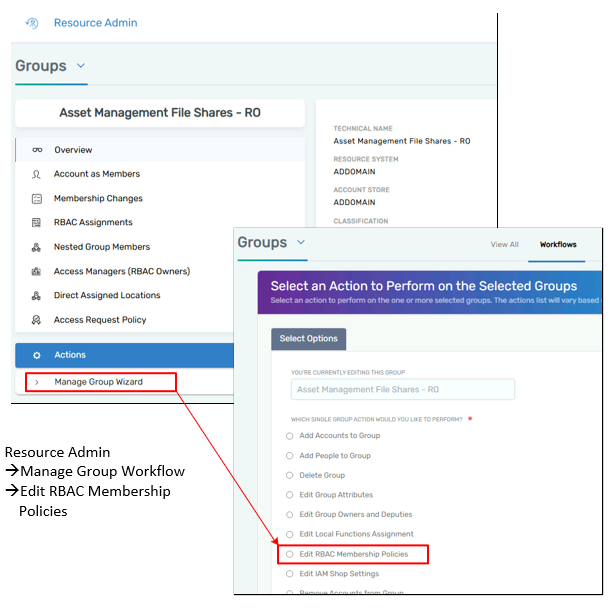
When starting from the resource perspective, an administrator typically begins by identifying the group to be assigned. Within the Resource Admin interface, you can use the Manage Group wizard to edit the RBAC membership policies and associate the group with one or more actors. These actors might be business roles and locations, management roles, query-based collections, or in rare cases, individual users. This approach is well-suited when you have a specific group and need to assign it to multiple actors at once. The same process can also be performed using the classic interface by navigating to the group’s advanced RBAC settings.
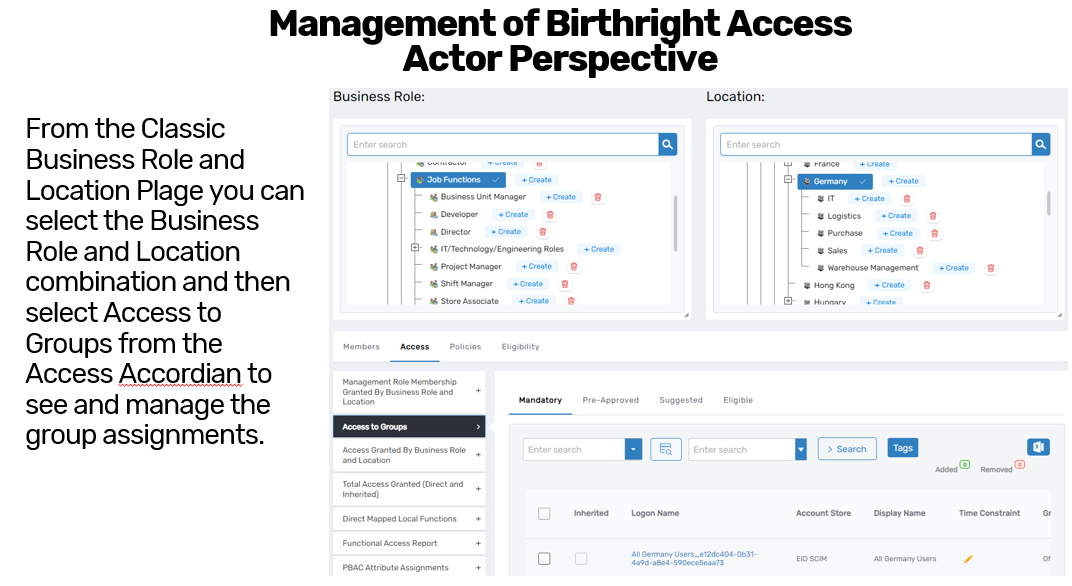
On the other hand, if you start from the actor perspective, the process focuses on a specific business role and location or a management role to which you want to assign one or more groups. For instance, selecting a management role in the Resource Admin view allows you to launch the Manage Management Role wizard, where you can assign group memberships directly. Similarly, business role and location records allow administrators to manage assigned groups, often aligning with roles derived from HR systems. This actor-first approach is often used when an organizational unit or job function needs a consistent set of group memberships.
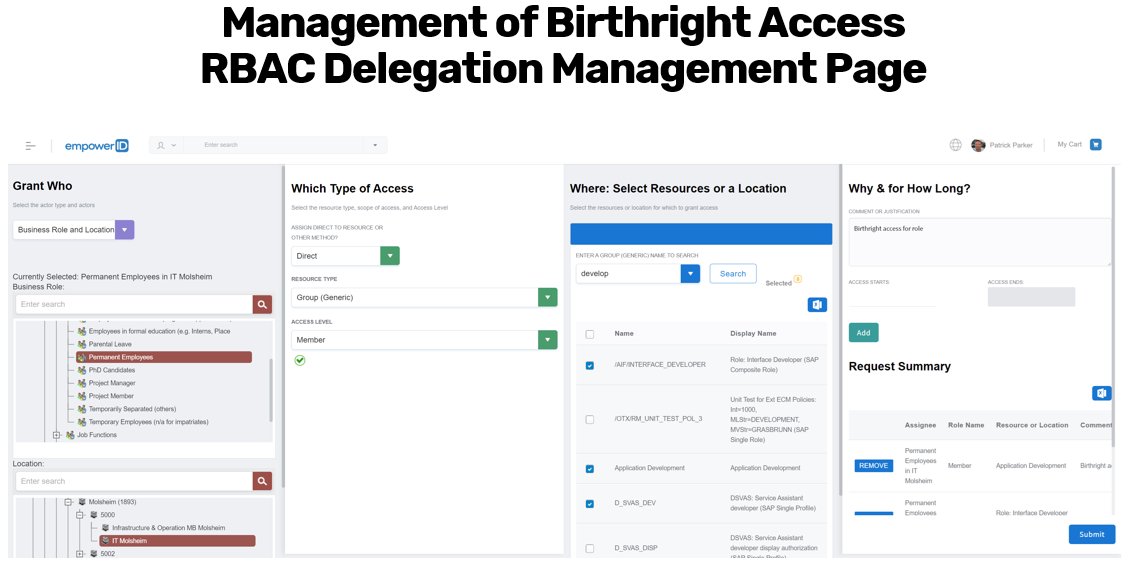
Finally, EmpowerID provides a powerful all-in-one interface called the RBAC Management Delegations page. This page consolidates the assignment process by allowing you to specify the actor (who), the type of access (what), and the scope or resource (where) all in one session. It's especially efficient for bulk operations and supports dynamic updates, such as applying assignments to multiple business roles and locations or adding permissions across a range of management roles. If you’re working from a predefined list—like a spreadsheet of access requirements—this interface is ideal. You can queue multiple assignments before submitting them all at once, and even preview and remove them interactively before finalizing.
These approaches reflect EmpowerID’s flexibility in handling entitlements. Whether you're assigning a single group to multiple roles, building out access profiles for new business units, or streamlining permission updates from a policy audit, the system's tools accommodate a range of administrative workflows.
Interfaces and Workflows
EmpowerID provides several administrative interfaces to perform entitlement assignments, each catering to different workflows and preferences.
The Manage Group Wizard, accessible via the Resource Admin section, allows you to edit the RBAC membership policies associated with a group. From here, you can assign the group to various RBAC actors such as business roles and locations or management roles. It provides a guided experience and is useful for viewing existing assignments, adding new ones, and seeing the resultant set of users impacted by each change.
In the Classic Interface, you can access the group’s one-page view, navigate to the “Advanced” tab, and then select “RBAC Access to This Resource.” This shows all actor assignments providing access to the group and allows you to manage them individually. Assignments can also be viewed from the “Actor RBAC Access” perspective, where you see what access a group or role provides.

When operating from the actor perspective, such as a management role or a business role and location, you can use either the Manage Management Role Wizard or the one-page view of the actor. These interfaces allow you to add group memberships and view what permissions are granted through each role. For example, a management role may have mandatory group assignments, which are visible and editable through these views.
The RBAC Delegation Management Page offers a consolidated view and is one of the most powerful tools in the platform. It enables you to define the actor, the access type, and the resource scope all in one place. It is particularly useful for mass assignments and supports dynamic combinations of business roles, management roles, and resource permissions. You can queue multiple assignments and submit them together, or preview and selectively remove them before confirming.
Example Use Case – Assignment via Delegation Page
In a practical example using the Delegation Management Page, an administrator may begin by selecting “All Employee Roles” within the Asset Management division as the actor. Next, they choose the access type, such as direct membership to a group. Then they browse for the desired group—like the Asset Management File Share – Read Only group—and add it to the assignment queue.
This process can be repeated for multiple divisions, such as Investment Banking, Risk & Compliance, and Wealth Management. Each selected actor can be assigned its corresponding group membership in one session. In the same interface, the administrator can shift from assigning business roles and locations to assigning access to a management role—adding permissions such as group membership management rights or other functional permissions for defined locations.
The key benefit of this method is the ability to manage all assignments—who gets access, what they get, and where—without switching interfaces. It allows full flexibility to build complex assignment matrices quickly and efficiently.
Creating a Birthright Access Assignment Using the Manage Group Wizard
The Manage Group Wizard provides a guided interface to assign group memberships to RBAC actors, making it ideal for setting up birthright entitlements. The following steps outline the process:
-
Navigate to Resource Admin
In the EmpowerID Web interface, go to the Identity Administration section and open Resource Admin. From here, select the Groups tab to manage existing groups. -
Search for the Target Group
Use the search bar to locate the group you want to assign as a birthright entitlement. For example, you might search for a group likeAsset Management File Share - Read Only. -
Launch the Manage Group Wizard
Once the group is selected, click on the Manage Group option to launch the wizard. This workflow allows you to view and configure RBAC membership policies for the selected group. -
Review Existing Assignments
The wizard will display any current assignments already linked to this group. For instance, it might show existing business role and location (BRL) assignments such as “All Employee Roles in Asset Management.” -
Add a New Assignment
To create a new birthright entitlement, select the type of actor you want to assign the group to. Common options include:- Business Role and Location
- Management Role
- Query-Based Collection
- Person (used for direct, non-inherited assignments)
-
Choose the Actor
After selecting the actor type (e.g., Business Role and Location), a new window will open where you can browse and select the specific BRL. For example, you might select “Financial Advisor in Equities.” -
Confirm and Continue
Once you've added the assignment, it will appear in the wizard as a pending change. You can remove it if necessary or proceed by clicking Next. -
Review Resultant Membership
EmpowerID will display a summary showing the number of people who will be affected by the new assignment based on the current population in that BRL. If the user count is0, this may indicate that the BRL is not currently assigned to any identities. -
Finalize the Assignment
After reviewing the impact, proceed through the final steps of the wizard and confirm the change. The new birthright group membership will now be automatically applied to users assigned to the selected BRL. -
Verify Assignment (Optional)
After completion, you may revisit the group in either the Resource Admin view or the Classic Interface to verify that the new RBAC assignment is listed.
Creating a Birthright Access Assignment Using the Classic Group View-One Interface (Resource Perspective)
This method focuses on assigning access to a group from the group’s own management screen using the legacy View-One interface. It’s especially useful when managing group-centric entitlement strategies and ensuring clarity on what access each group grants.
-
Open Identity Administration > Groups
Begin by navigating to the Identity Administration section of the EmpowerID Web interface. Select the Groups menu to browse or search existing groups. -
Search and Select the Target Group
Use the search feature to find the group you want to configure—for example,Asset Management File Share - Read Only. Click the group name to open its View-One page. -
Go to the Advanced Tab
Once inside the group’s detail view, switch to the Advanced tab to access administrative controls related to group access. -
Access “RBAC Access to This Resource”
Under the advanced options, select the RBAC Access to This Resource section. This view allows you to manage which RBAC actors (e.g., business roles and locations, management roles) will receive membership to the group. -
Review Existing Assignments
Review any current actor assignments for reference. You may see roles like “All Employee Roles in Asset Management” or “Financial Advisor in Equities” already listed. -
Add a New Actor Assignment
To create a new assignment, click the plus (+) icon next to the relevant actor type—typically Business Role and Location or Management Role. -
Select the Actor
A dialog box will appear where you can browse and select the desired actor. For example, you might select “Financial Advisor in Equities” under the business roles and locations hierarchy. -
Choose the Access Level
Set the Access Level to Member if your goal is to assign group membership (as opposed to other rights like “Access Manager” or “View Only”). -
Confirm and Save
Click OK or Save (depending on your interface version) to apply the assignment. The actor will now be listed as having RBAC access to the resource. -
Verify the Assignment
Confirm that the actor appears in the list with the correct access level. This ensures the assignment was successfully saved and that membership will be processed according to policy.
Creating a Birthright Access Assignment Using the Manage Delegations Page (Actor Perspective)
The RBAC Delegation Management page in EmpowerID offers a unified interface to assign access from the perspective of an actor, such as a business role and location or a management role. This is especially useful for administrators managing multiple entitlements across multiple actors in a single interface.
-
Navigate to the Manage Delegations Page
From the EmpowerID Web interface, go to the RBAC Delegation Management page. This can typically be found under administrative or RBAC configuration areas. -
Choose the Actor Perspective
Begin by selecting the actor to which you want to assign access. This could be a Business Role and Location (BRL) or a Management Role. For example, you might choose “All Employee Roles in Asset Management” or “Financial Advisor in Equities.” -
Click the “+” to Add a New Assignment
On the summary screen that lists current assignments, click the plus (+) icon to add a new delegation. This opens the full Manage Delegations editor. -
Select the Actor (Who)
In the first column of the editor, choose the actor receiving the assignment. Click the actor type (e.g., Business Role and Location), and use the browser to find and select the specific BRL or role you wish to update. -
Define the Access Type (What)
In the second column, select the type of access you’re assigning. For birthright entitlements, this is typically Direct Access. Then choose Member as the access level to indicate that you’re assigning group membership. -
Choose the Resource Scope (Where)
In the third column, select the group or resource that is being assigned. Use the search or browse function to locate the appropriate security group (e.g.,Asset Management File Share - Read Only), then add it to the assignment. -
Repeat as Needed for Multiple Assignments
Continue adding additional rows to assign multiple groups or resources to the same actor, or assign the same group to multiple actors, all within the same session. For example, you might assign different file share groups to “Investment Banking,” “Risk and Compliance,” and “Wealth Management.” -
Add Optional Delegation Constraints
If needed, specify constraints such as start and end dates or conditional logic that governs when the entitlement should be applied. -
Review and Submit Assignments
After all desired assignments have been configured, review the entries on the page. If you want to cancel any, you can remove them by clicking the delete icon next to the row. -
Submit to Finalize Assignments
When ready, click Submit to apply all the assignments in a single operation. EmpowerID will process these assignments and apply them to users dynamically based on their role or location.