EmpowerID Admin Lab 13 - RBAC Group Membership Assignments
Purpose
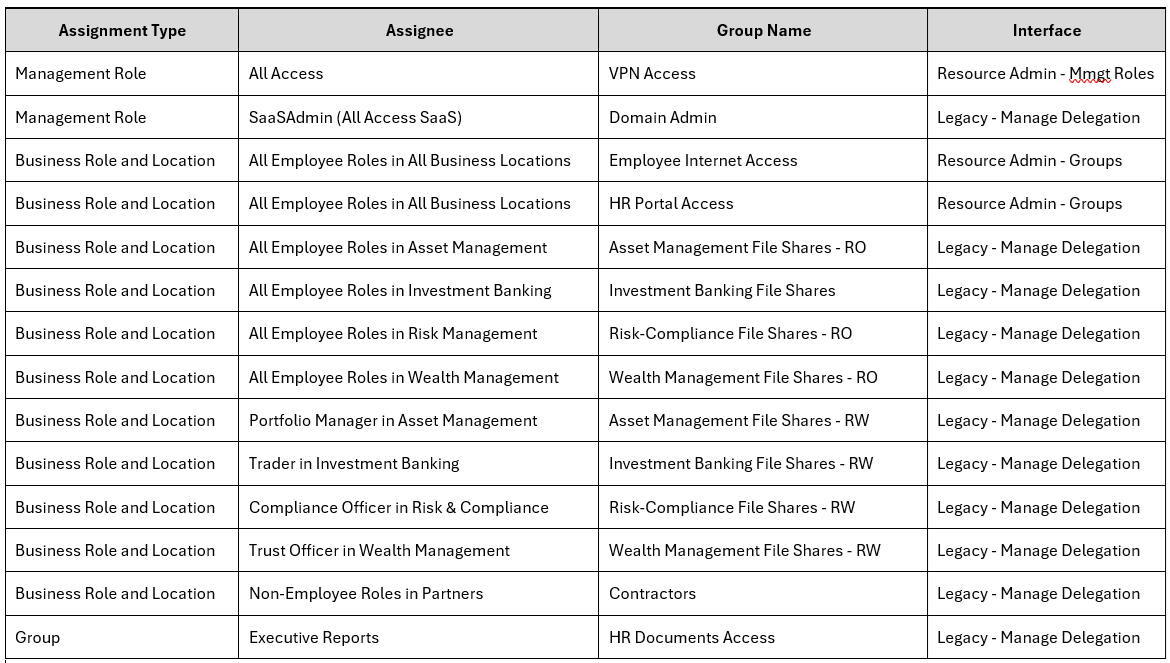
This lab guides you through configuring RBAC-assigned group memberships, also referred to as Birthright or default group memberships. These group memberships are assigned via RBAC policies based on security assignments such as management roles, business role locations, or existing group memberships. The following table lists the group membership assignments that need to be configured in this lab. It includes the RBAC Assignment point, the group to be assigned and the UI interface to use for the assignment.
Prerequisites
- Access to the EmpowerID training environment.
- A basic understanding of RBAC policies and group assignments.
Steps
1. Assign Group Memberships via Self-Service Workflow
- Navigate to Identity Administration > Resource Admin.
- Select Management Roles.
- Search for the All Access management role.
- Run the Manage Management Role Workflow and select Edit Group Assignments.
- Click Next to skip the existing assignments.
- Search for the VPN Access Group, select it and click next.
- Save the assignment and repeat for the HR Portal Access group.
2. Assign Group Memberships via Classic Admin Interface
- Navigate to the Role Management > Manage Delegations page in the Classic Admin Interface.
- Click the + button to create a new delegation.
- Assign the group memberships:
- In the Grant Who: column select Business Role Location for the Assignee Type
- Select the All Employee Roles as the business role and All Business Locations as the location
- In the Which Type of Access column select Direct for assignment method, Group(Security) for the Resource Type, and Member as the Access Level.
- In the Where column, search for and select the Employee Internet Access group and click Add in the 4th column.
- Repeat for other the other Business Roles, Locations, and groups:
- For the final group in the table, make sure you select Group for the Grant Who Assignee
3. Validate Assignments
- On the Manage Delegations page.
- Filter assignments by actor type of Business Role Location
- Verify assignments for all created groups and roles in the bottom half of the page.
5. Monitor Job Status
- Navigate to Admin > Applications and Directories > Account Stores and Systems > Job History.
- Search for the Group Membership Reconciliation Job.
- Confirm that:
- Group membership reconciliation processes all changes successfully.
Notes
- Use the Self-Service Workflow for one-off group membership assignments.
- Use the Classic Admin Interface - Manage Delegation page for bulk assignments.
- Allow time for the RBAC engine and reconciliation jobs to process changes before verifying.
- Monitor job history to troubleshoot any delays or errors.
Completion
Once all group memberships are assigned, processed, and verified, this lab is complete. Proceed to the next lab to explore additional EmpowerID configurations and workflows.