Creating an Active Directory Connector Account Store
Overview
This training guide provides a comprehensive walkthrough for configuring an Active Directory (AD) account store within EmpowerID. The guide is intended for administrators and system consultants who need to integrate Active Directory Domain Services (AD DS) with EmpowerID, enabling seamless synchronization of users, groups, OUs, and computers between the two systems.
In this guide, you will learn:
- How to create an Active Directory account store in EmpowerID.
- How to connect EmpowerID to an AD domain, whether on-premises or through a Cloud Gateway.
- How EmpowerID discovers and inventories AD objects such as users, groups, computers, and OUs.
- How to configure account store settings, including authentication, password synchronization, attribute flow, and provisioning policies.
- How EmpowerID performs full and delta inventory processing using Update Sequence Numbers (USN) to track changes in Active Directory.
- Best practices for selecting domain controllers to ensure efficient replication and provisioning operations.
Why Integrate Active Directory with EmpowerID?
EmpowerID's Active Directory connector allows organizations to leverage their existing directory services while taking advantage of EmpowerID’s centralized identity and access management capabilities.
By integrating AD with EmpowerID, organizations can:
- Automate user lifecycle management based on AD attributes.
- Synchronize group memberships for role-based access control (RBAC).
- Enable single sign-on (SSO) and authentication using AD credentials.
- Perform delegated administration while maintaining security and compliance.
- Detect and apply changes in real-time with EmpowerID’s delta inventory process.
How EmpowerID Interacts with Active Directory
The EmpowerID AD account store integration follows a structured approach:
-
Connecting to Active Directory
- Establishes a secure connection to AD via direct binding (on-premises) or Cloud Gateway (remote access).
- Authenticates with proxy credentials (NetBIOS, username, and password).
- Detects domains and domain controllers within the AD forest.
-
Initial Inventory Process
- Reads all accounts, groups, OUs, and computers from the domain.
- Discovers the core directory architecture, including Exchange configurations if present.
-
Configuring Account Store Settings
- Enables or disables authentication, password sync, attribute flow, and provisioning policies.
- Sets up inventory schedules and group membership reconciliation.
- Defines business role and location mapping, if applicable.
-
Ongoing Inventory & Change Detection
- Uses USN-based delta inventory to detect only changed objects instead of re-reading the entire directory.
- Queries AD for new, modified, or deleted users, groups, and objects.
- Updates EmpowerID records accordingly while maintaining identity correlation.
-
Provisioning & Password Management
- Supports account creation and deprovisioning based on defined policies.
- Allows password changes and resets synchronized between EmpowerID and AD.
- Uses targeted domain controllers to optimize replication and provisioning speed.
-
Monitoring & Maintenance
- Provides real-time job history and inventory logs.
- Allows manual selection of domain controllers for optimized replication.
- Supports scalability in multi-domain or hybrid environments.
This integration ensures that EmpowerID remains synchronized with Active Directory, enabling seamless identity and access management for organizations of any size. By following this guide, administrators can efficiently configure, monitor, and maintain AD account stores within EmpowerID, ensuring secure and automated identity governance.
Creating an Active Directory Account Store in EmpowerID
Creating an Active Directory Account Store in EmpowerID is a critical step in integrating your directory services with EmpowerID’s identity and access management platform. This section provides a detailed walkthrough of how to configure and establish a connection between EmpowerID and an Active Directory Domain Services (AD DS) environment.
1. Accessing the Account Store Configuration Page
To begin the configuration process:
-
Navigate to the Account Stores page
- Go to Admin → Applications and Directories → Account Stores and Systems.
- Click on the Account Store tab and hit Search to display the existing account stores.
-
Initiate the Account Store Creation Process
- Click on Create Account Store in the Actions panel on the right.
- Search for and select Active Directory Domain Services as the account store type.
2. Entering Basic Account Store Information
After selecting the Active Directory Domain Services account store type, EmpowerID prompts you to define basic details:
- Account Store Name – The internal name used to reference this AD connection.
- Display Name – A user-friendly name shown in the EmpowerID admin interface.
For example, if connecting to a primary Active Directory domain:
- Account Store Name:
AD_Domain_Account_Store - Display Name:
AD Domain Account Store
These names help administrators easily identify and manage the account store within EmpowerID.
3. Configuring Connection to Active Directory
For EmpowerID to establish a connection with Active Directory, you must specify the Fully Qualified Domain Name (FQDN) of the directory:
- FQDN: The domain name of the AD forest (e.g.,
domain.com).
Connecting On-Premises vs. Cloud Gateway
- If connecting directly to an on-premises AD, a direct network connection is used.
- If connecting remotely from a SaaS environment, select Cloud Gateway to establish a secure bridge between EmpowerID and the on-premises AD environment.
4. Entering Proxy Credentials
EmpowerID requires proxy credentials to authenticate and interact with the AD domain:
- Specify the NetBIOS domain name (e.g.,
AD_DOMAIN). - Enter the Username – Typically an administrator or service account with read permissions in AD.
- Enter the Password – The credentials of the service account.
For example:
- NetBIOS Name:
AD_DOMAIN - Username:
Administrator - Password:
********
Connection Testing
- If connecting on-premises, click Check Connection to validate the credentials.
- If using a Cloud Gateway, the connection check does not run until the gateway is selected in the next step.
Click Submit to proceed.
5. Selecting the Cloud Gateway Server (For Remote Connections)
If using a Cloud Gateway, EmpowerID will display a list of available Cloud Gateway servers that have been registered with the system.
- Select the appropriate Cloud Gateway Server from the list.
- Click Submit to continue.
6. Domain Discovery & Selection
After the connection is established, EmpowerID queries all domains within the AD forest. If there are multiple child domains, they will be listed for selection.
- Select the Active Directory domain to be managed (e.g.,
AD_Domain.com). - Click Submit.
At this stage, EmpowerID connects to the domain, retrieves domain controllers, and creates the account store definition.
7. Reviewing the Directory Server Discovery
Upon successfully creating the account store, EmpowerID automatically discovers the domain controllers in the environment.
- It reads the configuration partition from an available domain controller.
- If an Exchange environment is detected, EmpowerID will recognize and list the Exchange organization associated with the domain.
- At this point, inventory has not yet been performed—EmpowerID has only identified the directory structure.
Configuring Account Store Settings
Now that the Active Directory Account Store is created, administrators must configure various settings to control inventory, provisioning, authentication, and group synchronization.
1. Editing the Account Store Definition
- Open the newly created Active Directory Account Store.
- Click Edit Account Store to modify the settings.
2. Configuring General Account Store Settings
EmpowerID provides multiple options for configuring authentication, provisioning, and access control.
Authentication & Visibility Settings
- Enable Secure LDAP (LDAPS) or Standard LDAP Bindings (optional).
- Visibility in IAM Shop – Enable this setting to allow groups from the domain to be requested through the IAM Shop.
- Enable Authentication – Allow users to authenticate using Active Directory credentials.
- Enable Password Synchronization – Allow password changes and resets to sync between AD and EmpowerID.
Identity & Provisioning Settings
- Authoritative Identity Source – If AD should not create new identities in EmpowerID, disable Provisioning as an Identity Source.
- Enable Attribute Flow – Allow AD attributes to sync with EmpowerID.
- Enable Provisioning & Deprovisioning – Allow provisioning via policy-based provisioning.
Business Role & Location Processing
- If AD should not be used as a source for business roles or locations, disable this option.
3. Enabling Inventory Processing
EmpowerID inventories AD objects such as users, groups, and computers.
- Navigate to the Inventory Tab.
- Enable Inventory to start collecting directory objects.
- Configure the inventory schedule – Default is every 10 minutes indefinitely.
- Enable Group Membership Reconciliation to track group membership changes.
Additional Settings:
- Projection and Deleted Object Detection are not required for this setup.
Click Save to apply the configuration.
Running the Initial Inventory
Once the account store settings are saved:
- Return to the Account Store Page.
- View the Job History section.
- The Group Membership Reconciliation Job will execute first.
- Shortly after, the Inventory Job will start.
Upon completion, EmpowerID will:
- Read all users, groups, OUs, and computers from Active Directory.
- Populate these records into EmpowerID.
To verify:
- Click User Accounts to view imported users.
- Click Groups to see imported groups.
Verifying the Inventory Results
After the first inventory run:
- Navigate to the Account Store Details page.
- Check the Runtime Data for a summary of imported objects.
- Ensure all expected users, groups, and computers are visible in EmpowerID.
For example:
- Total Accounts Found: 500
- Groups Found: 69
- Computers Found: 1
Monitoring & Troubleshooting
If issues occur:
- Verify that the correct Cloud Gateway Server was selected.
- Ensure that the service account has read permissions in AD.
- Check the job history logs for inventory errors.
Conclusion
This section covered the complete creation and configuration of an Active Directory Account Store in EmpowerID. By following these steps, administrators can successfully integrate AD, enabling inventory, authentication, group synchronization, and provisioning capabilities.
In the next section, we will explore how EmpowerID performs delta inventory using USN tracking to efficiently detect and process directory changes.
Understanding Delta Inventory Processing in EmpowerID
EmpowerID uses delta inventory processing to efficiently detect and synchronize changes in Active Directory (AD) without re-reading the entire directory on every inventory run. This approach ensures that only new, modified, or deleted objects are processed, significantly reducing load, network traffic, and processing time.
1. How EmpowerID Detects Changes in Active Directory
EmpowerID leverages Update Sequence Numbers (USNs) from Active Directory to track changes. USNs are numeric values that increment whenever a record (such as a user, group, or computer) is modified in AD.
Each domain controller (DC) maintains a separate USN counter for objects in the directory. When an object is created, modified, or deleted, the USN increases, allowing EmpowerID to detect changes by comparing the last processed USN with the current USN value.
Instead of scanning all objects during every inventory run, EmpowerID:
- Reads the highest USN numbers from the domain controller after an inventory run.
- Stores these USNs in its database for future reference.
- On the next inventory run, it queries AD only for objects with USNs greater than the last recorded value.
- Updates its database with new or modified records, ensuring efficient synchronization.
2. Tracking USN Values in EmpowerID
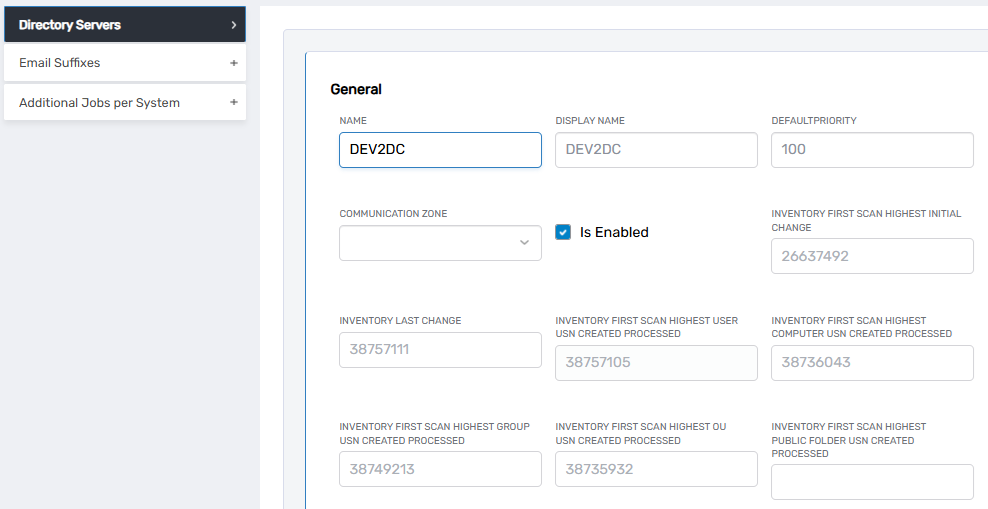
Each time EmpowerID performs an inventory, it logs the highest USN values from the directory. These values are stored in the Directory Server record within EmpowerID.
To view these values:
- Navigate to Admin → Account Stores and Systems → Directory Servers.
- Select the Active Directory domain controller used for inventory.
- Click Edit Directory Server Record to review the following fields:
- Inventory First Scan Highest USN – The highest USN value recorded when the first full inventory was performed.
- Inventory Last Change USN – The highest USN recorded during the most recent inventory run.
- Inventory Last Processed USN for Users, Groups, OUs, and Computers – The last USN values recorded for each object type.
Each time an inventory cycle completes, these USN values update to reflect the latest processed objects.
3. The Delta Inventory Workflow
When EmpowerID runs delta inventory, it follows a structured workflow:
-
Retrieve the Last Recorded USN
- EmpowerID queries its directory server records for the last successfully inventoried USN values.
-
Query AD for Changes
- EmpowerID sends LDAP queries to the domain controller, requesting all objects with USNs higher than the last processed USN.
-
Process New and Modified Objects
- EmpowerID updates its database with any new accounts, groups, OUs, or computers found.
- It also updates existing records if changes are detected.
-
Update USN Values
- EmpowerID records the highest USN values retrieved during the inventory run.
- These values are stored in the directory server record for future delta processing.
4. Handling Multi-Domain Controller Environments
In AD environments with multiple domain controllers, USN values do not synchronize across domain controllers. Each domain controller maintains its own unique USN sequence, meaning that querying different domain controllers for inventory could result in missing updates.
To prevent this, EmpowerID:
- Always inventories from the same primary domain controller unless manually changed.
- Stores the highest USN values from all enabled domain controllers.
- If a domain controller becomes unavailable, administrators can switch to another without losing synchronization because EmpowerID tracks the highest known USNs across all domain controllers.
5. Managing Domain Controller Selection for Inventory
By default, EmpowerID selects one specific domain controller as the target for inventory processing. This domain controller is listed as the "Inventoried Directory Server" in the account store configuration.
What Happens If the Domain Controller Fails?
- If the primary domain controller becomes unavailable, inventory will fail.
- An administrator can manually select a different domain controller from the Directory Servers list.
- Since EmpowerID tracks the last known USN across all domain controllers, switching to another picks up inventory exactly where it left off.
6. Best Practices for Selecting Domain Controllers
In environments with multiple domain controllers, administrators should follow best practices to optimize performance and reliability:
- Enable a small number of domain controllers (3-4) for inventory processing.
- Select domain controllers that are central to your replication topology to minimize delays in data availability.
- Avoid enabling too many domain controllers in EmpowerID, as this increases the risk of querying out-of-sync replicas.
- If a domain controller is remote or has high replication latency, it may cause mismatched data when provisioning accounts.
7. Ensuring Continuous Inventory Processing
EmpowerID maintains accurate identity data by ensuring that inventory runs continuously without gaps.
- If inventory is paused or a domain controller is unavailable for an extended period, EmpowerID still retains the last known USN values.
- When inventory resumes, EmpowerID retrieves changes from the last known point, preventing duplication or data loss.
- If no changes are detected (i.e., all USNs match the previous values), EmpowerID skips processing until new updates occur.
8. Why Delta Inventory Processing Matters
By using USN-based delta inventory, EmpowerID achieves:
✅ Efficient processing – Only changed records are inventoried, reducing load.
✅ Reduced network traffic – Queries are optimized for minimal LDAP impact.
✅ Faster updates – Changes are detected and synchronized in near real-time.
✅ Scalability – Large AD environments with thousands or millions of objects can be managed without performance issues.
✅ Fail-safe operations – If a domain controller fails, another can be used without reprocessing old data.
Conclusion
EmpowerID's delta inventory processing ensures that Active Directory integration remains efficient and scalable. By leveraging USNs, EmpowerID processes only new and modified objects, significantly reducing inventory time and resource usage.
Administrators can further optimize performance by selecting the right domain controllers, ensuring continuous tracking of USN values, and managing failover strategies for redundancy.
With USN tracking and multi-domain controller awareness, EmpowerID provides a robust, scalable, and reliable mechanism for keeping identity data synchronized between AD and EmpowerID.