Creating an EntraID Connector Account Store
Overview
This training guide provides a detailed walkthrough for configuring the EmpowerID Microsoft Entra ID SCIM Microservices Connector. It is designed for system administrators and identity management professionals responsible for integrating Microsoft Entra ID (formerly Azure AD) with EmpowerID. This integration enables seamless identity lifecycle management, governance, and compliance by leveraging SCIM (System for Cross-domain Identity Management) microservices.
The EmpowerID SCIM Microservices Connector allows secure, certificate-based authentication between EmpowerID and Microsoft Entra ID, eliminating the need to store usernames and passwords within EmpowerID. Instead, it leverages Azure Managed Identities and the Microsoft Graph API to perform identity synchronization and administrative operations.
How the EmpowerID SCIM Connector Works
The EmpowerID SCIM Microservices Connector consists of two primary components:
-
SCIM Microservice
- A microservice hosted within the Microsoft Entra ID tenant.
- Acts as an intermediary between EmpowerID and Microsoft Entra ID, using certificate authentication for secure communication.
- Uses Microsoft Graph API to read, modify, and synchronize identity data.
-
EmpowerID Account Store Connector
- Configured within EmpowerID to communicate with the SCIM Microservice.
- Handles inventory jobs, provisioning, attribute synchronization, and role-based access control (RBAC).
- Supports advanced identity operations such as application registration management, license assignments, and directory role assignments.
The workflow for synchronizing data between EmpowerID and Entra ID follows these steps:
- EmpowerID initiates an inventory job, requesting updates from Entra ID.
- The request is sent to the SCIM Microservice using certificate-based authentication.
- The SCIM Microservice communicates with Microsoft Entra ID using Graph API calls.
- Data retrieved from Entra ID is pushed back to EmpowerID, updating user, group, and role assignments.
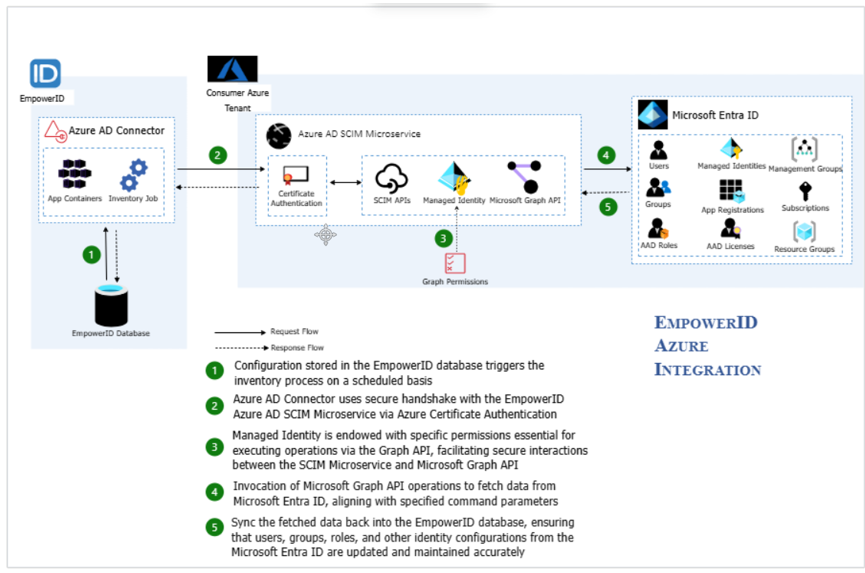
This microservices-based architecture ensures scalability, security, and compliance by leveraging Microsoft’s secure authentication framework.
Why Use the SCIM Microservices Connector?
The SCIM Microservices Connector provides several advantages for organizations integrating Microsoft Entra ID with EmpowerID:
✅ Secure Authentication – Uses certificate-based authentication instead of storing usernames and passwords.
✅ Role-Based Access Control (RBAC) – Synchronizes admin roles, security groups, and access policies from Entra ID.
✅ Multi-Tenant Scalability – Supports integration with multiple Entra ID tenants.
✅ Real-Time Synchronization – Leverages Microsoft Graph API for near real-time updates.
✅ Advanced Identity Governance – Supports application registration, license management, and role assignments.
This integration is essential for organizations that require centralized identity management while maintaining Microsoft Entra ID as their authoritative identity provider.
What Can Be Managed with the SCIM Microservices Connector?
The SCIM Microservices Connector allows EmpowerID to inventory and manage various Microsoft Entra ID components, including:
| Feature | Description |
|---|---|
| Users & Groups | Synchronizes users, groups, and memberships. |
| Azure Applications | Manages application registrations and service principals. |
| Licenses & Subscriptions | Inventories and assigns Microsoft 365 licenses to users and groups. |
| Admin Roles & RBAC | Retrieves and manages directory roles, RBAC assignments, and security groups. |
| Sign-In Activity | Tracks user authentication events and sign-in activity. |
| Deleted Objects Recovery | Supports inventory of soft-deleted users and groups for recovery. |
For deeper integration, EmpowerID also provides additional microservices for:
- Exchange Online Management
- SharePoint Online Permissions
- Azure AD B2C Identity Synchronization
Prerequisites for Deploying the SCIM Microservice
Before setting up the EmpowerID SCIM Microservices Connector, the following must be completed:
-
Deploy the SCIM Microservice in Microsoft Entra ID
- Register a Service Principal Application in Azure.
- Create and configure an Azure App Service to host the microservice.
- Assign the necessary Graph API permissions to the Managed Identity.
-
Generate Certificate-Based Authentication
- EmpowerID uses certificate authentication to communicate with the SCIM Microservice.
- The certificate must be uploaded and registered within Entra ID.
-
Create an Entra ID Account Store in EmpowerID
- Register the SCIM Microservice URL, Tenant ID, and App Object ID.
- Configure inventory jobs to synchronize users, groups, and roles.
Deploying the SCIM Microservice to Entra ID
Before configuring the EmpowerID Microsoft Entra ID Account Store, the SCIM Microservice must be deployed within the Microsoft Entra ID tenant. This process consists of several key steps that ensure the microservice can authenticate securely and execute Graph API operations for user, group, and application management.
The deployment involves:
- Registering the SCIM Microservice as a Service Principal Application
- Creating and Configuring an Azure App Service
- Publishing the SCIM Microservice to the Azure Tenant
- Assigning API Permissions to the Managed Identity
- Recording Required Configuration Data for EmpowerID
All these steps are detailed in the EmpowerID Admin Guide, accessible via the following link:
Azure AD SCIM Deployment and Configuration
1. Registering the SCIM Microservice as a Service Principal
The first step is to register the SCIM Microservice in Microsoft Entra ID as a Service Principal Application. This allows it to securely authenticate and communicate with Microsoft Graph API.
Steps to Register the Service Principal in Entra ID:
- Navigate to Azure Portal → Microsoft Entra ID → App Registrations.
- Click New Registration and provide:
- Name:
EmpowerID SCIM Microservice - Supported Account Types: Choose Accounts in this organizational directory only (Single Tenant).
- Name:
- Click Register to create the application.
- Copy and save the Application (Client) ID and Directory (Tenant) ID—these will be needed later.
Next, you must configure certificate-based authentication for secure communication between the SCIM Microservice and EmpowerID.
2. Creating the Azure App Service for the SCIM Microservice
The SCIM Microservice must be hosted in Microsoft Azure as an Azure App Service. This enables the microservice to act as a bridge between EmpowerID and Microsoft Entra ID.
Steps to Create the Azure App Service:
- Navigate to Azure Portal → App Services.
- Click + Create and select Web App.
- Enter the following details:
- Subscription: Choose the appropriate subscription.
- Resource Group: Create a new or use an existing group.
- Name: Enter a unique name (e.g.,
empowerid-scim-microservice). - Publish: Select Code.
- Runtime Stack: Choose .NET 6 (LTS).
- Region: Select the appropriate Azure region.
- Click Review + Create, then Create.
- Once created, copy and save the App Service URL—this will be used when configuring the account store in EmpowerID.
3. Publishing the SCIM Microservice to Azure
Once the Azure App Service is ready, the SCIM Microservice must be deployed to this environment. EmpowerID provides a PowerShell script to automate this deployment.
Steps to Deploy the SCIM Microservice:
-
Download the EmpowerID SCIM Microservice Deployment PowerShell Script from the documentation link.
-
Open PowerShell as Administrator and navigate to the script location.
-
Run the following command in PowerShell:
.\Deploy-SCIMMicroservice.ps1 -TenantID "your-tenant-id" -AppID "your-app-id" -AppURL "your-app-service-url"
-
The script will:
- Deploy the SCIM Microservice to the Azure App Service.
- Register required API endpoints for Microsoft Graph API.
- Validate the certificate authentication settings.
Upon successful deployment, the SCIM Microservice will be live and ready for integration with EmpowerID.
4. Assigning API Permissions to the Managed Identity
The SCIM Microservice uses Microsoft Graph API to communicate with Microsoft Entra ID. The Managed Identity assigned to the service must have the necessary Graph API permissions to manage identities, applications, and groups.
Steps to Assign Graph API Permissions:
- Navigate to Azure Portal → App Registrations → Select the SCIM Microservice App.
- Click API Permissions → Add Permission.
- Select Microsoft Graph, then add the following permissions:
- Directory.Read.All (Read Directory Data)
- User.Read.All (Read Users)
- Group.Read.All (Read Groups)
- Application.Read.All (Read Applications)
- RoleManagement.Read.All (Read Role Assignments)
- Policy.Read.All (Read Policies)
- Click Grant Admin Consent to approve the permissions.
If the SCIM Microservice will be used for license management, subscriptions, or Azure RBAC, additional permissions may be required.
5. Recording Required Configuration Data
Once the SCIM Microservice is deployed and permissions are assigned, several pieces of information must be recorded for use when configuring the EmpowerID Account Store:
| Configuration Item | Description |
|---|---|
| SCIM Microservice URL | The Azure App Service URL where the SCIM Microservice is hosted. |
| Azure Application Object ID | The Application (Client) ID from the App Registration. |
| Tenant ID | The Directory (Tenant) ID from the App Registration. |
| App Certificate Thumbprint | The certificate thumbprint used for authentication. |
This information will be required when registering the Entra ID Tenant within EmpowerID.
Summary
What We Have Done So Far:
✔ Registered the SCIM Microservice as a Service Principal in Entra ID.
✔ Created an Azure App Service to host the SCIM Microservice.
✔ Published the SCIM Microservice using a PowerShell deployment script.
✔ Assigned necessary Microsoft Graph API permissions to the Managed Identity.
✔ Recorded critical configuration data needed for EmpowerID integration.
Next Steps:
Now that the SCIM Microservice is successfully deployed, the next step is to create an Entra ID Account Store within EmpowerID and configure it to use the microservice. This will establish a secure, real-time identity synchronization between Microsoft Entra ID and EmpowerID.
Creating an Entra ID Account Store in EmpowerID
Once the SCIM Microservice has been successfully deployed and configured in Microsoft Entra ID, the next step is to create an Entra ID Account Store in EmpowerID. This process establishes the connection between EmpowerID and the SCIM Microservice, enabling inventory, provisioning, and role-based access control (RBAC) operations.
This section will walk through:
- Accessing the Azure RBAC Manager in EmpowerID
- Registering the Entra ID Tenant
- Entering Required Tenant Configuration Data
- Verifying the Account Store
- Enabling Inventory Processing
- Configuring Advanced Inventory and Management Features
1. Accessing the Azure RBAC Manager in EmpowerID
The Entra ID SCIM Microservice connector follows a slightly different process than a traditional account store creation in EmpowerID.
- Log in to EmpowerID as an administrator.
- Navigate to Admin → Azure RBAC Manager → Configuration.
- Click on the Tenants tab.
- Click the "+" (Add New Tenant) button to begin the registration process.
2. Registering the Entra ID Tenant
After selecting Add New Tenant, a configuration form will appear, requiring several key details about the Entra ID Tenant and SCIM Microservice.
Fields to Populate:
- Name – Enter a descriptive name for the Entra ID tenant. Example:
Entra ID Tenant. - SCIM Microservice URL – The Azure App Service URL where the SCIM Microservice is hosted.
- Azure Application Object ID – The Application (Client) ID from the App Registration.
- Tenant ID – The Directory (Tenant) ID from the App Registration.
- App Certificate Thumbprint – The certificate thumbprint used for authentication.
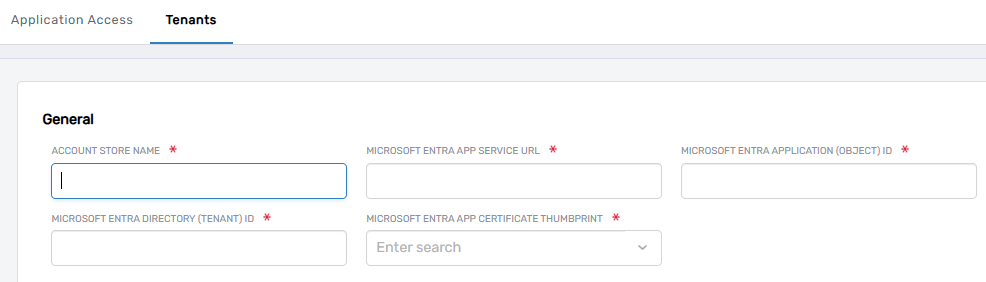
💡 Tip: These values were recorded during the SCIM Microservice Deployment process in Azure. Ensure they are copied correctly.
- Click Save to register the tenant in EmpowerID.
3. Verifying the Account Store in EmpowerID
Once the tenant registration is completed, EmpowerID automatically creates the Entra ID Account Store Definition.
- Navigate to Admin → Account Stores.
- Search for the newly created Entra ID Tenant.
- Confirm that it appears as an "Azure AD SCIM Security Boundary Type".
At this point, EmpowerID has established a basic connection with Entra ID, but additional configuration is required to enable inventory and provisioning capabilities.
4. Enabling Inventory Processing
To ensure EmpowerID can inventory users, groups, and other objects from Entra ID, inventory processing must be enabled.
- Open the Account Store Definition for the newly created Entra ID Tenant.
- Navigate to the Inventory Tab.
- Enable Inventory and configure the schedule:
- The default schedule is every 10 minutes indefinitely, which ensures that changes in Entra ID are detected in near real-time.
- Enable Group Membership Reconciliation to track changes in group memberships.
- Click Save to apply the changes.
💡 Note: The first inventory run may take longer than subsequent runs since EmpowerID needs to retrieve and store all initial user, group, and role data.
5. Configuring Advanced Inventory and Management Features
EmpowerID offers additional features to extend the integration between Entra ID and EmpowerID. These can be enabled in the Resource System Configuration tab.
Key Features & Their Functions:
| Feature | Description |
|---|---|
| Enable Azure Application Inventory | Inventories application registrations from Entra ID. |
| Enable Azure License Inventory | Inventories and assigns Microsoft 365 licenses to users and groups. |
| Enable Azure Admin Role Inventory | Inventories admin role assignments in Entra ID. |
| Enable Azure Subscription Inventory | Inventories subscriptions and resource groups. |
| Enable Sign-In Activity Inventory | Captures user authentication events and sign-in activity. |
| Enable Deleted Objects Inventory | Supports soft-deleted users and groups recovery. |
To enable these features:
- Open the Entra ID Account Store Definition in EmpowerID.
- Navigate to Resource System Configuration.
- Scroll down to find the additional inventory settings.
- Toggle ON the relevant features based on your organization’s needs.
- Click Save.
6. Managing Additional Cloud Services in EmpowerID
EmpowerID also provides integration options for managing other Microsoft Cloud Services via separate microservices. These include:
- Exchange Online Connector – Manages mailboxes and distribution lists.
- SharePoint Online Connector – Manages SharePoint site permissions.
- Azure AD B2C SCIM Connector – Supports B2C identity management.
To enable these integrations:
- Deploy the corresponding EmpowerID microservice as per the EmpowerID Admin Guide.
- Configure additional API permissions for the SCIM Managed Identity in Entra ID.
- Enable the specific integration setting within EmpowerID Resource System Configuration.
Summary of Key Steps
✔ Accessed the Azure RBAC Manager and initiated tenant registration.
✔ Entered the necessary tenant configuration details.
✔ Verified that the Entra ID Account Store was created successfully.
✔ Enabled inventory processing and configured the schedule.
✔ Turned on advanced inventory features for applications, roles, and licenses.
✔ Explored additional Microsoft Cloud Service integrations available in EmpowerID.
Next Steps:
Now that the Entra ID Account Store is fully configured, EmpowerID can synchronize users, groups, and roles in real-time. The next step is to test provisioning, deprovisioning, and access control scenarios to ensure the integration is functioning as expected.
By following this process, EmpowerID administrators can efficiently manage identities, security groups, and administrative roles within Microsoft Entra ID while ensuring compliance with governance policies.