Understanding the Workflow Model
A workflow is a sequence of activities that mirrors the steps in a business process. It provides a logical, orderly representation of the actual tasks carried out by individuals or systems interacting with a business model. In EmpowerID, workflows serve as the primary method for users to engage with IT resources to achieve specific organizational objectives.
Primary Layers in a Workflow
-
Process Layer
This layer represents the logical flow of the activities within a workflow. It defines the sequence and conditions of tasks, decision points, branching, and parallel execution paths. -
Data Layer
The data layer captures and manages the information processed throughout the workflow. It includes input and output data, intermediate variables, and any data transformations or manipulations required by the workflow activities. -
Presentation Layer
This layer is specific to user-centric workflows that require human interaction. It provides the user interface (UI) through which end-users interact with the workflow, input data, or make decisions.
In the EmpowerID model, users never directly interact with a workflow; rather, they interact with what is known as a request workflow. A request workflow is one of the resource types registered in the EmpowerID Identity Warehouse that is related to resource acquisition and management. A specific request workflow is an Identity Warehouse resource record corresponding to an EmpowerID workflow that is used to control who may interact with the workflow.
Typical Components of an EmpowerID Workflow
A typical EmpowerID workflow comprises several components, such as:
- Forms
- Lookups
- Operation Activities
- Line Rules
- Activities
Depending on the purpose of the workflow, not all components need to be present.
Workflow Studio IDE
The Workflow Studio IDE is where you develop EmpowerID workflows. It comprises four user interface components that work together to provide developers with a visual design environment. Through drag-and-drop operations, depictions of business processes can be quickly translated into workflow logic without the need for extensive code.
Key Features:
- Dragging predefined activities onto the design surface of the IDE.
- Connecting activities with flow lines to define logic.
- Using code editors to inject custom C# code into workflows.
Components of the Workflow Studio IDE
The Workflow Studio IDE consists of the following four components:
| Component | Description |
|---|---|
| Toolbar | Provides quick access to frequently used commands and features. |
| Solution Explorer | Displays and organizes workflow applications and related objects in a hierarchical structure. |
| Document Space | A visual workspace for designing workflows, forms, and lookups. |
| Toolbox | Contains a library of predefined activities and components that can be dragged onto the design surface. |
The below image shows what the Workflow Studio IDE looks like with a Flow Chart workflow opened in the Workflow Designer (also known as the Document Space).
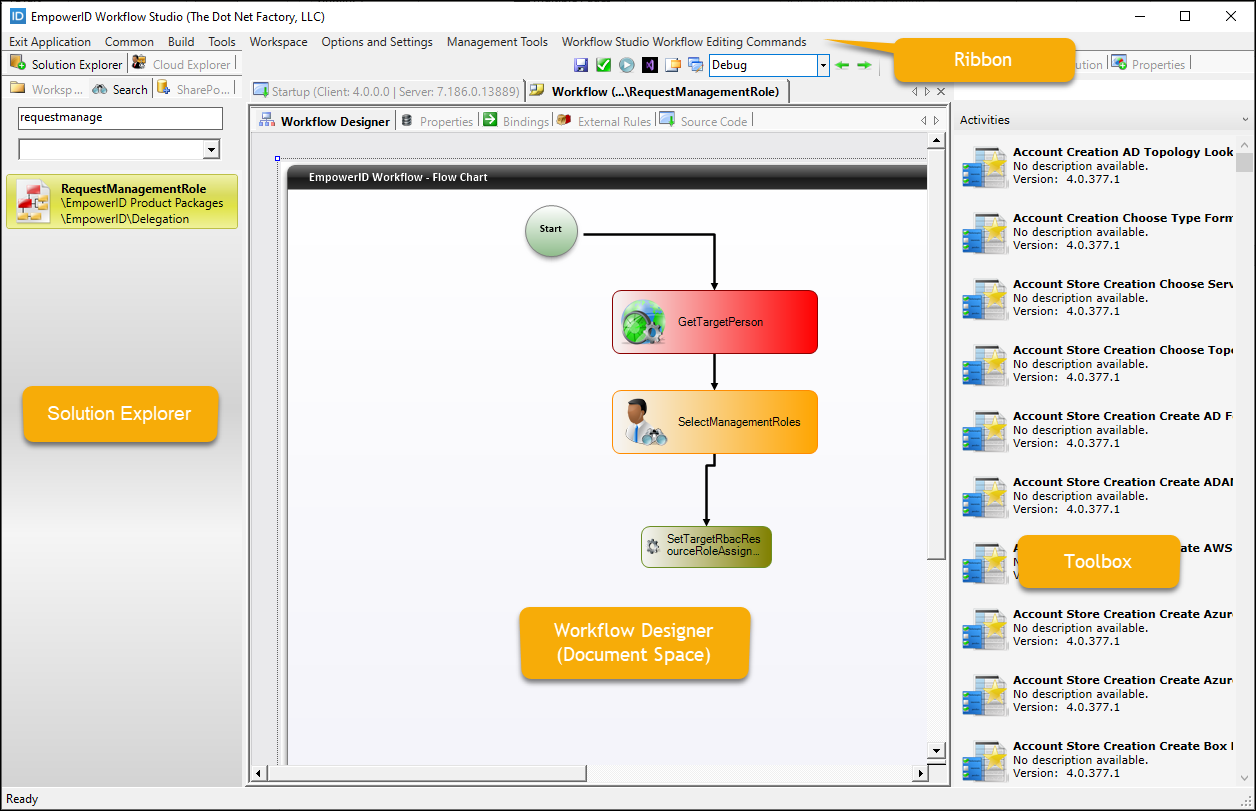
By combining these components, the Workflow Studio IDE creates a rich, interactive environment for workflow development.
Workflow Studio Toolbar
The Workflow Studio toolbar provides immediate access to a variety of tools and application-specific development commands. The commands are dynamic in that the number of commands at any given time is determined by the number and types of designers and editors opened in the Workflow Studio IDE.
Toolbar Commands
| Command | Purpose |
|---|---|
| Exit Application | Closes Workflow Studio. |
| Common > Save | Saves the currently open item. |
| Common > Save As | Opens a dialog that allows you to name an open folder item and choose the folder to save it. |
| Common > Deployment Services | Provides options for opening and creating new manifests, building solutions, and packaging development items. |
| Common > Refresh Toolbox | Forces a refresh of the toolbox. Recent changes will be reflected in the update. |
| Common > Object Browser | Displays the Workflow Studio class library. |
| Build > Compile | Compiles the open workflow, activity, form, or lookup. |
| Build > Publish | Publishes workflows to the designated workflow server. |
| Build > Deployment | Provides options for deployment tasks such as opening and creating manifests, building solutions, and packaging items. |
| Tools > View Assemblies | Opens a list of all Workflow Studio assemblies by version number for adding or removing assemblies. |
| Tools > Activity Templates | Opens a dialog to view and delete any activity templates from Workflow Studio. |
| Tools > Event Viewer | Opens an Event Viewer to view any workflow events on a selected machine. |
| Tools > Isolate Workflow Versions | Allows saving an existing workflow as a different version. |
| Workspace > Build Log | Opens the Build log, if one exists. |
| Workspace > Cancel Build | Cancels any batch build operations in your workspace. |
| Workspace > Program Files | Opens the Program Files folder on the local machine. |
| Workspace > Program Data | Opens the ProgramData folder on the local machine. |
| Workspace > Compile Temp | Opens the ProgramData > CompilerTemp folder on the local machine. |
| Workspace > Dyna Local Temp Dll | Opens the ProgramData > DynaLocalTempDll folder on the local machine. |
| Workspace > Intelli Cache | Opens the ProgramData > Cache folder on the local machine. |
| Workspace > Workflow Templates | Opens the ProgramData > UserWorkflowTemplates folder on the local machine. |
| Options and Settings > Alert Receivers | Opens a window displaying a list of configured Alert Event Receivers. |
| Options and Settings > STS Claims Extensions | Opens the STS Claims Extensions dialog with related assemblies listed. |
| Options and Settings > SSO Extensions | Opens the SSO Extension editor to display a list of extensions and related assemblies. |
| Options and Settings > C# Code Editor Font | Opens the Editor Style dialog to customize text appearance in the C# Code Editor. |
Workflow Studio: Workflow Editing Commands
The following commands only appear when a workflow is open in the Workflow Designer or an activity is open in the Activity Designer.
| Command | Purpose |
|---|---|
| Add New Property | Opens the Add New Property dialog to add a property to the workflow or activity for data binding. |
| Delete Property | Deletes a selected property. |
| Promote | Promotes the selected property. |
| Bind Property | Opens the Data Binding Shortcut dialog to bind properties within the same workflow or activity. |
| Bind Workflow | Opens the Shortcut Workflow Association wizard to call an external workflow and return a property. |
| Copy | Copies a selected item in the designer. |
| Cut | Cuts a selected item in the designer. |
| Paste | Pastes a previously copied item into the designer. |
| Delete | Deletes a selected item from the designer. |
| Zoom In | Magnifies the designer. |
| Zoom Out | Decreases the magnification level of the designer. |
| Pointer | Releases the mouse from the Zoom In or Zoom Out control. |
| Print Setup | Opens the Page Setup dialog to configure print options. |
| Print Preview | Displays a preview of the workflow or activity as it will appear when printed. |
| Prints the workflow or activity to the selected printer. | |
| Add Reference | Opens the GAC Assembly Reference dialog to add an assembly reference to the project. |
Solution Explorer
The Solution Explorer tab in Workflow Studio is an essential tool for organizing, accessing, and managing your workflow applications and other objects within the development environment. The three sub-tabs within the Solution Explorer provide distinct functionalities to help you efficiently work with your projects:
Sub-tabs in Solution Explorer
-
Workspace Tab
- Displays all the objects you develop in Workflow Studio, organized into folders on your local development machine.
- These folders act as containers for holding and organizing your workflow applications, activities, user interface elements, and other objects.
- You can create new folders, add objects to existing folders, and manage the contents of your workspace through this tab.
- As you develop new objects, Workflow Studio prompts you to select the folder where the object should be placed, ensuring that your workspace remains organized and easy to navigate.
-
Search Tab
- Allows you to search for objects by name and type.
- Makes it easy to quickly locate specific items within your workspace.
- This functionality is especially useful when working with large projects or searching for objects across multiple folders.
-
SharePoint Tab
- Enables you to work with your SharePoint objects, integrating them into your EmpowerID workflows as needed.
- Provides seamless collaboration and integration between your EmpowerID projects and SharePoint resources.
Key Benefits of Solution Explorer
The Solution Explorer tab in Workflow Studio provides a comprehensive and user-friendly interface for managing your workflow applications and objects. By organizing your projects in folders and providing easy access to search and integration features, the Solution Explorer helps you maintain an efficient and streamlined development process.
Source Control Folders
Source Control folders exist for each item type that can be created in Workflow Studio and encompass the following:
| Source Control Folder | Folder Purpose |
|---|---|
| Adaptive Auth Rules | Provides a location for organizing Adaptive Auth Rules you create in Workflow Studio. |
| Alert Receivers | Provides a location for organizing Alert Receivers you create in Workflow Studio. |
| APIs | Provides a location for organizing APIs you create in Workflow Studio. |
| Azure Functions V1 | Provides a location for organizing Azure Functions V1 apps. |
| Azure Functions V2 | Provides a location for organizing Azure Functions V2 apps. |
| Azure Functions V3 | Provides a location for organizing Azure Functions V3 apps. |
| Business Rules | Provides a location for organizing Business Rule apps. |
| Class Libraries | Provides a location for organizing Class Library apps. |
| Console Applications | Provides a location for organizing Console Apps. |
| Microservice V1 | Provides a location for organizing Microservice V1 apps you create in Workflow Studio. |
| Microservice V2 | Provides a location for organizing Microservice V2 apps you create in Workflow Studio. |
| Microservice V3 | Provides a location for organizing Microservice V3 apps you create in Workflow Studio. |
| OAuth Extensions | Provides a location for organizing OAuth Extensions you create in Workflow Studio. |
| SAML Extensions | Provides a location for organizing SAML Extensions you create in Workflow Studio. |
| SCIM Microservices V2 | Provides a location for organizing SCIM Microservices V2 apps you create in Workflow Studio. |
| STS Extensions | Provides a location for organizing STS Extensions you create in Workflow Studio. |
| UMA Extensions | Provides a location for organizing UMA Extensions you create in Workflow Studio. |
| User Interface > Forms | Provides a location for organizing Forms you create in Workflow Studio. |
| User Interface > Lookup Controls | Provides a location for organizing Lookup Controls you create in Workflow Studio. |
| User Interface > UI Pages | Provides a location for organizing UI Pages you create in Workflow Studio. |
| Workflows > Activities | Provides a location for organizing Workflow Activities you create in Workflow Studio. |
| Workflows > Applications | Provides a location for organizing Workflow Applications you create in Workflow Studio. |
| Workflows > Composites | Provides a location for organizing Composite Workflows you create in Workflow Studio. |
| Workflow Rules | Provides a location for organizing Workflow Rules you create in Workflow Studio. |
Workspace Tab Commands
The Workspace tab of Solution Explorer gives you ready access to the commands associated with folders and folder items. These commands are accessible from a context menu that appears when right-clicking an object in the Workspace Source Control tree.
| Command | Purpose of Command |
|---|---|
| New Folder | Creates a new top-level folder with a specified child folder on the file system of the local machine, such as MyDevFolder > Workflow Rules |
| Add Item Folders | Creates a new folder of a selected item for organizing development work. For example, if you select APIs, Workflow Studio creates a new APIs folder |
| Open in File Explorer | Opens the specified folder in File Explorer. |
| New Workflow | Opens a new workflow in the designer. |
| New Workflow Activity | Opens a new workflow activity in the designer. |
| New Operation Activity | Opens a new operation activity in the designer. |
| New User Interface | Opens a new form, lookup, or UI page in the designer. |
| New Extension or Library | Opens a new instance of the selected object in the designer. |
| New Console Application | Opens a new console app. |
| New Adaptive Authentication | Opens a new adaptive authentication workflow or adaptive auth rules class library in the designer. |
| Remember my Login | Retains your login so you do not need to reauthenticate when restarting Workflow Studio. |
| Set Local Repository Path | Sets the path bound to the repo for your organization. |
| Delete Folder [Current Folder Name] | Deletes the currently selected folder from your file system. |
| Refresh | Refreshes the source control tree. |
Document Space
The Document Space in Workflow Studio is where you work with various designers and editors to develop and edit workflow applications, activities, forms, and lookup controls. The designers and editors offer visual design capabilities, making it easy to create and modify your workflow components without extensive coding.
Key Designers and Editors in Workflow Studio
- Workflow Designer
The Workflow Designer allows you to visually design workflow applications and access all necessary commands and editors to build a complete workflow application. It provides tabs for designing the workflow, managing properties, creating bindings, setting up external rules, and viewing source code.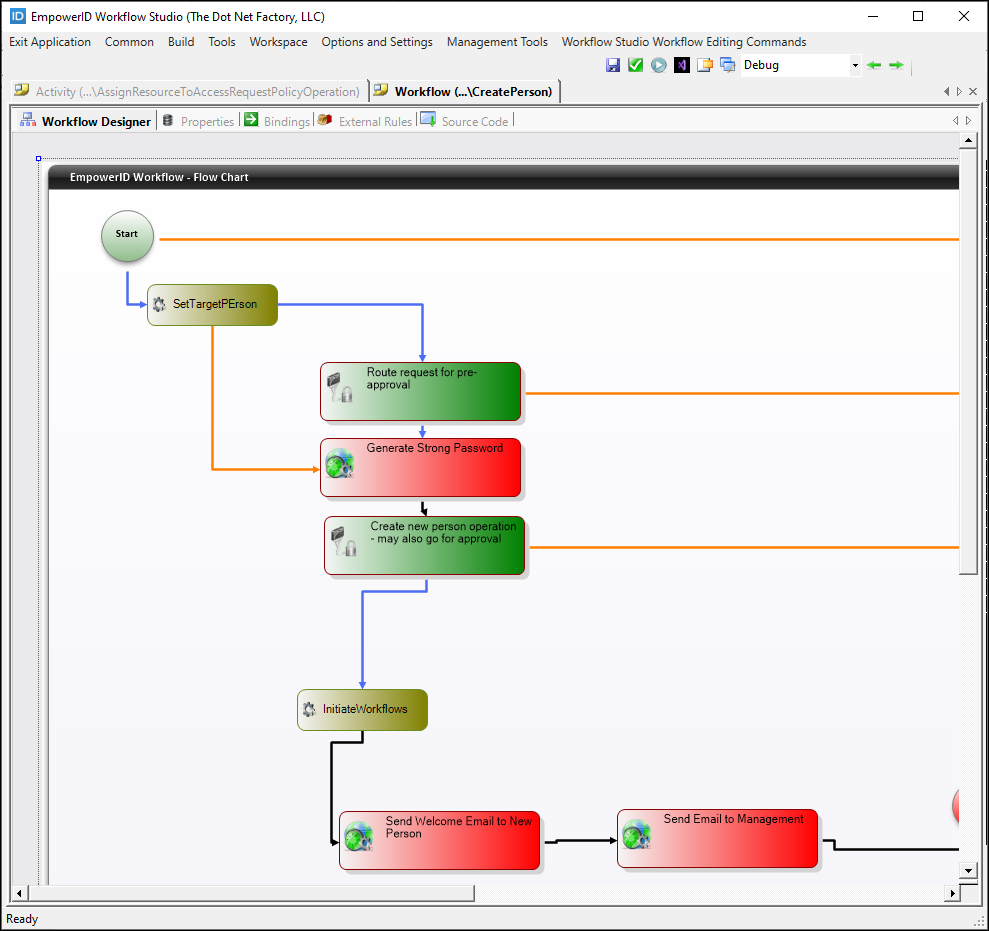
When you open a workflow in Workflow Studio, you gain access to several workflow-related tabs that provide different functionalities to assist you in designing and managing the workflow process. These tabs include:
-
Workflow Designer Tab – In this tab, you create and modify the workflow visually by adding shapes and connecting them with lines and Business Rules (line rules) to define the process flow within the workflow.
-
Properties Tab – This tab provides a tree view of the workflow's properties. By clicking on a property, you can view its details. To add new properties to the workflow, right-click the base node in the tree and select "Add New Property" from the context menu.
-
Bindings Tab – The Bindings Tab displays two tree views showing the workflow's properties and the properties of each shape within the workflow. Using simple drag-and-drop operations, you can bind workflow and shape or activity properties to one another by dragging a property from one tree onto the corresponding property in the other tree. This binding allows you to visually maintain data consistency throughout the workflow process execution.
-
External Rules Tab – This tab is similar to the Bindings tab, but it displays two different tree views for binding properties in your workflow application. One tree shows the properties of the workflow and any shapes or activities within the workflow, while the other tree displays the Smart Object properties of any External Business Rule Application added to the workflow. This enables you to bind workflow properties to the Smart Object properties of the External Business Rule Application.
-
Source Code Tab – This tab allows you to view and edit the source code of the workflow application, providing an opportunity to further customize the workflow by modifying or adding custom code if necessary.